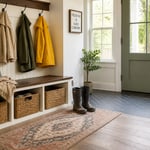
If your small bathroom makes you feel like you’re getting dressed in a walk-in closet, you’re not alone — and you’re not stuck. Small bathrooms are actually easier to transform than large ones. Every change you make is immediately visible. A gallon of paint, a new mirror, a shelf above the toilet. The difference is obvious in a room this size — nowhere for an upgrade to hide.
I’ve worked through a lot of small bathroom ideas over the years. Most of the ones that make the biggest difference aren’t gut renovations. They’re targeted swaps, clever additions, and a few structural moves that change how the whole room functions. Some cost nothing. Some take a weekend. A handful require a contractor. All of them make a real, visible difference.
These 18 small bathroom ideas run from a $5 tension rod trick all the way up to a tub-to-shower conversion. Wherever you’re starting from, there’s something here you can put to work.
1. Light Paint Colors That Make a Small Bathroom Feel Larger
Paint is the cheapest and fastest upgrade in any small bathroom, and the color choice comes down to one number: LRV, or Light Reflectance Value. This is the percentage of light a paint color reflects back into the room. For a small bathroom, you want that number above 70 — ideally in the 80s. It’s listed right on the paint chip once you know to look for it.
What high-LRV colors actually do is reduce the contrast between your walls, ceiling, and trim. When everything in the room is a similar light shade, the eye can’t find the hard boundaries. The room feels less like a box. Benjamin Moore White Dove (OC-17, LRV 83) is one of the most popular choices because it’s warm enough to feel welcoming rather than clinical. If the bathroom has essentially zero natural light, go even brighter. Chantilly Lace (OC-65, LRV 92) or Behr Ultra Pure White (LRV 93) are designed for exactly that situation.
Finish matters as much as color. Flat paint absorbs moisture and marks easily — use satin for bathroom walls. It handles humidity, it’s wipeable, and it reflects just enough light to add to overall brightness. One trick that costs nothing: paint the ceiling the same shade as the walls, or a shade lighter. It removes the visual line at the top of the room and adds perceived height without changing anything physical. For more color options to consider, there’s a thorough guide to best paint colors for a small bathroom worth reading before you commit.
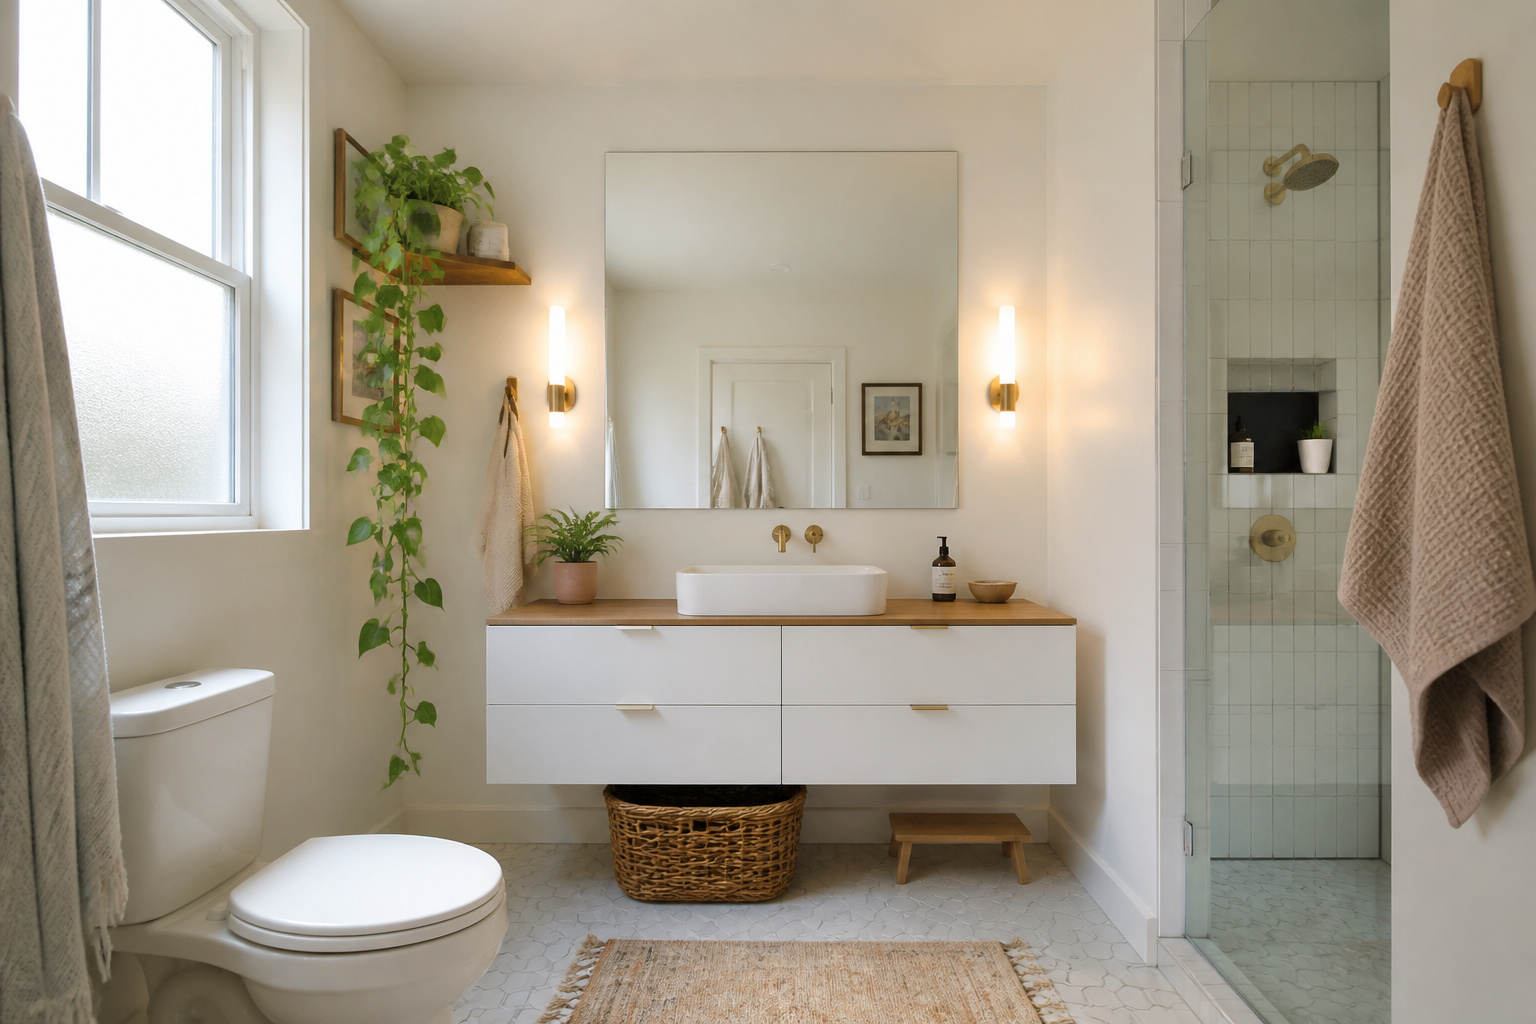
2. Floating Vanities That Visually Open Up the Floor
A floating vanity isn’t just a design trend. It genuinely changes how the room feels by keeping the floor visible from one wall to the other. Traditional floor-standing vanities fill in the lower third of the room. Remove the visual mass at floor level and the bathroom immediately reads as larger, even though nothing physically moved.

The IKEA GODMORGON is the workhorse option for budget-conscious small bathroom ideas. It mounts 5.5–10.25 inches off the floor and comes in widths starting at 24 inches. The cabinet depth is 19.25 inches — slightly shallower than many standard vanities. That’s a benefit in a tight bathroom where every inch counts. For standard counter height, mount the bottom at around 10 inches off the floor.
The installation requires proper wall backing. A floating vanity needs studs or a solid plywood backer board (¾-inch ply, screwed to studs). Drywall anchors alone will fail under the weight of a full sink basin. If your studs don’t align with the vanity’s mounting points, a horizontal plywood backer is the reliable solution. Mid-range alternatives from VIGO and Foremost run $300–$700 and offer better hardware than IKEA with similar DIY-friendly installation. Whatever you choose, look for soft-close hinges and a water-resistant interior finish — bare particleboard absorbs moisture and doesn’t last.
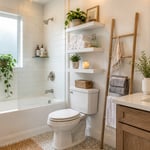
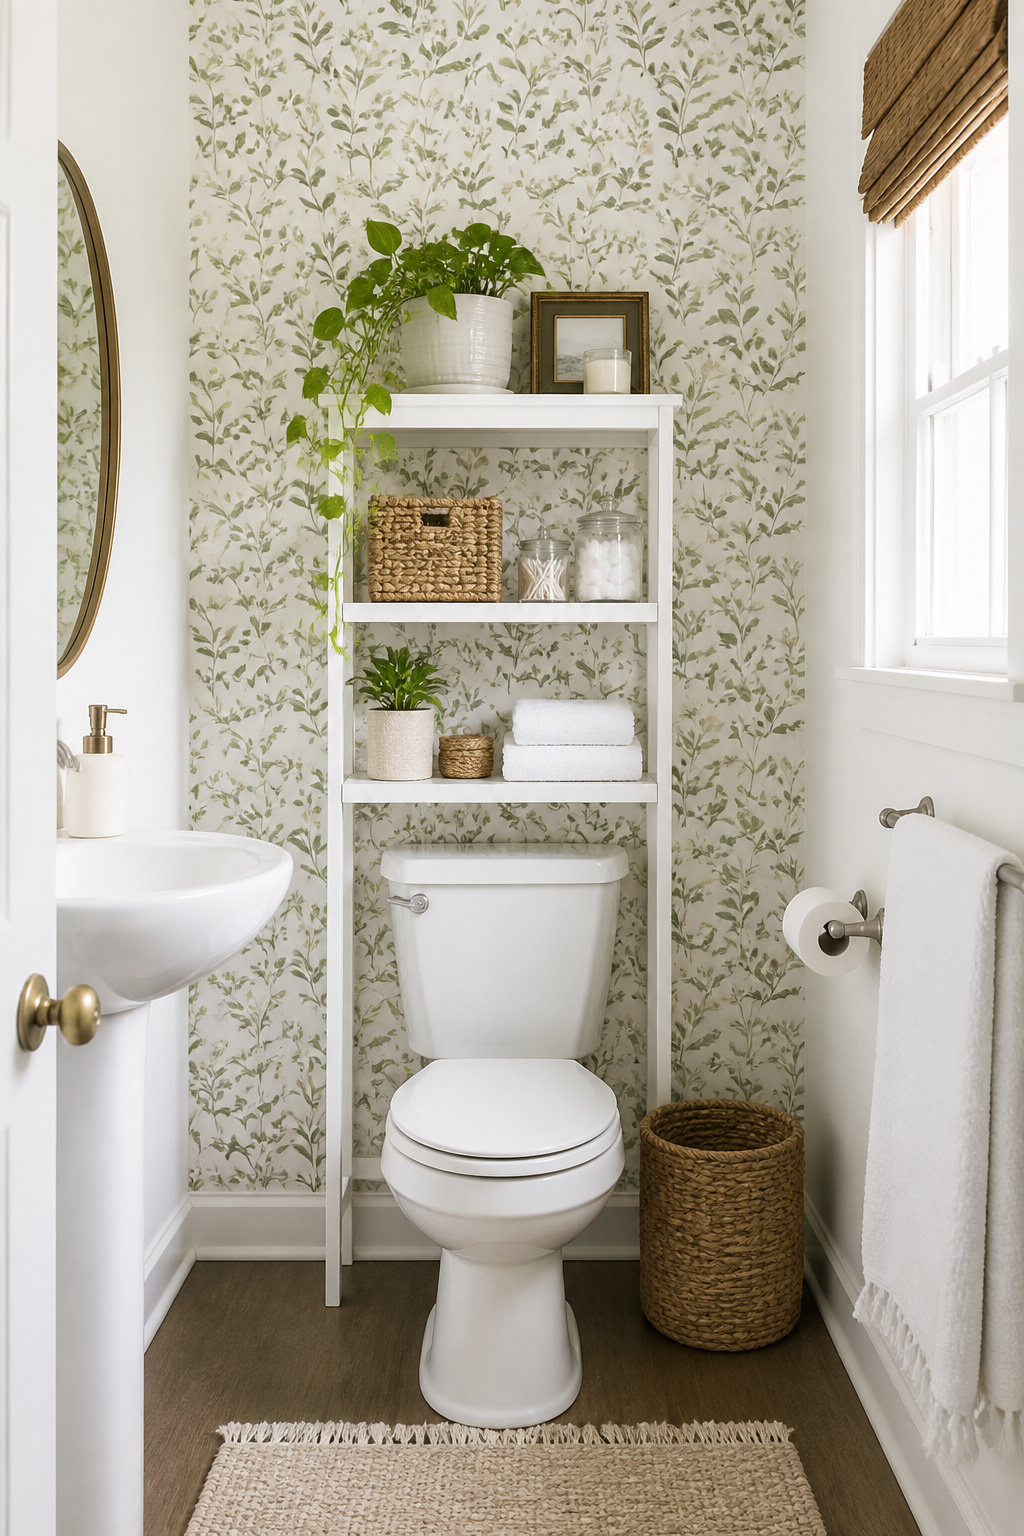
3. Over-the-Toilet Shelving That Doubles Your Storage
The space above your toilet cistern is almost certainly doing nothing right now. That gap is typically 24–36 inches wide and 30–40 inches tall before hitting the ceiling. That’s enough for three or four shelves. It’s the most consistently ignored vertical space in a small bathroom, and claiming it doesn’t require any drilling if you don’t want it to.
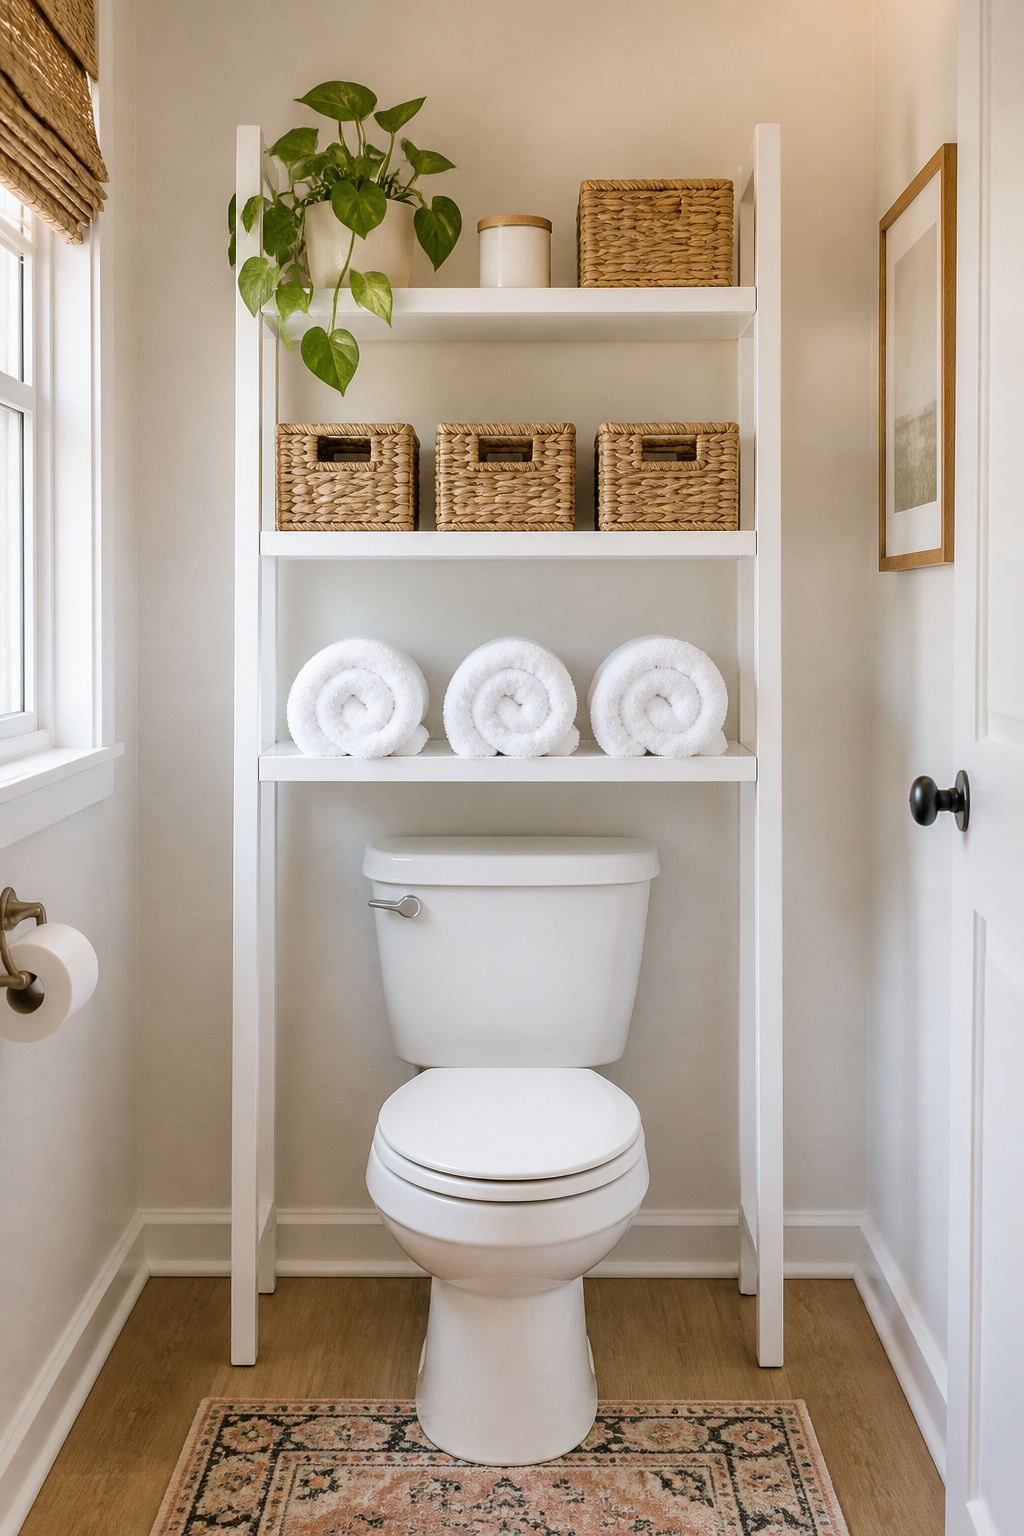
A freestanding etagere slots in over the cistern and sits on the floor. No drilling, no damage — ideal for renters. Standard dimensions run about 23–25 inches wide, 7–12 inches deep, and 65–68 inches tall. IKEA’s FRÖSJON is one of the cleaner options at about $60; RiverRidge and Zenna Home offer solid alternatives in the $40–$120 range. If you’re willing to drill, a pair of wall-mounted floating shelves at 30 and 48 inches above the floor give you two storage levels with a more built-in look.
The styling makes or breaks these units. The 3-item rule per shelf keeps them from reading as cluttered: one functional item (rolled towels, extra toilet paper), one container (a small basket or jar), and one decorative element (a plant, a candle). Matching containers across the shelves — same basket material or same jar style — unify the look and make mismatched products invisible. Keep the bottom shelf lightly stocked so there’s visible floor space between the toilet and the etagere legs.
4. Glass Shower Panels to Open Up Small Bathroom Designs
A shower curtain creates a solid wall that cuts the bathroom visually in half. In a small space, that can halve the perceived square footage as effectively as removing half the room. Replacing it with glass maintains the sightline from the bathroom door to the back wall of the shower. The room suddenly feels connected rather than divided.
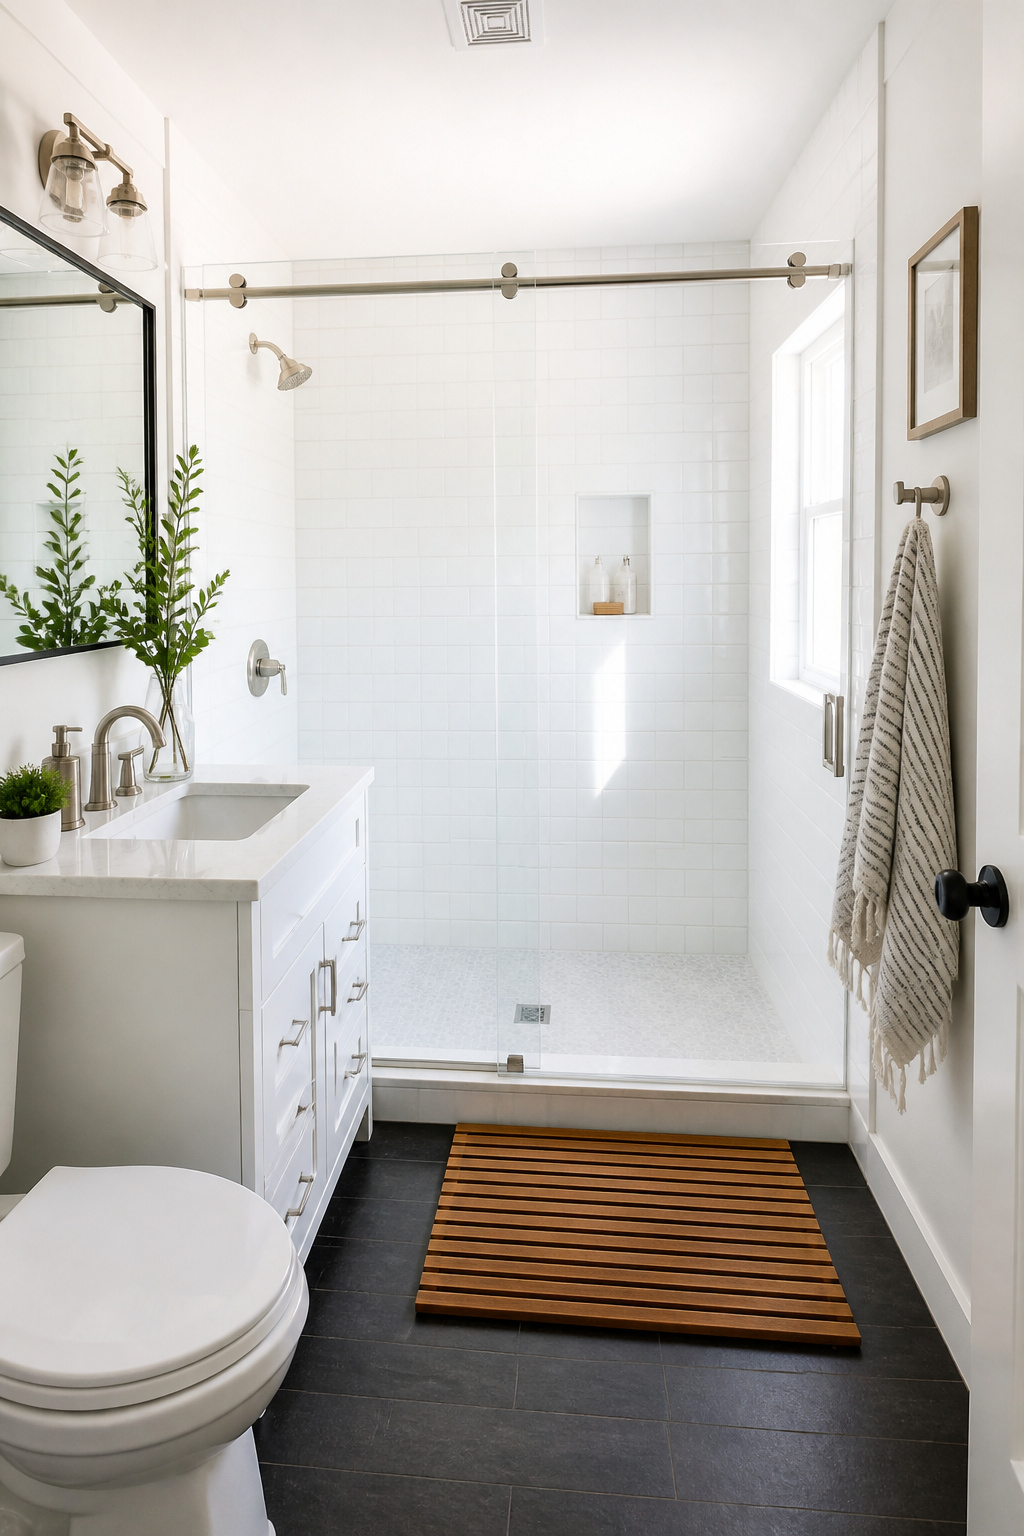
Framed shower doors are the most affordable entry point: $400–$1,100 installed, and the easiest to DIY because the metal frame carries the structural load. For small bathrooms, sliding (bypass) doors are almost always better than swing-out doors. A hinged frameless door swinging into a 5×8 bathroom requires stepping back every time you open it. Semi-frameless sliding doors at $500–$1,550 installed give you the visual cleanliness of minimal frame hardware without that clearance problem.
For renters, a clear or frosted PEVA shower curtain is a genuine improvement over opaque fabric. A clear liner lets the eye travel into the shower space. Tension-mounted shower screens (no drilling required) from KOHLER and OVE Decors are a middle-ground option at $150–$300.
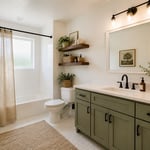
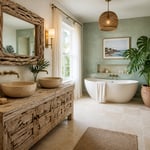
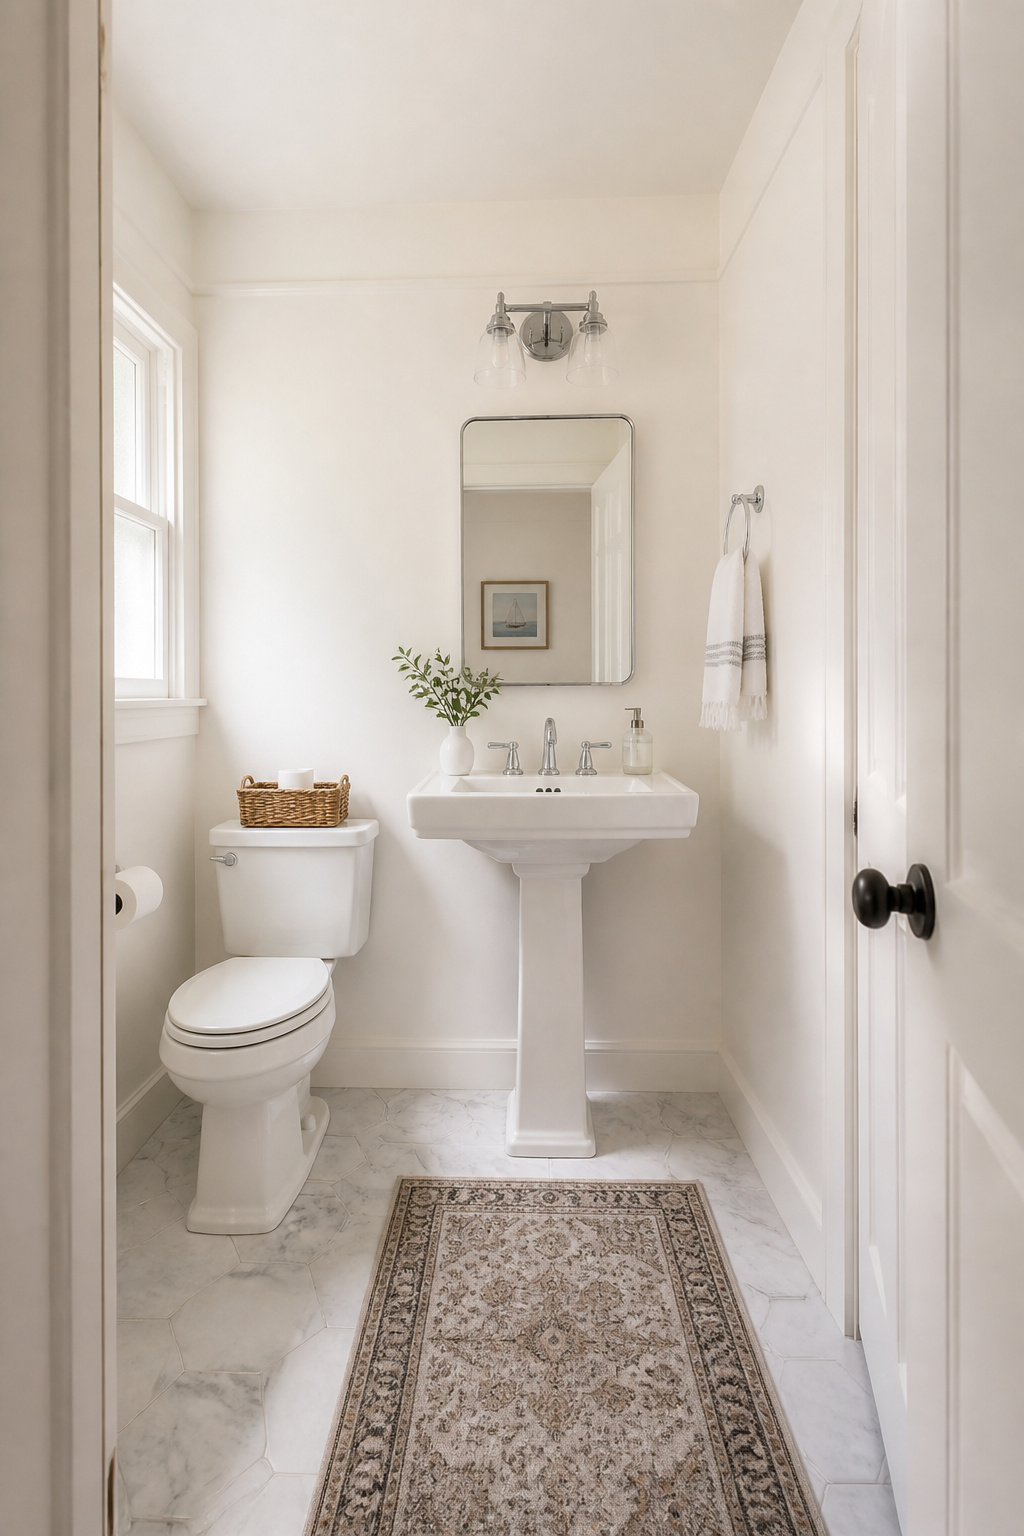
5. Large Mirrors to Double the Visual Depth of Your Bathroom
A large mirror is the most reliable high-impact, low-skill upgrade in any small bathroom. Mirrors create a visual second room behind them, doubling the perceived depth of the space. In a bathroom with a window, positioning the mirror to reflect it doubles the apparent natural light at no cost.
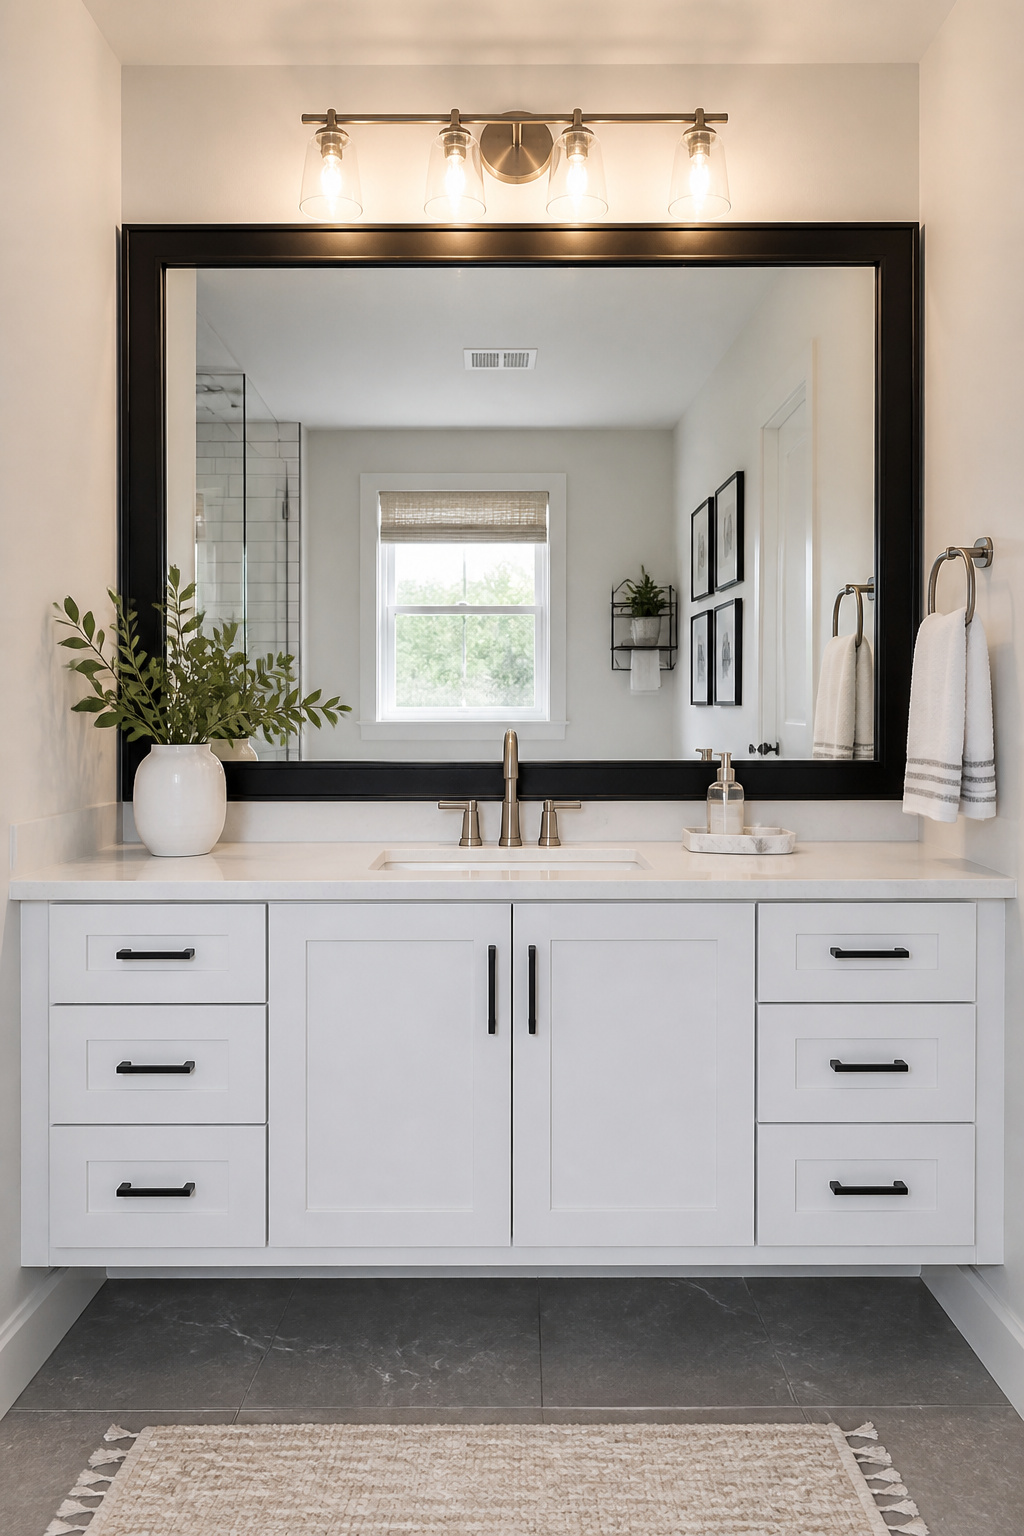
Sizing rule: aim for 70–80% of the vanity width at minimum. For maximum effect, push wider. A mirror spanning the full vanity width reads as intentional and maximizes the spatial illusion. Even better: replace the standard mirror with an oversized medicine cabinet. You get a large mirror surface plus concealed storage behind it, which reclaims valuable counter space.
The most satisfying upgrade here is framing an existing builder-grade flat mirror. It costs less than $40 using moisture-resistant wood trim from a hardware store, takes 2–3 hours, and turns a rental-apartment mirror into a purchased-looking piece. The adhesive is a mirror-specific construction adhesive — no drilling into tile required. A frame painted the same color as the walls looks built-in; a frame in matte black or brushed gold makes it a focal point. Read through how to choose the perfect mirror for your small bathroom before finalizing sizing — there’s useful guidance on placement and proportion worth seeing.
6. Vertical Tile Patterns That Draw the Eye Upward
Tiles do something different depending on which direction you install them. Horizontal orientation makes a room feel wider. Vertical makes it feel taller. In a small bathroom with standard or low ceilings, vertical is almost always the right call. The parallel lines rising from floor to ceiling pull the eye up and create a sense of height the room doesn’t have structurally.
The most accessible starting point is standard 3×6 subway tile in a vertical stack bond. It’s the same tile you see everywhere, rotated 90 degrees and stacked directly above itself rather than offset. Step up to 4×12 or 4×16 plank tile and the fewer grout lines make the upward movement more continuous. Large-format 12×24 tile installed vertically is the most dramatic version. Professional installation is recommended due to weight and leveling precision, but the effect in a small shower alcove is significant.
For renters, peel-and-stick tile panels in vertical orientation give most of the visual benefit without adhesive or grout. FloorPops and Art3d are solid options at $1–$4 per square foot. One thing to avoid: high-contrast grout with vertical tiles creates a pattern of dots that fights the upward movement. Match the grout to the tile color or stay within two shades.
7. Wall-Mounted Fixtures to Maximize Small Bathroom Floor Space
The most dramatic floor-space change in a small bathroom comes from moving fixtures off the floor entirely. A wall-mounted sink and a wall-hung toilet together eliminate virtually every floor-level visual anchor. What’s left is an unbroken tile floor that the eye reads as far more generous than it is.
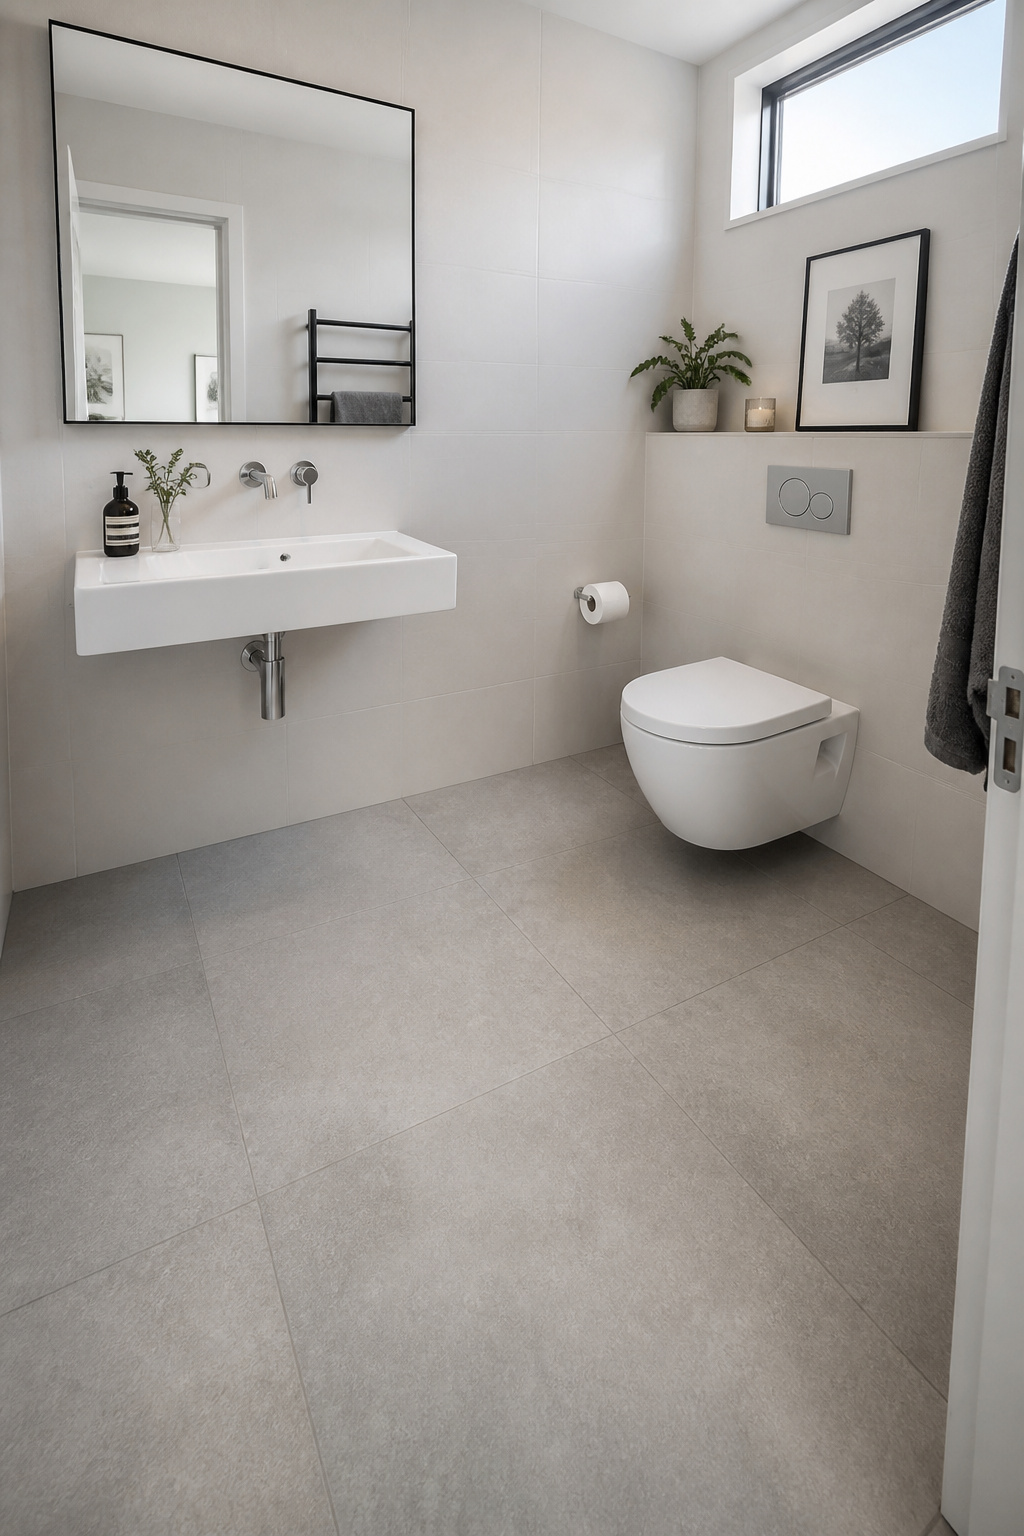
A wall-mount sink is the more accessible of the two. Sink costs run $100–$500, with installation at $200–$600 for plumbing work. The critical installation requirement is proper wall blocking: a plywood backer screwed between studs that carries the weight of the sink and anyone leaning on it. Anchoring to drywall alone is not a choice — it’s a slow failure.
Wall-hung toilets are higher impact but more complex. They require an in-wall carrier system (DURAVIT, KOHLER, and GEBERIT are the leading options) buried inside the wall. The in-wall tank saves 6–8 inches of floor depth compared to a floor-mount toilet. That’s meaningful in any bathroom where 60 square feet is generous. Total installed cost: $1,000–$3,000+ including carrier, bowl, and labor. Professional installation is strongly recommended; an improperly installed in-wall carrier creates a leak inside the wall cavity. A practical middle ground: a compact-projection toilet (TOTO Aquia, American Standard Cadet 3) stays floor-mounted but measures 25–26 inches front-to-back instead of the standard 28–30 inches.
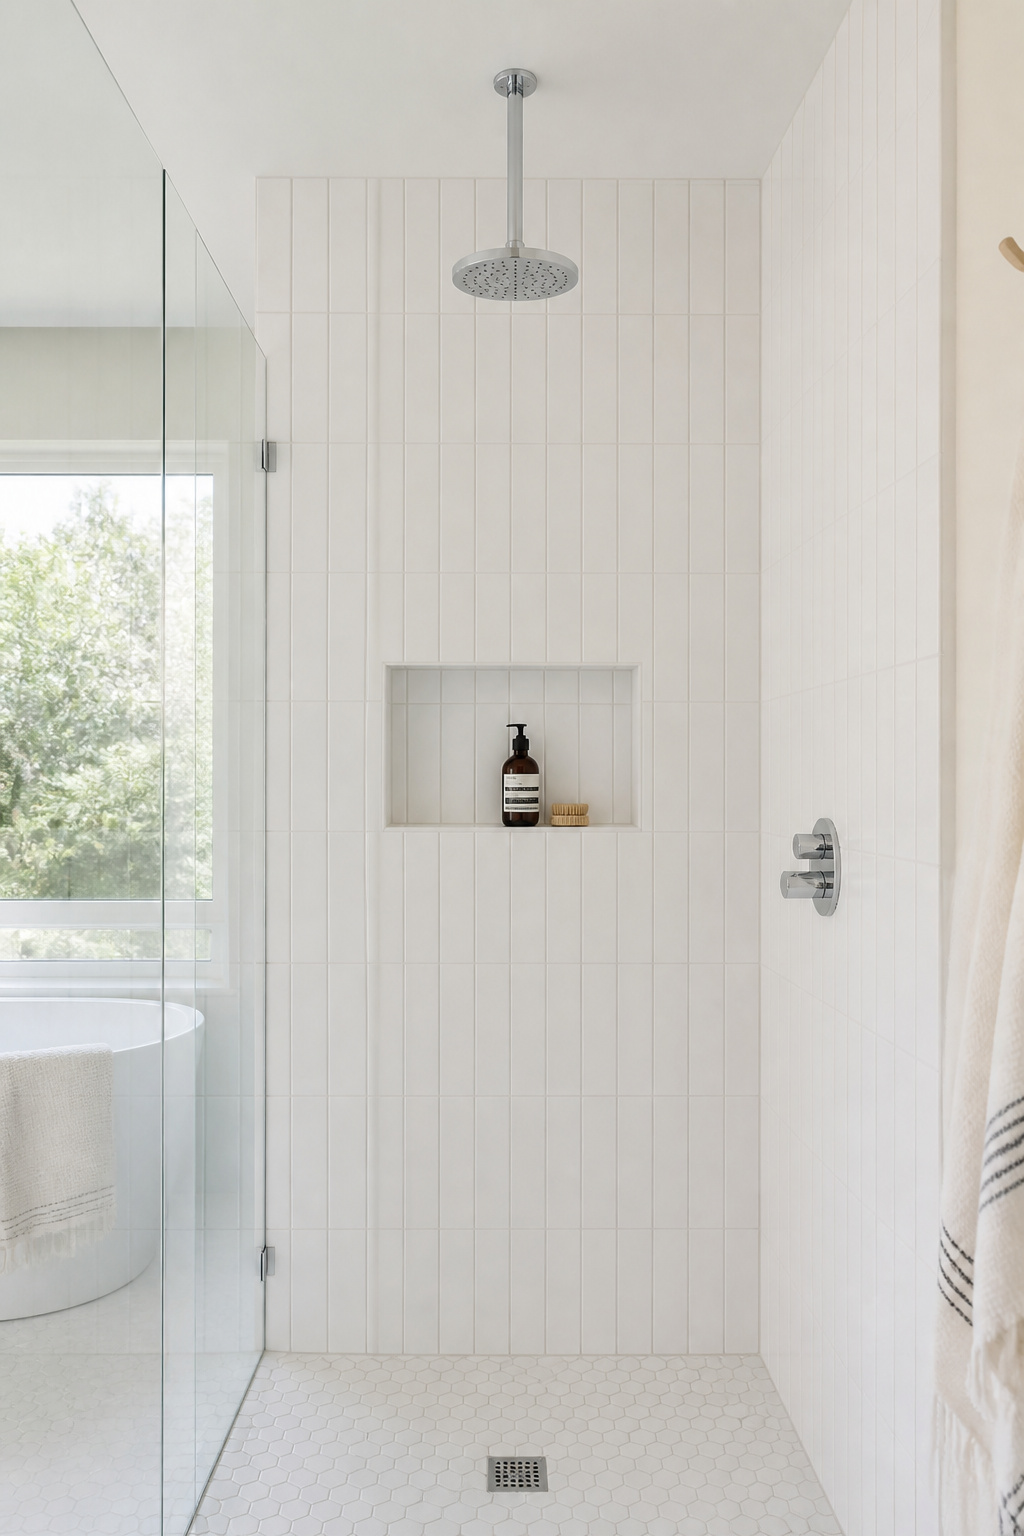
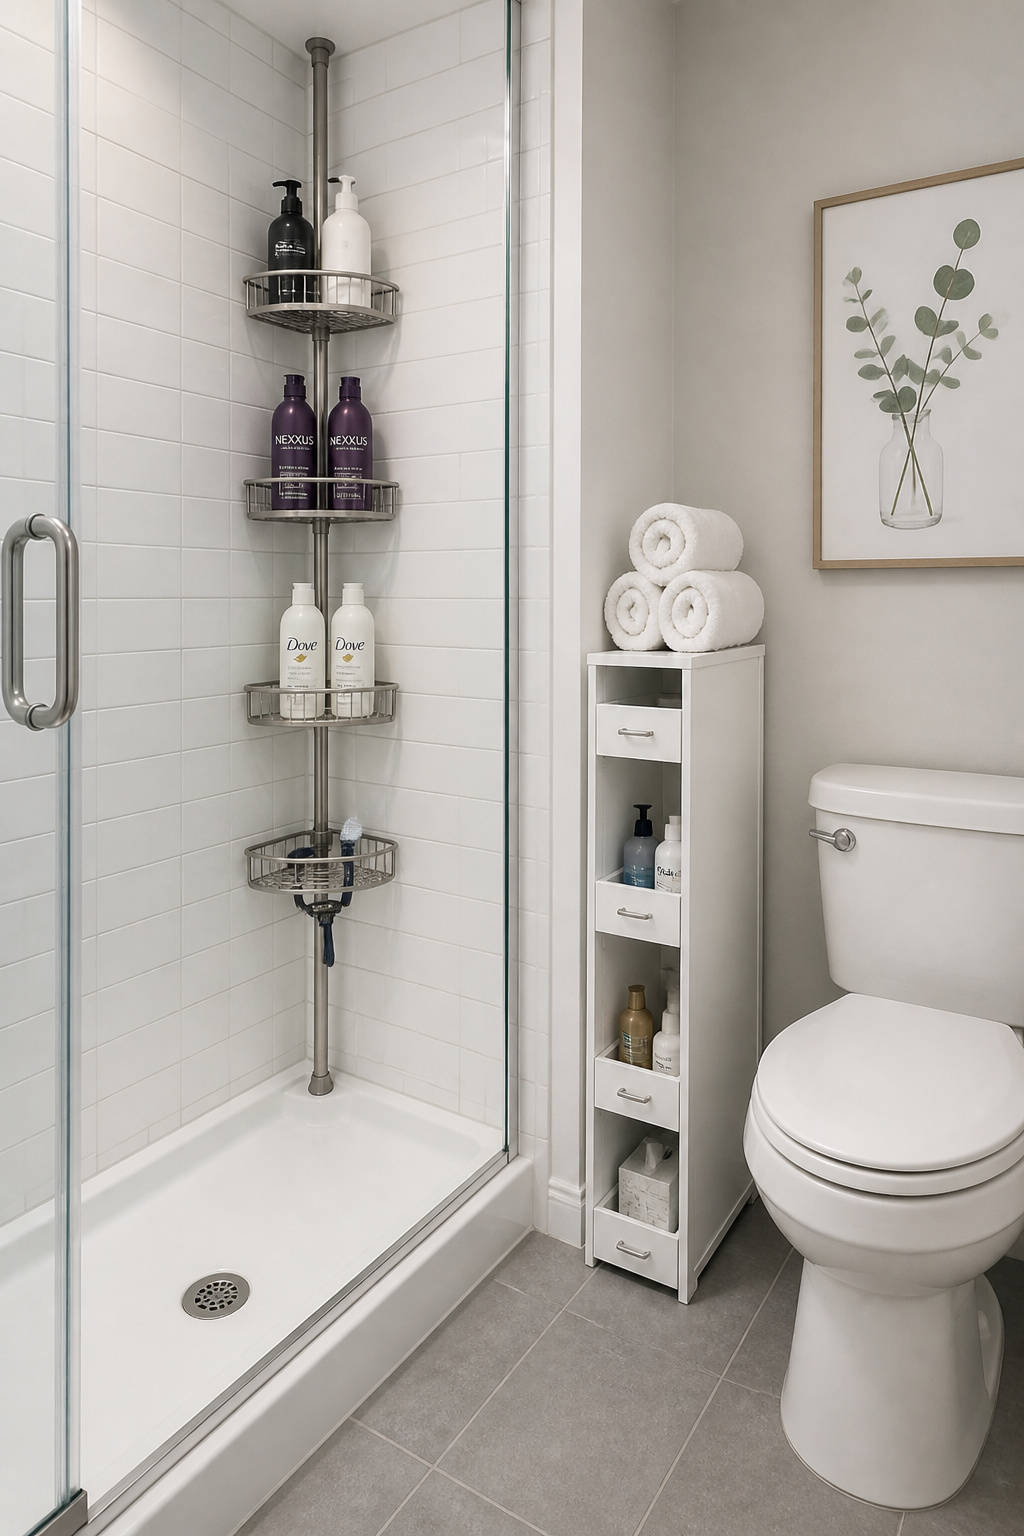
8. Recessed Niche Shelves for Hidden, Built-In Storage
A recessed niche is storage that lives inside the wall rather than on it. In a shower, shampoo, conditioner, and body wash sit in a flush-mounted pocket that projects nothing into the shower space. No caddy hanging off the showerhead, no corner shelf collecting soap scum. Just a clean opening that looks like it was always meant to be there.
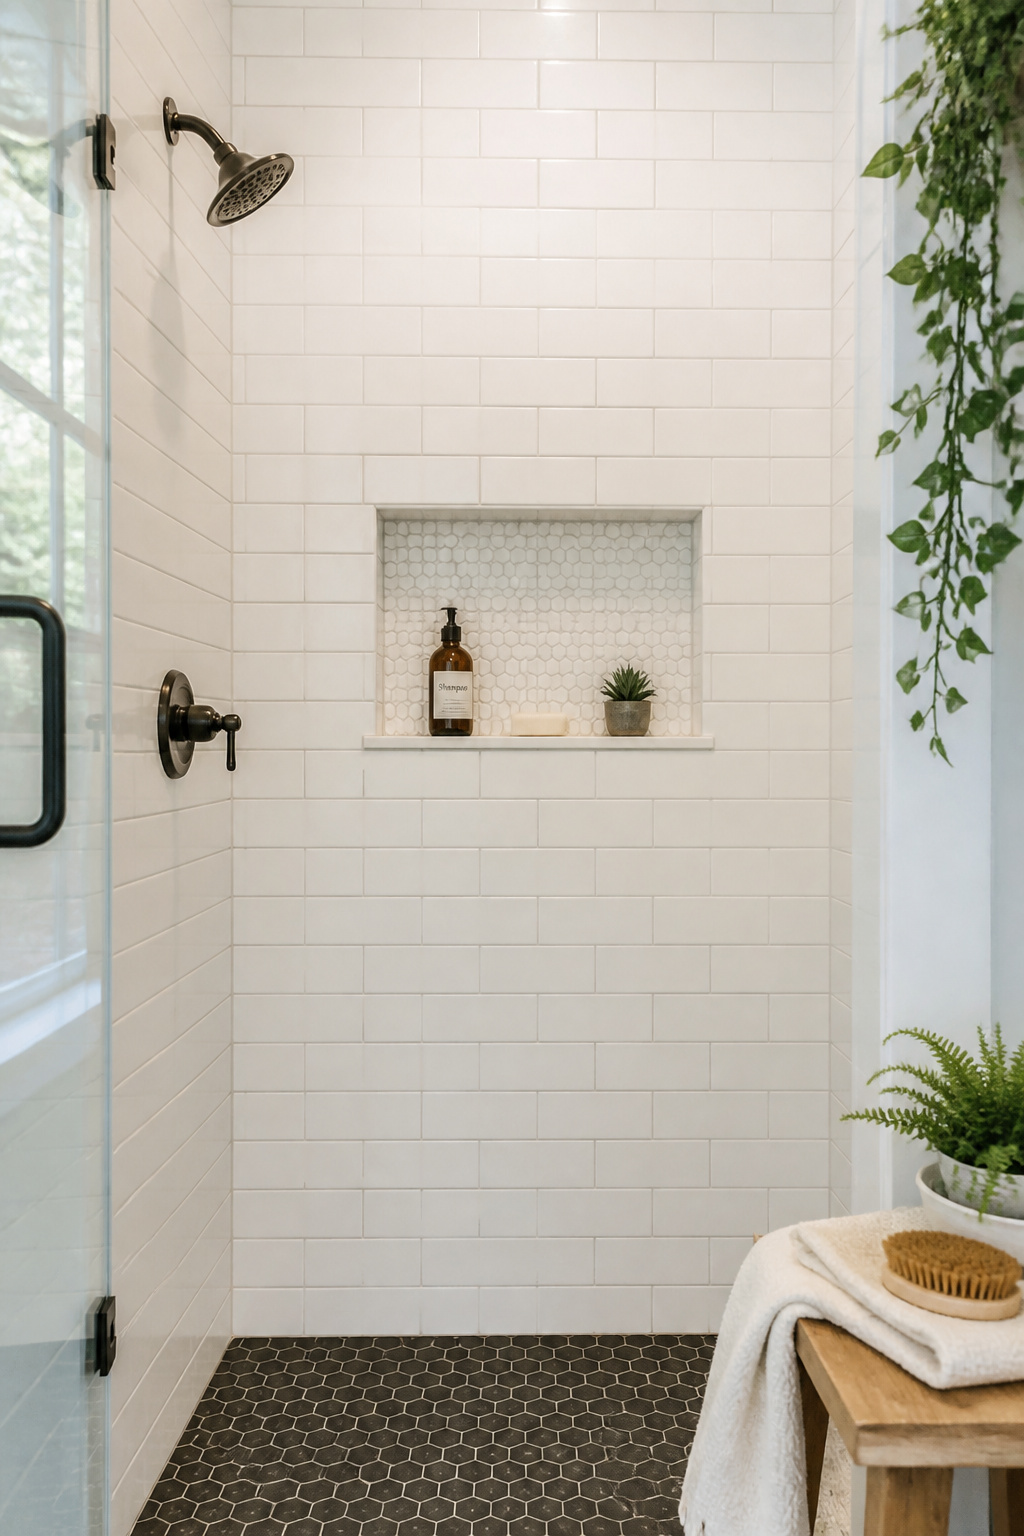
Standard niche size is 12 inches wide by 24 inches tall by 3.5–5 inches deep. This fits between standard 16-inch stud spacing with room for framing on each side, and holds full-size shampoo bottles comfortably. The bottom should slope slightly (about 1/8 inch) toward the shower so water drains out rather than pooling.
Building one is a weekend project for a motivated DIYer. Sequence: locate studs, cut the drywall opening, and frame the top and bottom with 2×4 lumber. Cover the interior with cement board, apply two coats of liquid waterproofing membrane (RedGard and HydroBan are the standard products), then tile. The waterproofing is the step most commonly skipped — and the one that can never be skipped. Any moisture behind unprotected cement board will eventually cause mold and structural damage. Material costs DIY: $50–$150. Contractor cost: $200–$1,200. Tiling the interior to match the shower surround makes it seamless; a contrasting mosaic adds a small visual moment that feels designed.
9. Walk-In Shower Conversions That Transform Tiny Bathrooms
Removing a tub is a big decision and a bigger project, but the case for it is straightforward. A standard 60×30 inch alcove tub occupies roughly 12.5 square feet of floor plan — more than 20% of a 60 square foot bathroom. Replace it with a walk-in shower in the same footprint and that entire area becomes usable, accessible space. As small bathroom ideas go, this is the one that changes how the whole bathroom functions every single day.
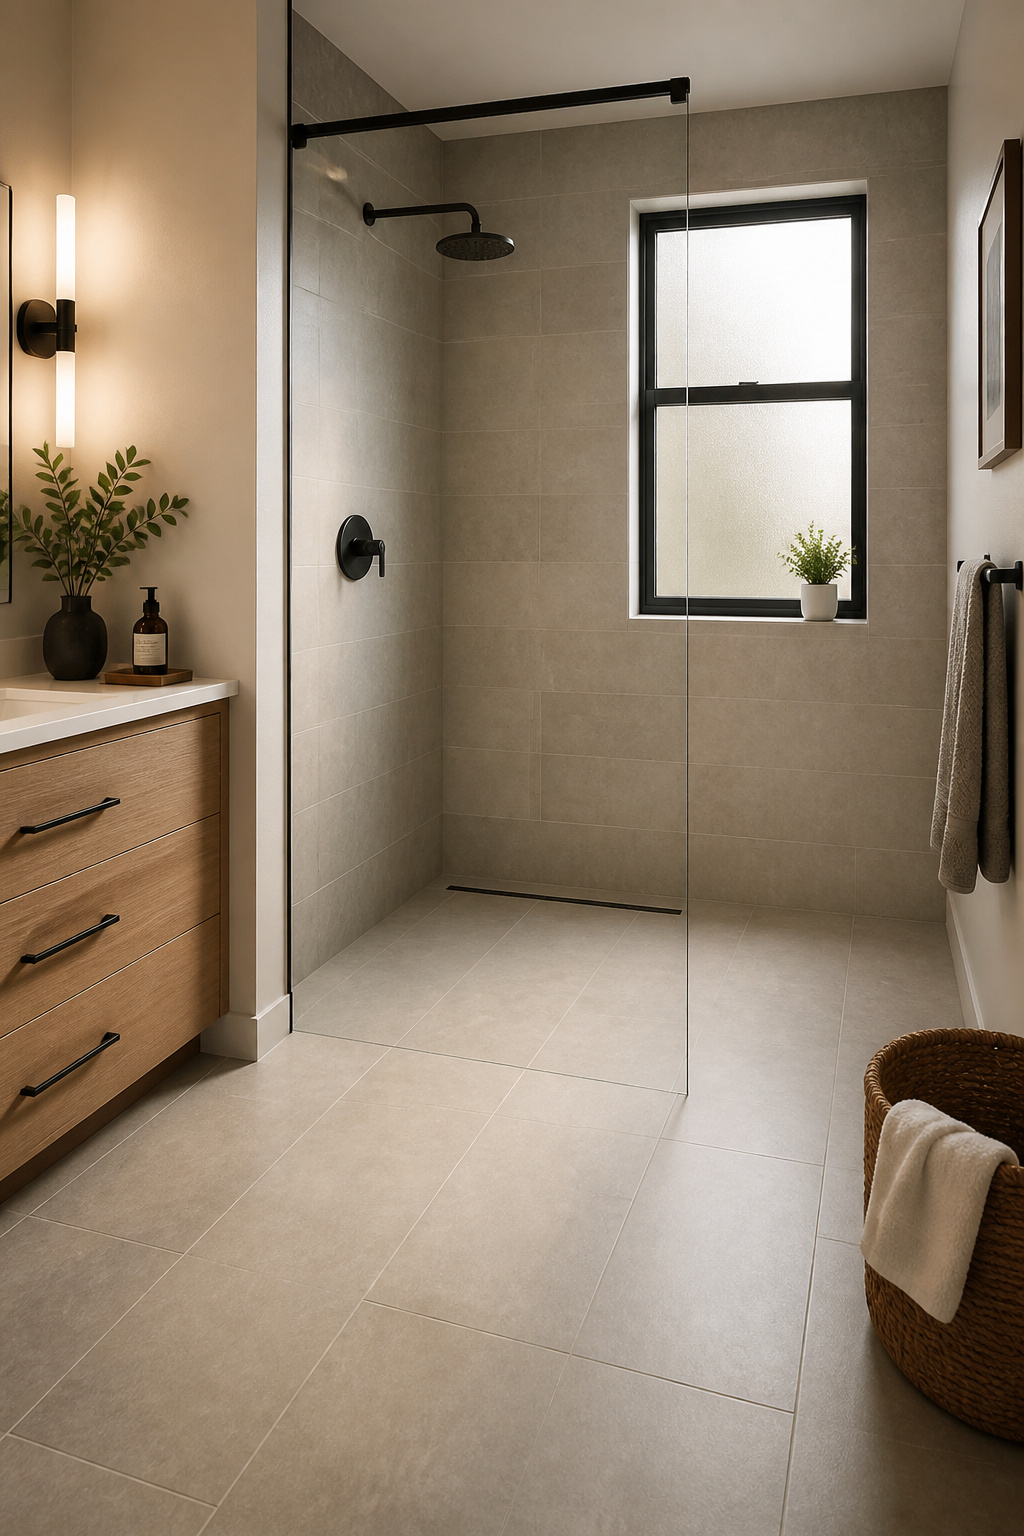
The comfortable minimum for a walk-in shower is 36×48 inches. Building code allows 32×32 as the absolute minimum, but it’s genuinely tight for most adults. In a tub-to-shower conversion building in the existing alcove, the footprint is 60×30 — larger than you need. That gives options: a generous rectangular shower, a corner door configuration, or a curbless design that improves accessibility.
Total cost ranges widely. A prefab kit installation runs $1,000–$3,000 installed. A custom tiled shower in the same space runs $3,500–$12,000 depending on tile selection and whether the drain needs to move. Moving the drain adds $900–$2,000 — a significant cost to plan for. In homes with two bathrooms, a tub-to-shower conversion is generally considered neutral or positive for resale. In a single-bathroom home, most buyers expect at least one tub.
10. Layered Lighting to Brighten Small Bathroom Spaces
Single-bulb overhead lighting is the worst setup for a small bathroom. It casts downward shadows on your face and leaves corners dim. The whole space feels smaller than it is. The fix isn’t a brighter bulb; it’s a different approach: layered lighting.
The best vanity lighting is side-lit — sconces flanking the mirror at 60–65 inches from the floor, approximately eye level. This eliminates the harsh shadows that a top-mounted bar creates. Aim for 800–1,200 lumens per fixture. For any bathroom used for grooming, CRI of 90 or above is the standard — below CRI 80, skin tones look inaccurate and the room feels off. All LED fixtures have CRI ratings on the packaging; check before buying.
For ambient light, 2–4 recessed 4-inch LED downlights on a dimmer replace a single overhead fixture and provide far better coverage. A dimmer switch costs $15–$25 and about 20 minutes to install — it turns a sterile overhead into something actually pleasant at night. Plug-in vanity sconces are the renter’s route: no electrical work, just a cord running behind the mirror. Globe Electric and Kichler both offer options under $50 per fixture. More guidance on getting the vanity zone right is in this bathroom lighting over mirror breakdown.
11. Bold Accent Wallpaper on a Single Feature Wall
Wallpaper on all four walls of a small bathroom creates a pattern that presses in from every direction. But one wall? One wall changes the room’s personality without overwhelming the space. It gives the pattern a single focal point while letting the remaining walls recede. That’s exactly the effect small bathroom ideas aim for.
The best accent wall is typically the one you face as you walk in — the wall behind the toilet, or behind the tub deck. Small-scale geometric patterns (diamonds, thin stripes, hexagons) and botanicals with negative space work well. High-contrast large-scale patterns or bold horizontal stripes can make the room feel more compressed. In a tight space, a pattern that draws attention to the walls draws attention to how close together they are.
Material selection matters. Solid vinyl wallpaper is the most durable for bathrooms — it’s a thin vinyl sheet that moisture can’t penetrate. Vinyl-coated paper works outside the direct splash zone. Grasscloth, jute, or any natural fiber absorbs moisture and will fail — avoid entirely. For renters, vinyl peel-and-stick (Tempaper, Chasing Paper) is fully removable. Cost: $2.50–$6 per square foot; a single accent wall in a small bathroom runs $75–$240 in materials. One prep note: peel-and-stick doesn’t adhere well to flat/matte paint. Prime the wall or use eggshell/satin as a base coat first.
12. Heated Towel Rails That Add Function Without Clutter
A standard towel bar stores towels. A heated towel rail stores them, warms them, and dries them between uses. That last function matters more than it seems in a small bathroom with limited air circulation. Damp towels in a confined space are the main source of the musty smell.
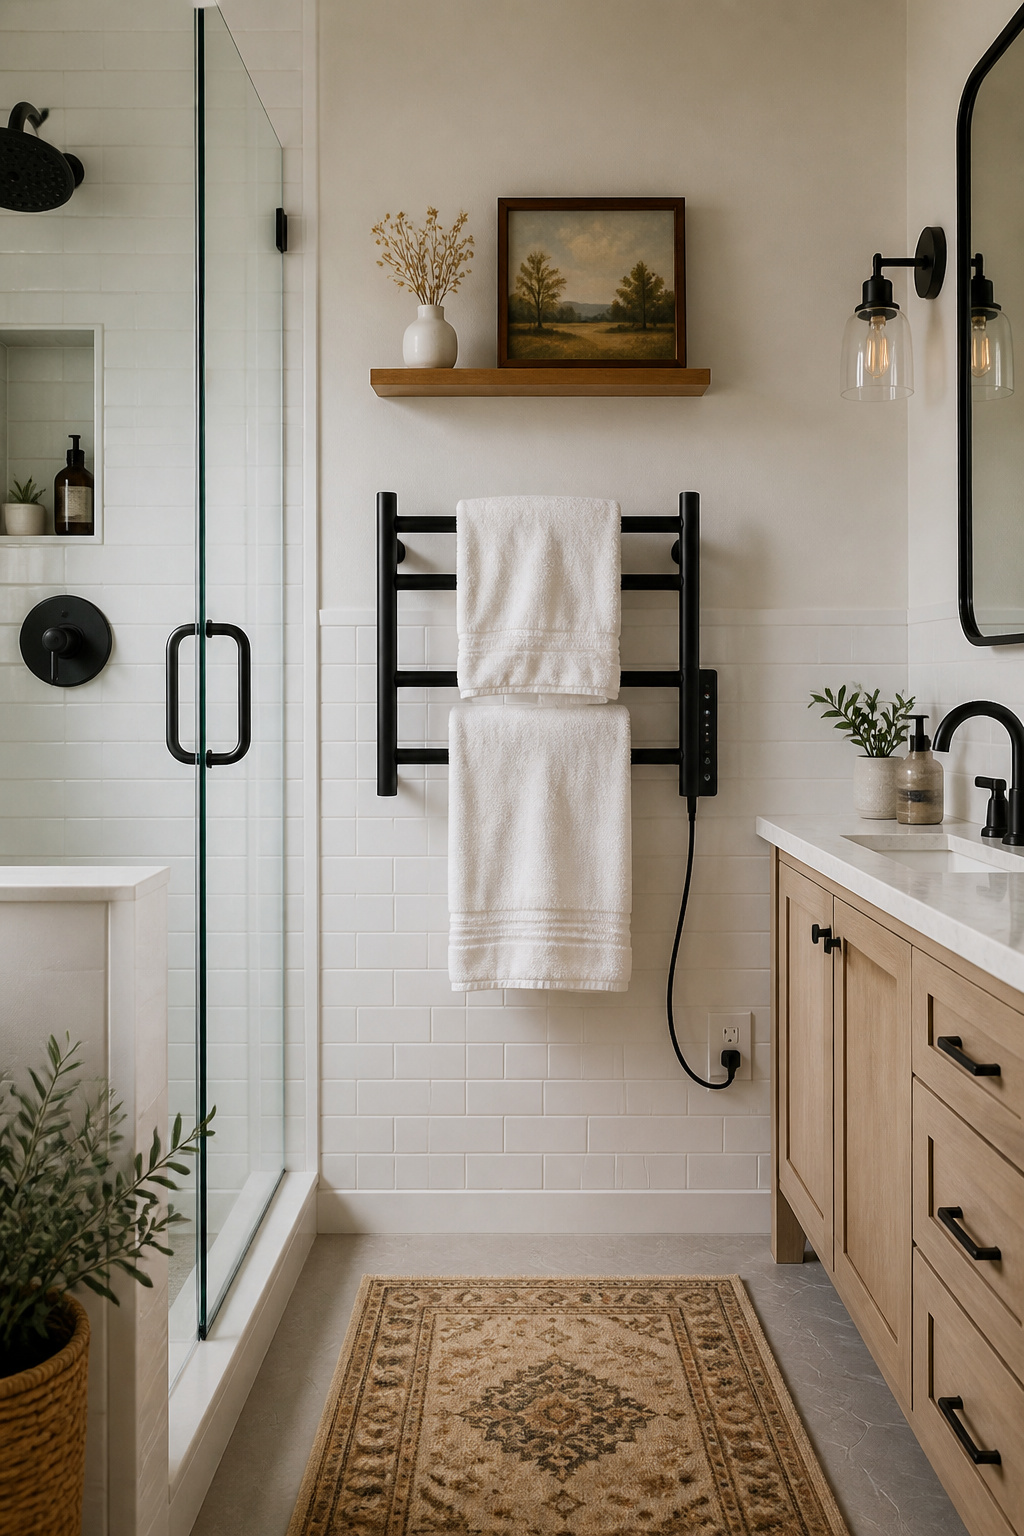
Plug-in electric models install in 15–30 minutes: mount the bracket, plug in. The cord runs from the bottom or side of the unit — less visually clean than a hardwired version, but entirely functional. Price range: $80–$300. Hardwired models require an electrician ($100–$300 in labor) but leave no visible cord and look like they were always there. Code requires hardwired models to be GFCI-protected and placed at least 24 inches from the water source.
For sizing in a small bathroom, a 20-inch single rail is enough for one to two bath towels. Mount with the bottom bar 24–36 inches off the floor — accessible from the shower without stretching. A vertical rail (taller than wide) uses wall height rather than width, useful when the available wall section is narrow. Running cost is modest: a 150–300W rail running for an hour after each shower adds roughly $2–$5 per month to an electric bill. Match the finish to the rest of your bathroom hardware — chrome, brushed nickel, or matte black — and it looks intentional rather than added-on.
13. Cohesive Accessory Edits That Refresh Small Bathroom Ideas
Mismatched accessories are a budget problem disguised as a design problem. A chrome towel ring, a brushed nickel toilet paper holder, a plastic soap pump in a third finish entirely — in a large room, these fade into the background. In a small bathroom where everything is within 3 feet of everything else, the eye registers every inconsistency.

The solution is straightforward: buy a 4-piece hardware set in one finish and replace everything at once. Amazon Basics makes a brushed nickel set for $35–$50. VIGO’s 4-piece in matte black or brushed gold runs $80–$120. KOHLER’s coordinated collections handle the higher end at $150–$300. None of this is expensive — the point is to spend once on a matched set rather than replacing things one at a time in whatever was available.
The three most versatile finishes: chrome is classic and pairs with anything but shows water spots readily. Brushed nickel hides fingerprints and reads warmer than chrome. Matte black is the current high-impact choice, particularly strong against white tile or natural wood tones. Mixing two finishes is fine if done deliberately — matte black hardware with brushed nickel plumbing fixtures is a combination that tends to work well.
One free upgrade that multiplies the effect: clear the counter to three items maximum. A soap dispenser, one other functional item, and one decorative piece (a small plant, a candle). More than three items and the counter looks busy regardless of how nice the hardware is.
14. Simple Accessory Edits That Elevate Small Bathroom Ideas
Cabinet hardware is one of the most overlooked quick wins among small bathroom ideas. The drawer pulls and knobs on your vanity are likely the original builder-grade pieces — small, cheap, forgettable. Replacing them is a screwdriver-only swap.

Hardware Swaps That Make the Most Difference
The key measurement is center-to-center distance between screw holes (common sizes: 3 inch, 3.75 inch, 5 inch). Buy hardware that matches the existing spacing and no drilling or patching is required. Matte black pulls on a white or natural wood vanity are currently one of the highest-impact, lowest-cost moves in a small bathroom. A set of 4–6 cabinet pulls costs $20–$60.
If you’re replacing hardware anyway, it’s also a good time to reconsider towel storage. Hooks project only 2–3 inches from the wall vs a towel bar at 3.5–4.5 inches. In a bathroom where 5 inches of wall clearance next to the door is all you have, a hook works where a bar doesn’t. In a tight bathroom, replacing one standard towel bar with two hooks gives you the same storage in less wall projection.
Counter accessories are the final layer. Matching materials — all ceramic, all glass, all stainless — make a collection of counter items look curated rather than accidental. A small tray (marble, wood, or ceramic, 8–12 inches wide) corrals the soap dispenser, toothbrush holder, and other items into a single visual unit. Amazon and Target carry ceramic counter accessory sets for $20–$50. A small marble tray plus a set of ceramic dispensers — total cost under $40 — is one of the better investments you can make in a small bathroom.
15. Under-Sink Organizers to Tame Cabinet Clutter
The cabinet under a bathroom sink is the storage space that everyone has and almost nobody uses well. The p-trap — the curved drain pipe running through the middle of the cabinet — sits at roughly mid-height and makes a standard shelf useless. Most people end up shoving things in around the pipe and hoping for the best.
Work in two zones: left and right of the p-trap (where full-height storage is available) and directly below it (where flat, shallow items can slide in). Dedicated under-sink organizers are built for exactly this — look for ‘adjustable shelf height’ or ‘p-trap friendly’ in the description. The mDesign and iDesign tiered pull-out units are the most popular options: a stationary top shelf clears the pipe while a pull-out bottom drawer handles lower storage. Cost: $25–$50.
Also worth knowing: the tension rod trick. Mount a tension curtain rod horizontally across the inside of the cabinet, 6–8 inches below the top, and hang spray bottles by their trigger handles from it. Cost: $5–$10 and 5 minutes. It frees the entire cabinet floor for larger items and is one of the better organizing solutions that requires almost nothing. For a broader view of organizing the whole bathroom, the bathroom storage solutions that actually work guide covers the full scope.
16. Corner Shelves and Curved Rails That Claim Dead Space
Most small bathroom storage thinking focuses on the obvious walls and cabinets. The more useful question is: where is the space that nobody is using at all? In almost every bathroom there are at least three dead zones: shower corners, the narrow floor gap beside the toilet, and the wall space over the bathroom door. Small bathroom ideas that target these spots add storage without consuming any existing usable area.
Shower corners are the most immediately useful. A tension pole corner caddy (ALLZONE, SEIRIONE, Glacier Bay: $25–$60) installs in minutes with no drilling — the spring-loaded pole wedges between floor and ceiling. Four tiers hold shampoo, conditioner, body wash, and a razor without any wall penetration. For a more permanent solution, a drill-mount corner shelf screwed into tile with a $15 diamond drill bit is the most secure option. Expect to pay $20–$80 for the shelf itself.
The gap beside the toilet is usually 4–8 inches — enough for a slim pull-out cart (marketed as ‘bathroom gap organizer’ or ‘slim storage tower’). SONGMICS and HASKO both make 4-tier carts for $30–$80. One important check: confirm the bathroom door doesn’t swing into that gap before ordering a cart that would block it every time the door opens.
17. Plants and Natural Textures That Make Any Bathroom Feel Finished
Storage and lighting solve practical problems. Plants and natural textures solve a different one: a small bathroom that’s organized but sterile still doesn’t feel good to be in. A few well-chosen natural elements add warmth and personality that no paint chip or hardware finish can fully replicate.
The best plants for a bathroom are the ones that actually survive there. Pothos loves humidity, grows fast in bathroom steam, and handles low light. Water it when the top inch of soil dries out — in a humid room, that’s less often than you’d expect. Snake plants water every 2–4 weeks, tolerate near-complete shade, and are impossible to kill through neglect. Air plants require no soil at all: mist 2–3 times a week or give them a 30-minute soak once weekly.
Natural textures are equally accessible. A teak or bamboo bath mat replaces a fabric one with a surface that dries completely between uses and doesn’t hold mildew. Sealed wicker baskets as storage containers — on shelves, under the sink — add texture that plastic bins never do. Hang a dried eucalyptus bundle from the showerhead. Shower steam activates the oils, the bathroom smells remarkable, and the whole thing costs $5–$15 at a farmers market or craft store. It’s one of the simplest small bathroom ideas that delivers an outsized sensory improvement.
18. Matching Grout Color to Tile to Make a Small Bathroom Look Bigger
The color of your grout has a real effect on how large the tiled surfaces in your bathroom appear. High-contrast grout — dark grout with white tile, or white grout with dark tile — creates a visible grid across every tiled surface. The eye follows the lines and registers each individual tile rather than reading the wall or floor as one continuous surface. In a small bathroom, that fragmentation makes the space feel busier and more enclosed.
When Grout Color Makes or Breaks the Room
Matching grout closely to the tile color — within two or three shades — makes the entire tiled surface read as one continuous material. The boundaries between tiles become nearly invisible and the wall or floor feels expansive rather than assembled. For white or light gray tile, a near-white or soft gray grout (Mapei Warm Gray, Laticrete Snow White) maintains the bright, open feel without the grid effect. Tone-on-tone also hides discoloration better over time — staining is far less visible in matching grout than in contrasting.
If your current tile has discolored or mismatched grout, grout renew paint (Rust-Oleum Grout Paint, Polyblend Grout Renew) is a legitimate DIY fix. Applied with a small brush along each grout line, it recolors the surface for $10–$20 per tube — enough for approximately 100 square feet of 4×4 tile. A small bathroom floor takes 2–3 hours and $15–$30 in materials. The caveat: this is a cosmetic solution. If the grout is crumbling or cracked, fix it structurally before applying colorant. See modern bathroom tile ideas for more on getting tile choices right from the start.
Choosing the Right Small Bathroom Ideas for Your Space
Before anything else, decide which type of change you’re making. Free and low-cost small bathroom ideas — decluttering the counter, swapping hardware, adding an over-toilet shelf, hanging a larger mirror — are available to everyone, renter or owner. These small bathroom ideas should come first, because they’re immediate and they’ll make every subsequent upgrade more visible.
The mid-tier upgrades (under $500) are where the highest-impact changes live: paint the walls, add a glass shower panel, swap to a floating vanity, install peel-and-stick wallpaper on one wall. Most of these are DIY-friendly for anyone comfortable with basic tools. Renters should check their lease before drilling or painting, but many landlords permit both with advance notice and a plan to restore on move-out.
The structural changes — tub-to-shower conversion, recessed shower niche, wall-mounted toilet — are owner territory. They require planning, budget, and in most cases a contractor for the plumbing work. They’re worth doing if the bathroom is yours for more than a few years. The payoff compounds over time. A walk-in shower in a 60 sq ft bathroom isn’t just a design upgrade — it changes how the whole room works day to day.
Start with what you can do this weekend. The paint, the mirror, the hardware, the under-sink organizers — these small bathroom ideas are a Saturday morning project. Everything else can wait until the timing and budget line up.