Here’s the thing about small bathrooms: almost every tip you’ve read tells you to keep things light, keep things minimal, keep things from making the space feel smaller. And then you walk in, face a beige box with a builder vanity and a single overhead bulb, and wonder why it still doesn’t feel like anything.
The small bathroom inspiration that actually moves the needle isn’t about hiding the room’s size — it’s about working with it. A 50 sq ft bathroom that leans into its character beats a 50 sq ft bathroom that pretends to be something else every single time. These 17 ideas cover the full range: free changes you can make this afternoon, weekend projects under $100, and the bigger structural moves that genuinely transform how a room feels to live in.
Some of them will be perfect for your situation. Others won’t. But at least one is going to make you grab a tape measure.
1. Floor-to-Ceiling Tile That Draws the Eye Upward
Most bathroom tile installations stop at the shower surround or the backsplash zone behind the sink, leaving painted drywall above. That colour break — where tile ends and wall begins — is the single thing telling your eye “the ceiling is nearby.” Remove the break, and the ceiling feels farther away.
Running tile from floor to ceiling works because the eye follows continuous vertical lines upward. There’s no visual stop, no transition to navigate. Large-format tiles (12×24 or 18×36) amplify this further — they cut grout lines by 60-70% compared to standard 4×4 tiles, removing the visual grid that makes rooms feel segmented.
The grout colour matters more than most people expect. Match your grout to your tile as closely as possible and the whole wall reads as one continuous surface. Use a heavily contrasting grout and every tile joint becomes a line — suddenly the wall feels busier, not calmer.
Installed cost for a tiled shower surround or accent wall runs $10-$50 per square foot depending on tile and labour. For DIY tilers, renting a tile saw costs $40-$60 per day — worth it for a one-room project. The tricky part isn’t the tiling itself; it’s the waterproofing and grouting, where shortcuts cause water damage downstream. If you want to explore the bathroom tile designs that open up small spaces, there’s a lot of range from classic white to dramatic stone.
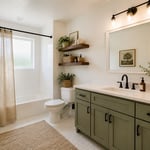
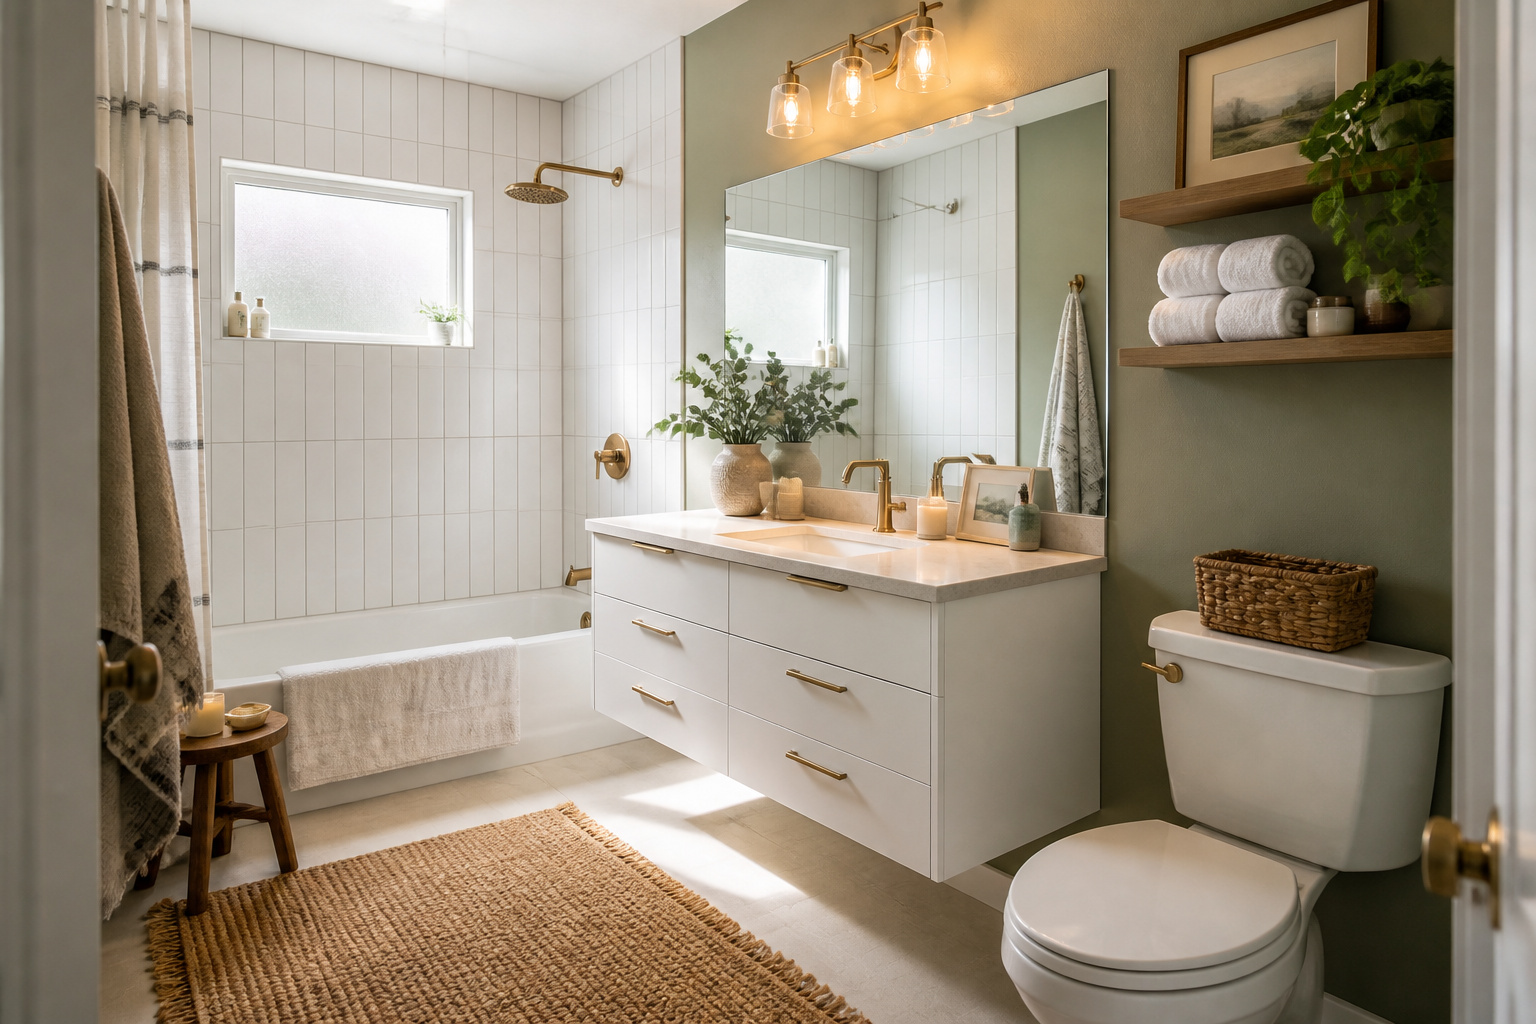
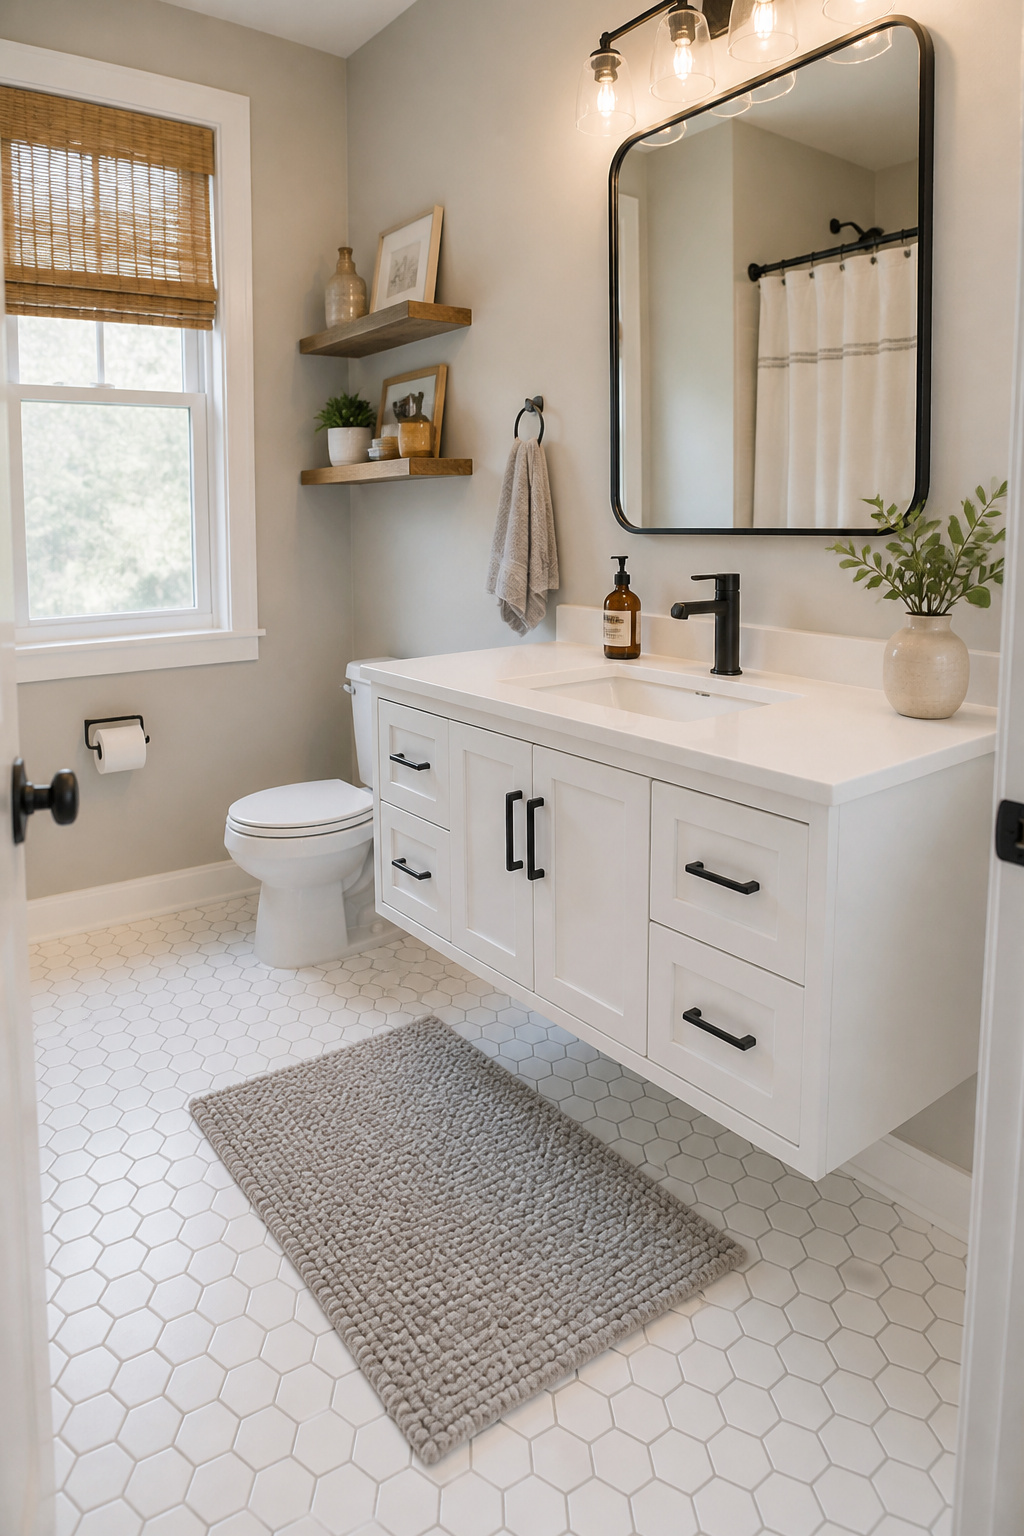
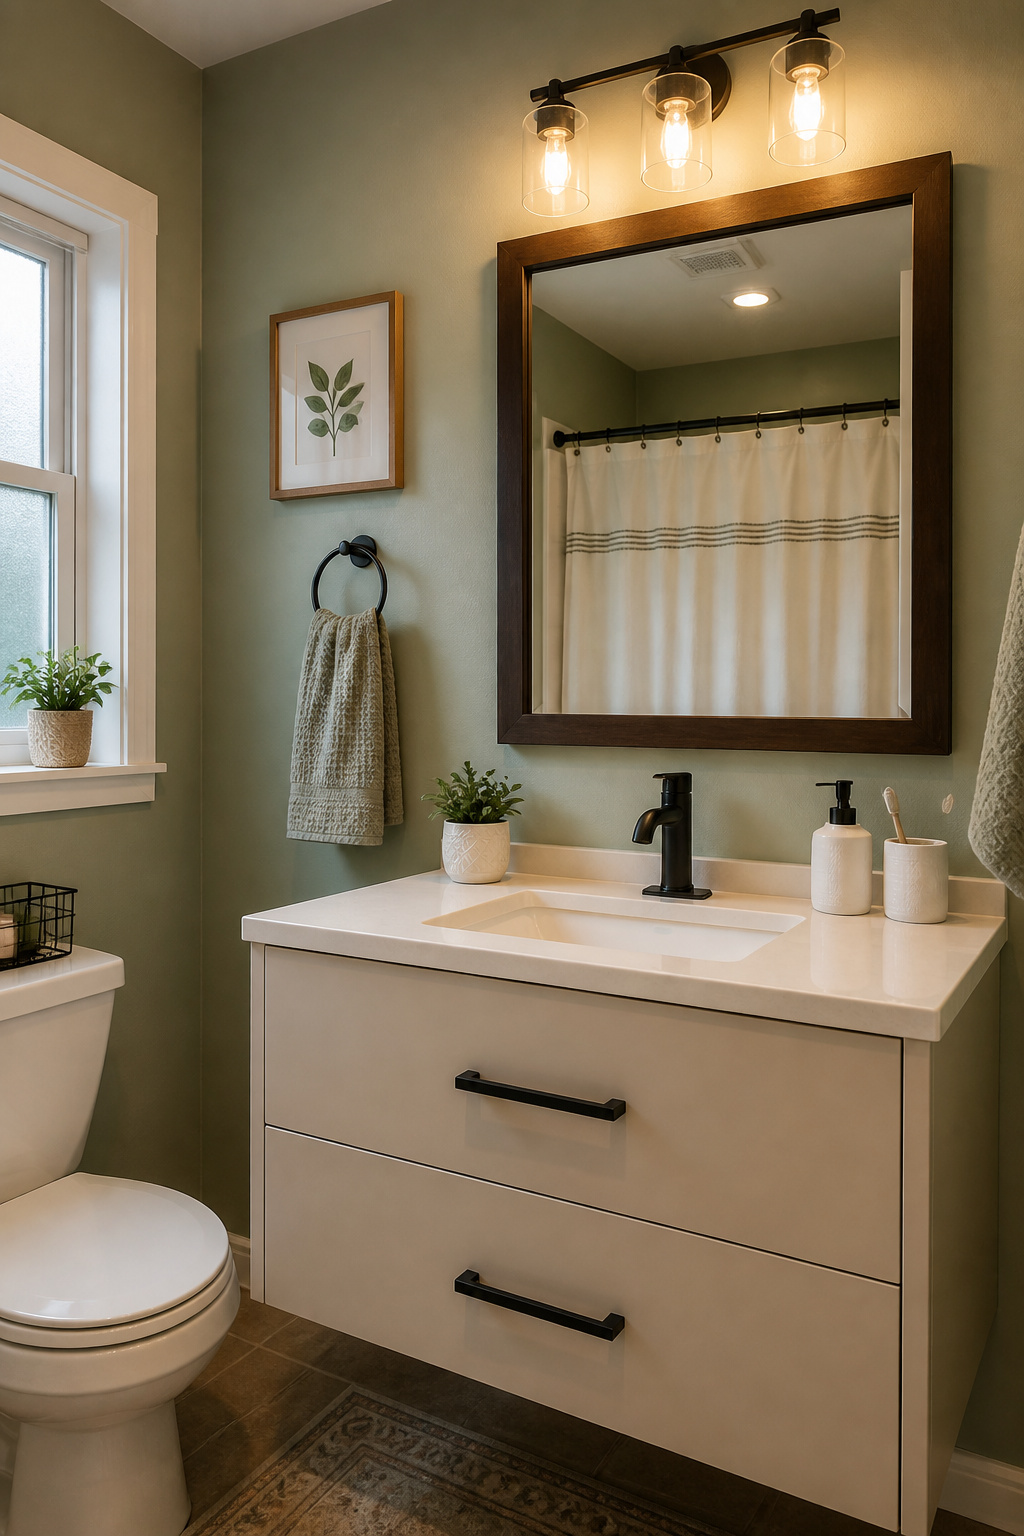
2. A Frameless Mirror That Spans the Full Vanity Wall
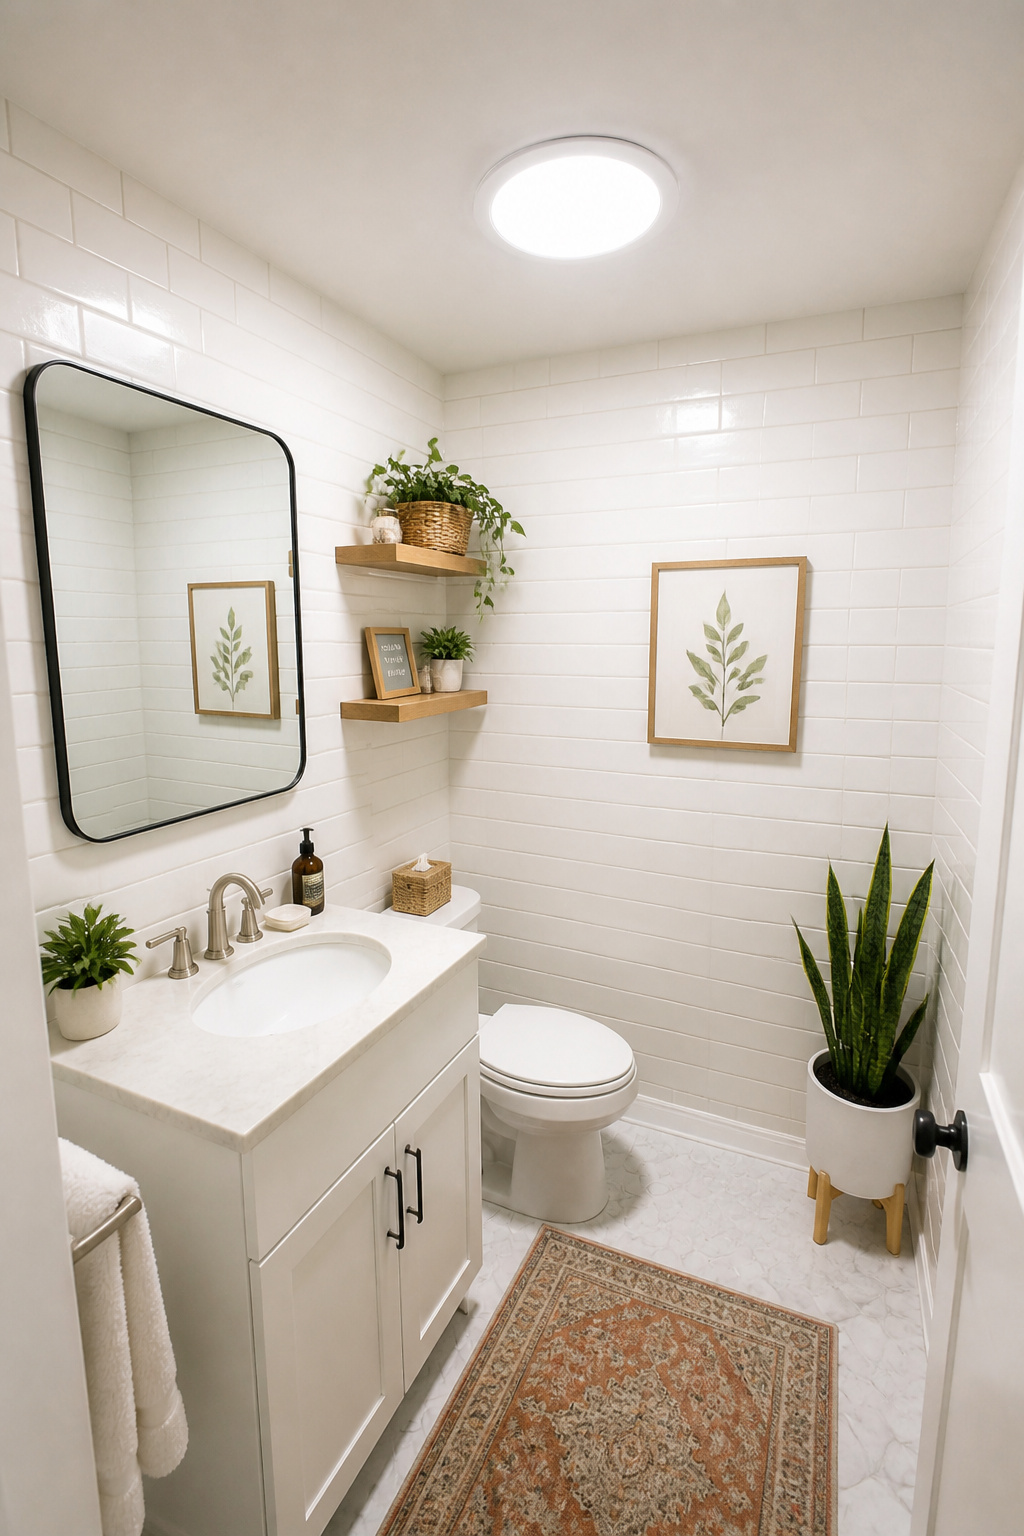
A frame tells your eye where the mirror ends. A frameless mirror doesn’t — the polished glass edge blends into the wall, and the reflective surface feels like a window rather than a fixture. It’s one of the most straightforward pieces of small bathroom inspiration available, and it works in any style from farmhouse to minimalist.
The width is where most people underestimate the effect. A mirror that matches or slightly exceeds the vanity width doubles the light in the room and doubles the perceived depth behind whoever is standing at the sink. It’s doing a lot of work at once.
Sizing rule: match the mirror width to the vanity, or go up to 2 inches wider on each side. Height should centre at 60 inches from the floor with the bottom sitting 4-7 inches above the faucet handles. For installation, J-clips at the bottom and L-clips at the top distribute weight without drilling into tile. Mirrors over 30 lbs need to hit studs.
Budget-wise, IKEA’s HOVET mirror (30×78 inches, around $150) is a popular solution when hung horizontally above a wide vanity. HomeGoods turns up large frameless pieces seasonally for $40-$120. For a custom size, local glass shops cut frameless mirror glass for $8-$15 per square foot — a 24×36 piece typically runs $60-$80.
3. A Floating Vanity to Free Up Visual Floor Space
The floor under a floating vanity is empty. That sounds obvious, but the visual consequence is significant: your eye reads unbroken floor area as spacious. The same room with a floor-to-ceiling vanity cabinet blocks light from reaching that zone entirely, and the brain registers the heavy base as additional room mass. As small bathroom inspiration goes, a floating vanity pays dividends every time you walk in.
Floating vanities work best when the floor tile is worth seeing — if your floor is dated or worn, a floor-standing vanity is the better call until you’re ready to address the floor too.
Mounting requirements: you need to hit studs, or add 2×4 blocking between studs before closing the wall. Most vanities mount at 32-36 inches height (slightly higher than the standard 30-32 inch floor-standing vanity, which is more ergonomically comfortable). Weight ranges from 50-150 lbs for most single-basin vanities, so stud mounting is always preferable to toggles.
For price, IKEA’s GODMORGON line ($200-$500) is the most popular budget option — it mounts into studs and accepts standard undermount sinks. Home Depot and Wayfair carry 24-inch singles starting around $180. If you’re handy and patient, converting a wall-hung cabinet from Craigslist into a floating vanity with a vessel sink is achievable for under $200 — whatever bathroom vanity decor ideas you choose to style around it will feel much more intentional with the visual floor space open beneath.
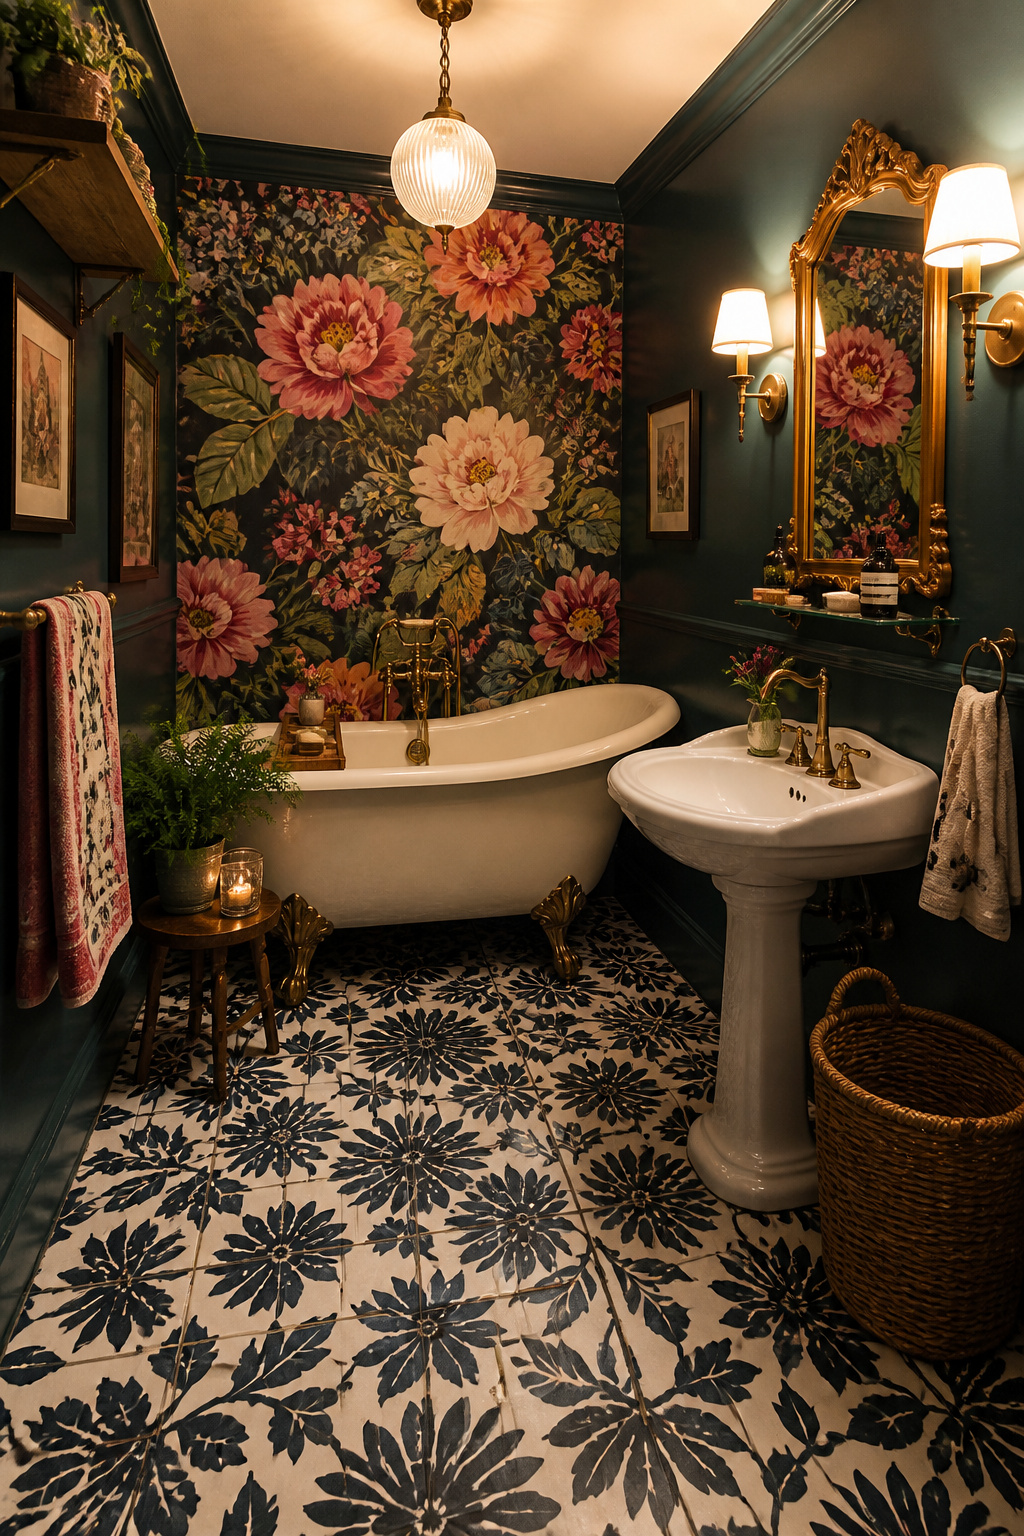
4. Statement Wallpaper as Small Bathroom Inspiration on One Wall
Bold wallpaper in a small bathroom sounds like the opposite of good advice, and that’s exactly why it works. A small room contains pattern better than a large room — you see a portion of the repeat at a time, which teases rather than overwhelms. And it reads as a deliberate design decision rather than wallpaper-everywhere desperation.
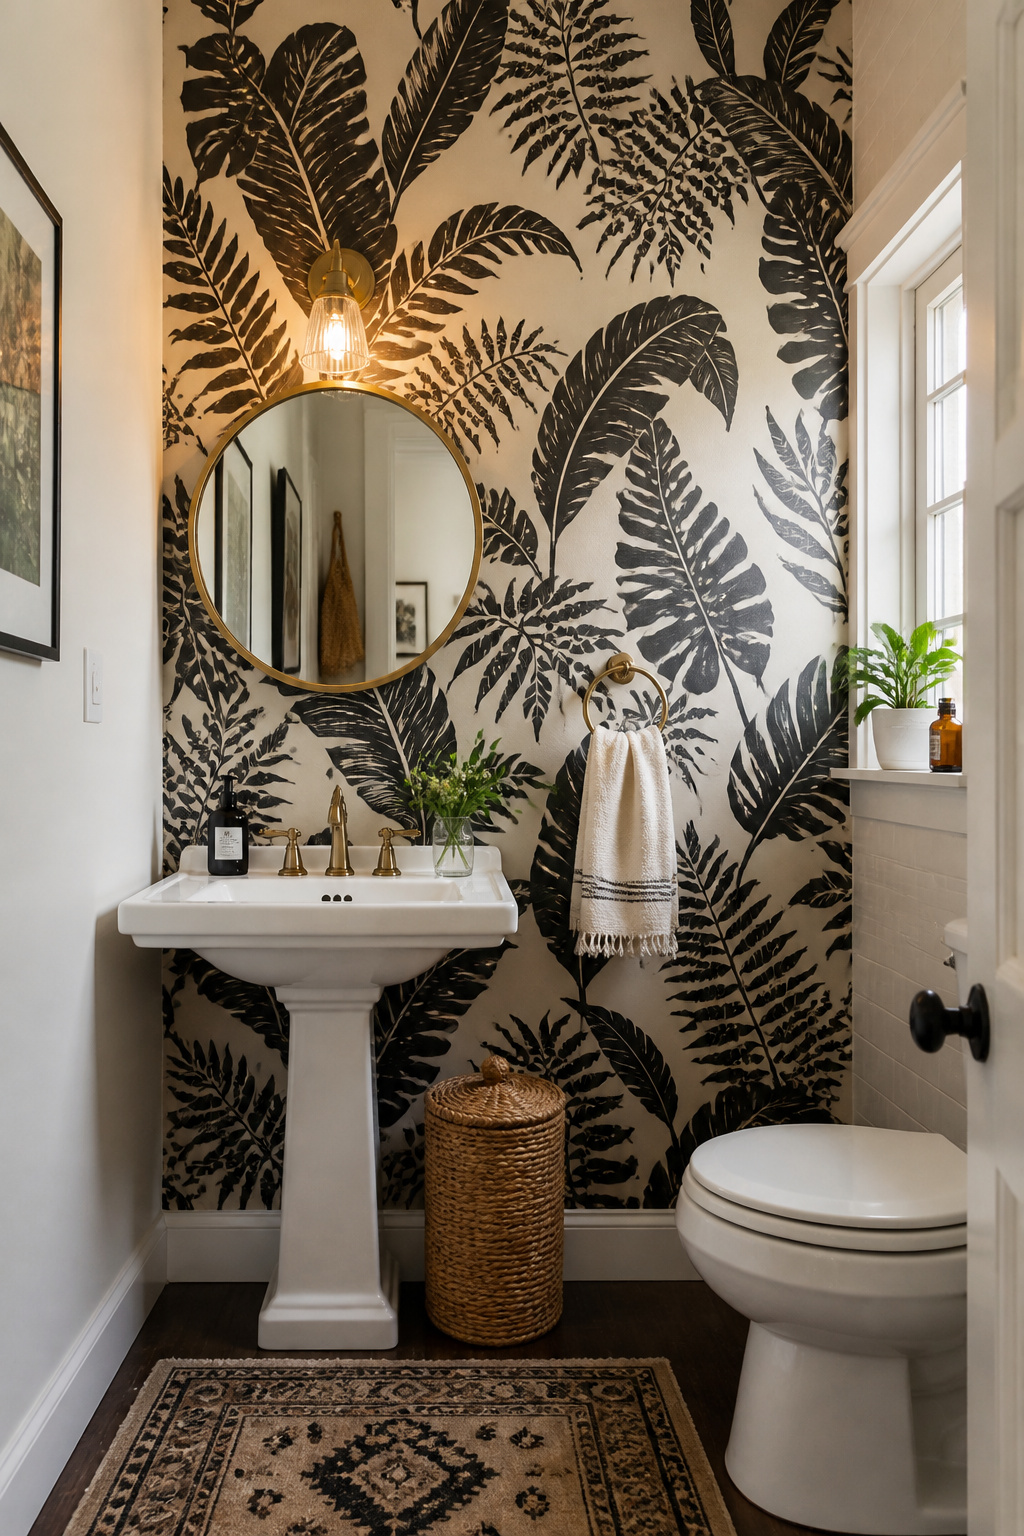
The wall that works best is the one directly opposite the door. That’s the first thing you see when the door opens, and it sets the tone for the whole room instantly. Large-scale prints — botanicals, maximalist florals, geometric murals — do particularly well in bathrooms because the small footprint limits how much pattern you’re committing to.
Peel-and-stick is the practical choice for bathrooms because it’s forgiving and removable. Look for vinyl-backed varieties specifically labelled “moisture-resistant” — standard peel-and-stick paper will bubble in bathroom humidity within months. Traditional paste wallpaper works too, but must be vinyl-coated or non-woven varieties rated for wet environments. Either way, ventilation is the real durability factor — an exhaust fan running during and for 15 minutes after every shower extends wallpaper life significantly.
Prep is non-negotiable: clean, dry, smooth walls only, and new paint needs 30 days to fully cure before peel-and-stick will adhere reliably. Budget: $2-$6 per square foot for peel-and-stick; a single accent wall in a small bathroom typically runs $70-$300 depending on brand.
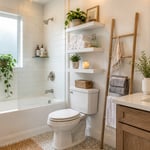
5. Open Shelving Above the Toilet for Practical, Pretty Storage
The wall above the toilet is one of the most underused spaces in the average bathroom — typically 30-35 inches of clear wall between the tank top and the ceiling that most people leave completely blank. A pair of floating shelves there costs less than a dinner out and adds both storage and visual weight to an empty wall. It’s small bathroom inspiration that’s entirely within reach for a first-time DIYer.
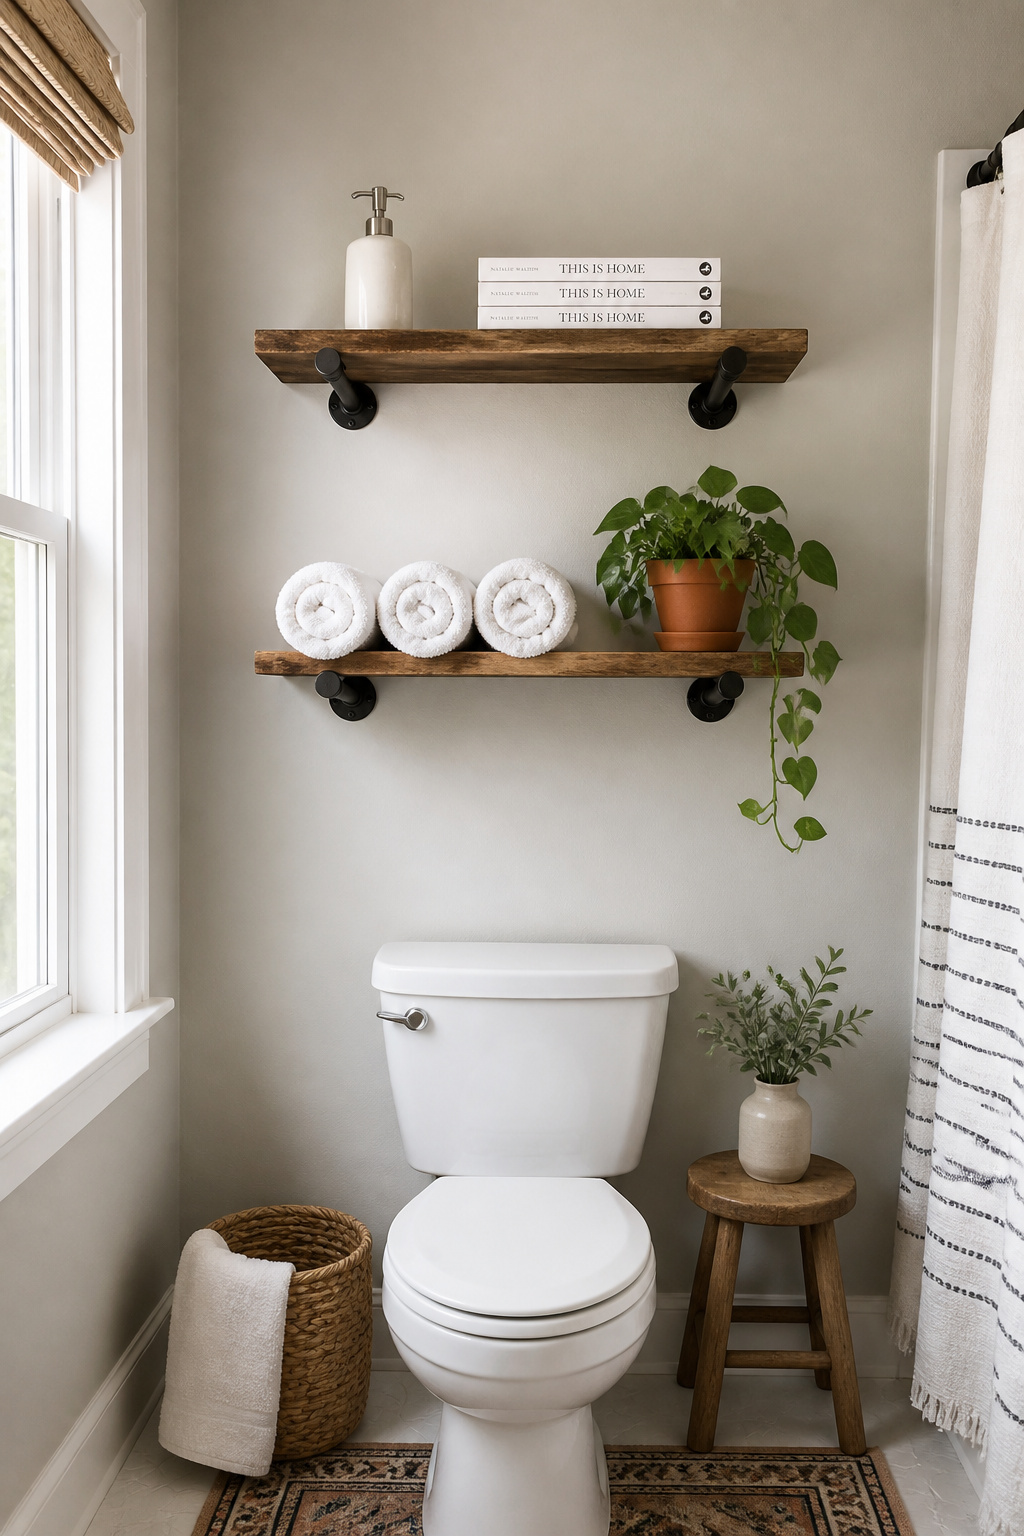
The key is what goes on them. Open shelves reward editing: keep useful items at 70% of the shelf space and leave the remaining 30% for one or two visual elements. Identical rolled towels, a small plant, and a single candle look like a design decision. A row of branded shampoo bottles and random product clutter looks like a forgotten shelf. If bulk items (extra toilet paper, cleaning supplies) need to live up there, put them in matching baskets.
Shelf depth above a toilet should be 8-10 inches — deep enough for a rolled towel or small basket, shallow enough that standing up doesn’t mean knocking things over. Bottom shelf minimum is 24 inches above the tank top, and if you’re doing two shelves, 18 inches between them gives enough clearance for a potted plant or a tall bottle. For a full overview of what to do with all that bathroom wall space, bathroom storage ideas for small spaces covers far more than just above the toilet.
Installation tools needed: stud finder, level, drill, 2-inch screws. Total project time, including measuring and patching any pilot hole misses, is typically 45 minutes to 2 hours for a first-timer.
6. Dark Paint That Makes a Small Bathroom Feel Intentional
The conventional wisdom is that dark paint makes small rooms feel smaller. It does — technically. But there’s a version of small-and-dark that doesn’t feel like a problem, and it’s worth understanding why. Dark paint as small bathroom inspiration is counterintuitive, which is precisely what makes it so effective when executed well.
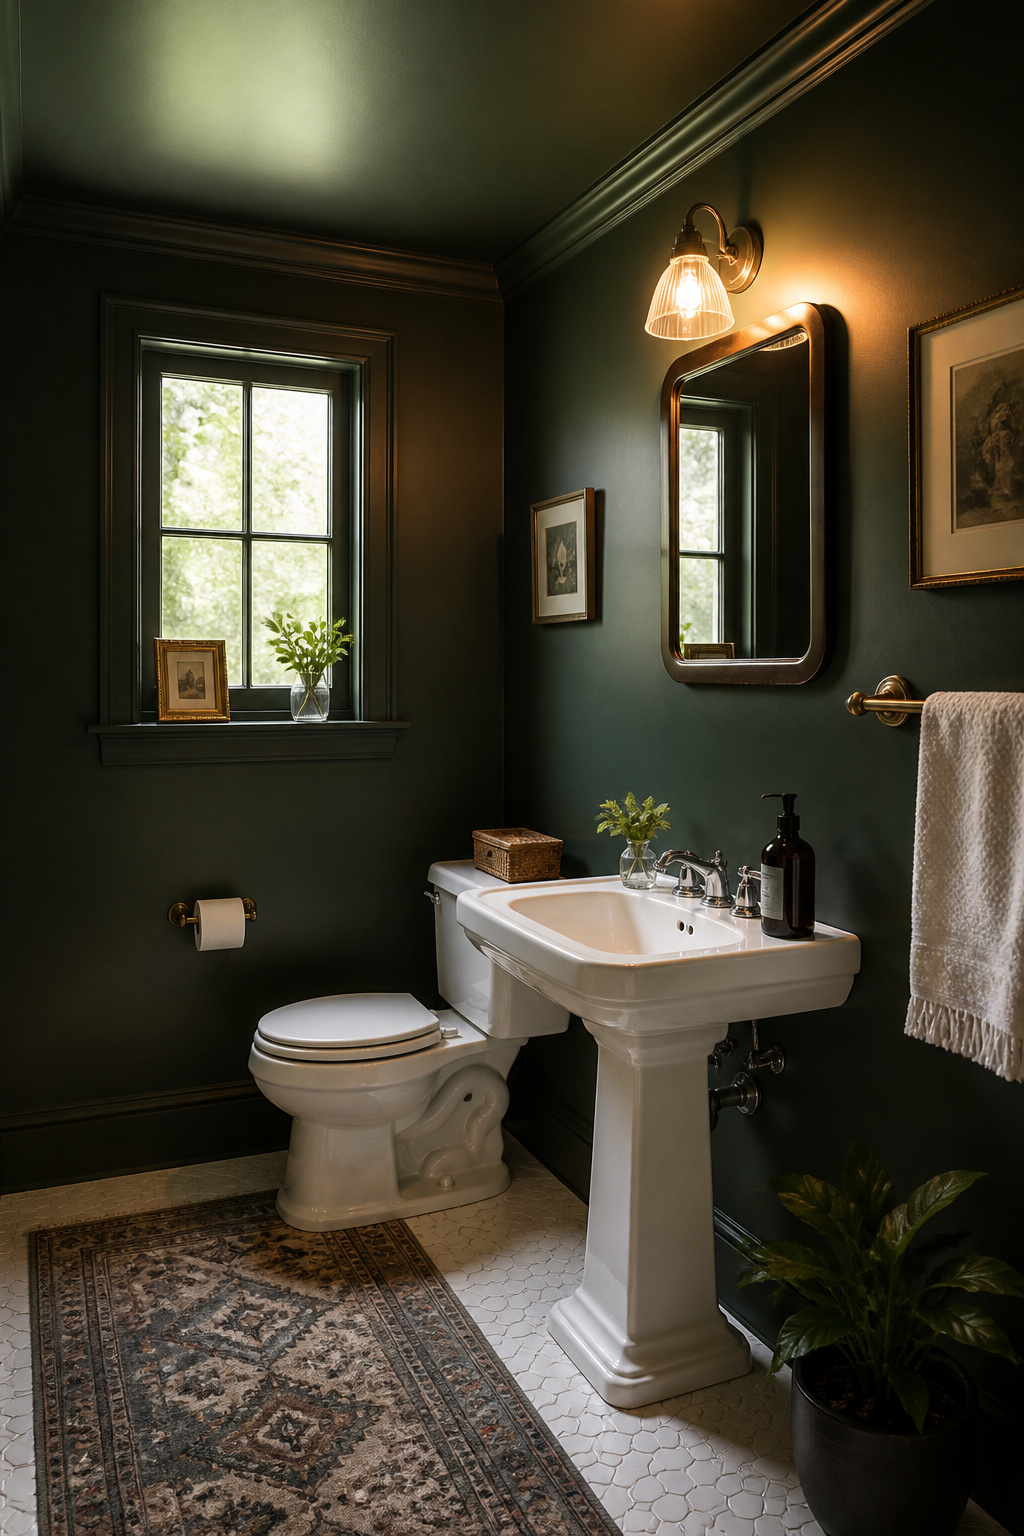
Dark walls recede visually, making the room’s boundaries ambiguous. When you can’t quite see where the wall ends, the room stops feeling like a hard box. The effect is closer to what you experience in a candlelit restaurant than in a storage closet — and it comes down to lighting. Warm-spectrum bulbs (2700K-3000K) against dark walls create the spa feeling; cool bulbs against dark walls create the cave feeling. Get the lighting right first, then choose the colour.
Deep forest green is the most universally praised choice — Benjamin Moore Tarrytown Green and Farrow & Ball Brassica come up constantly in designer bathrooms. It reads as organic and pairs beautifully with brass or unlacquered brass hardware. Navy (Sherwin-Williams Naval, Benjamin Moore Hale Navy) is the classic option that never dates and works with both chrome and brass. Warm charcoals (Benjamin Moore Wrought Iron) work well with good natural light but can tip toward cave in windowless spaces.
The move that makes dark paint work in any size bathroom is colour-drenching: paint walls, ceiling, and trim the same colour. It removes all the stop lines that define the box and makes the space feel intentional rather than truncated. For context on all the options, including the lighter end of the spectrum, best paint colours for a small bathroom covers the full range worth considering.
7. Vertical Subway Tile: A Classic Small Bathroom Idea That Works
Subway tile is everywhere — so much so that it’s easy to dismiss it. But there’s a version most people haven’t tried, and it changes the whole character of the room: turn it vertical. For zero-extra-cost small bathroom inspiration, this is the most underrated option on this list.
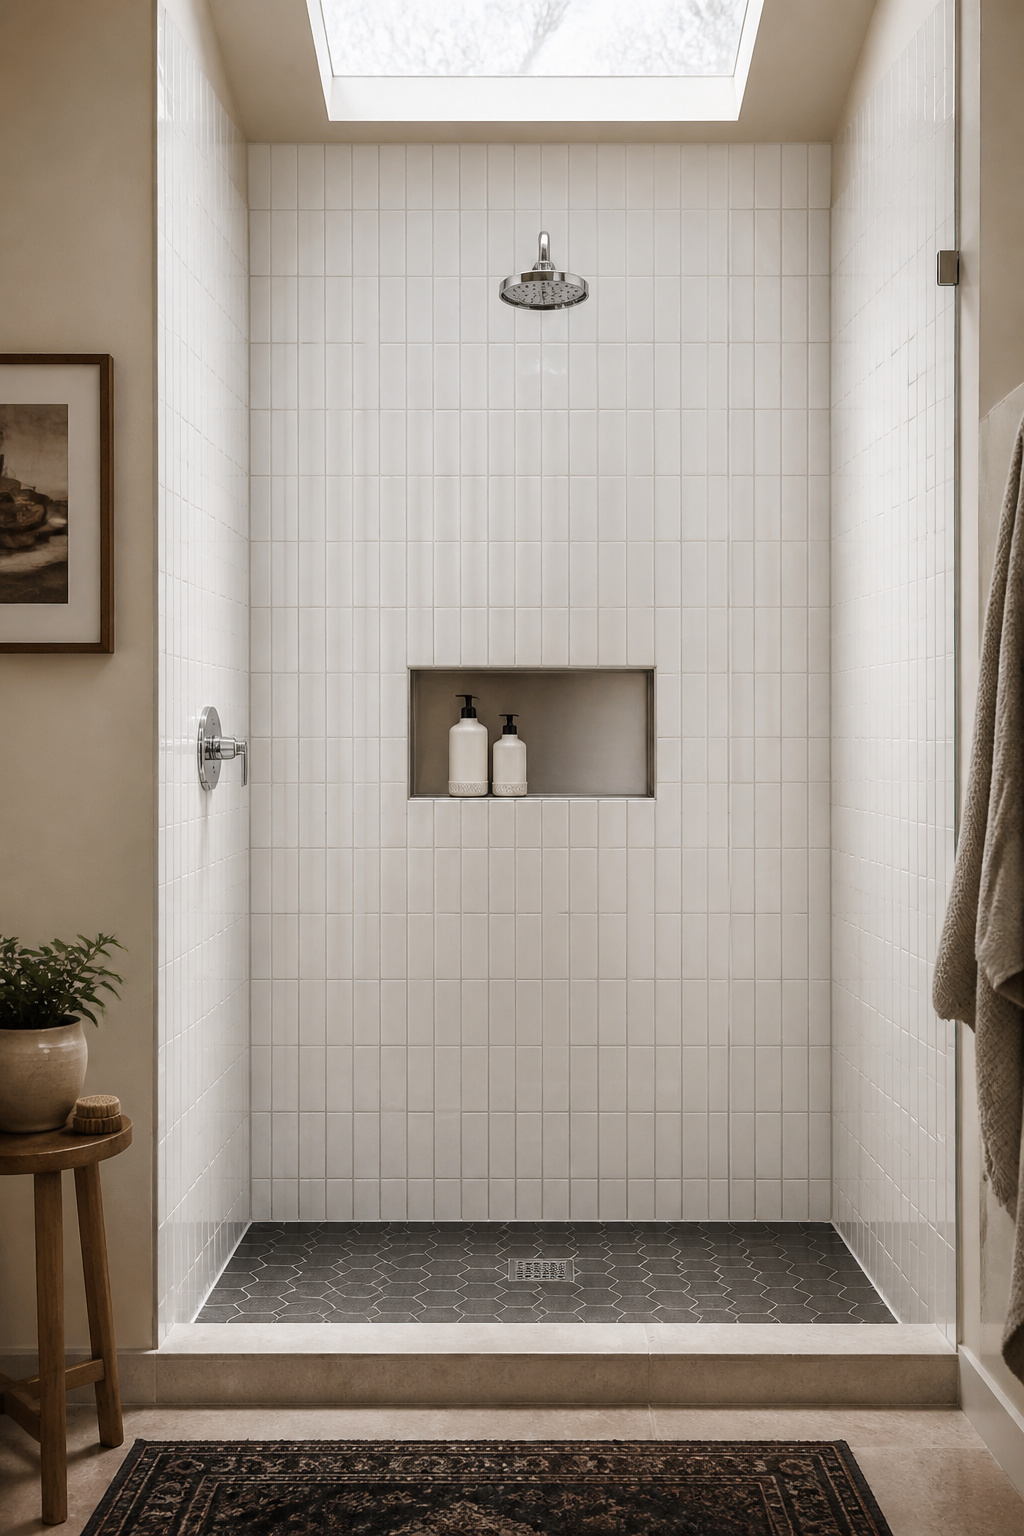
Horizontal subway tile draws the eye across the wall and emphasises room width. Vertical draws the eye upward and emphasises height. For small bathrooms where you want to pull the ceiling up visually, vertical is almost always the better orientation — and it’s the same tile, the same cost, installed by the same person. The only difference is direction.
The standard 3×6 tile in vertical orientation makes each tile read as a 6-inch-tall element. Stacked vertical (no offset, tiles perfectly aligned) reads as modern and graphic. A traditional 1/3 offset in vertical reads softer and more transitional. Either way, the height effect is real — Fireclay Tile’s data from bathroom projects consistently puts vertical subway as one of the highest-impact pattern changes in small shower walls.
Cost breakdown: standard white ceramic subway tile runs $1-$8 per square foot; glass or handmade subway runs $15-$40. Vertical installation adds roughly $2-$3 per sq ft in labour over horizontal because more cuts are needed at floor and ceiling. Total installed cost for a shower surround: $700-$2,500 depending on size and tile selection.
One pro tip: start with a perfectly level reference line regardless of whether the floor is perfectly level — any lean in the tile is more obvious on vertical installation because the eye has longer lines to follow.
8. A Pocket Door to Reclaim 6-10 Square Feet of Floor Space
A standard 24-inch bathroom door swings through approximately 9 square feet of arc. In a 35 square foot bathroom, that’s 25% of your floor area that exists only to let the door open. Small bathroom inspiration doesn’t always come from decor — sometimes it comes from reconsidering the basic mechanics of how the room functions, and a pocket door is the clearest example.
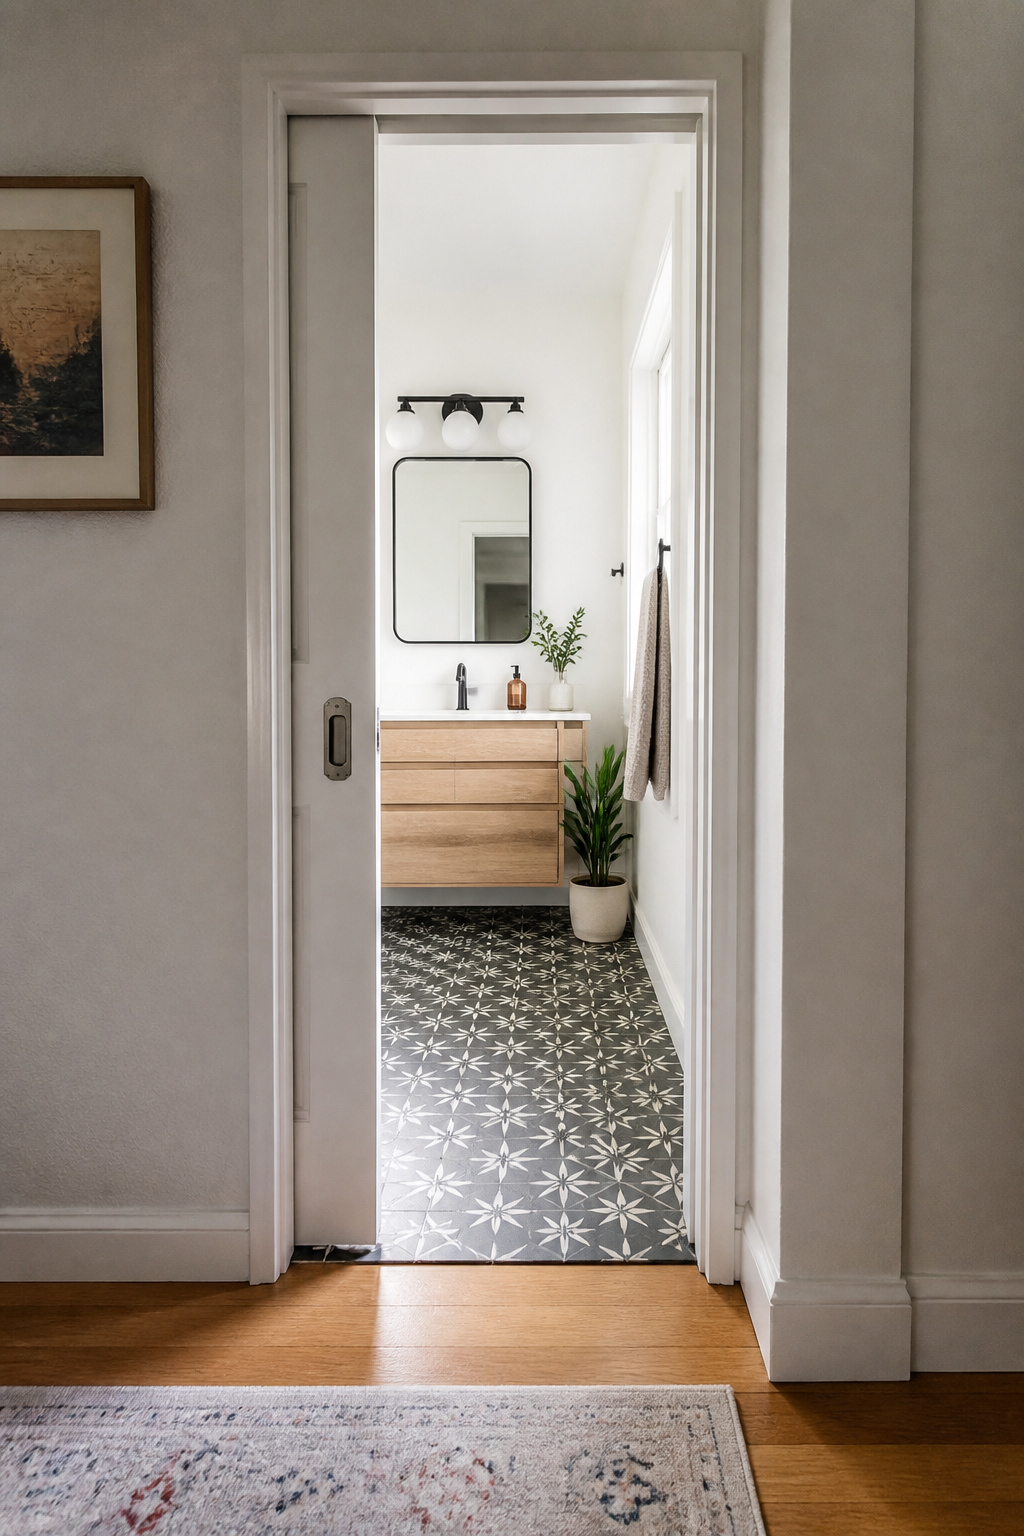
The math isn’t complicated, but seeing it written down changes how the option feels. Nine square feet is enough to add a narrow linen shelf, widen the clearance around the toilet, or simply make the room feel like it was designed with human bodies in mind.
Retrofitting a pocket door requires opening the wall cavity, installing a track frame, and finishing the wall again — $1,200-$2,500 professionally installed, typically a 2-3 day project including drywall repair. The non-negotiable pre-check: the wall the door slides into must be free of plumbing, electrical, and HVAC runs. That’s the most common deal-killer for retrofits, and it’s worth knowing before getting attached to the idea.
The renter-friendly alternative is a barn door: a surface-mount track on the outside of the wall, door slides to one side. Total cost runs $500-$1,500. No wall cavity work, minimal anchors. The trade-off is privacy — barn doors leave a small gap at the edges, which matters for bathroom doors more than most.
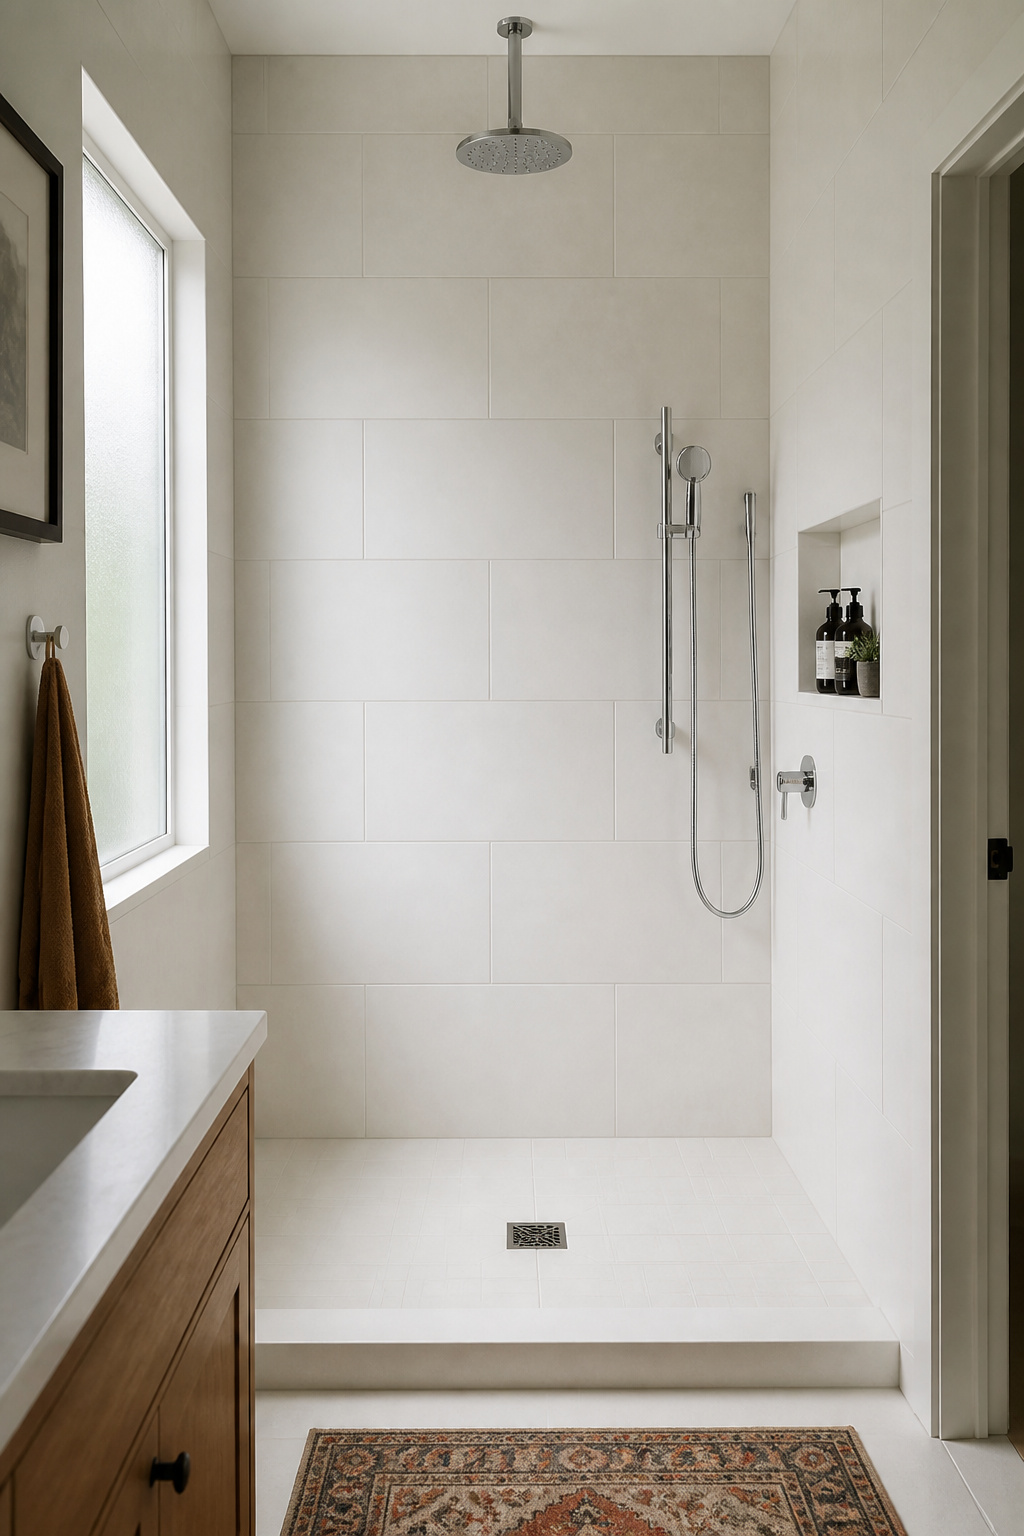
9. Built-In Shower Niches That Replace Cluttered Caddy Shelves
A hanging shower caddy is the most visually chaotic element in most bathrooms — a wire rack of differently sized branded bottles, inevitably with rust streaks on the grout below it. As small bathroom inspiration goes, a built-in niche is one of those changes that looks expensive and feels like an afterthought to execute. It turns storage into architecture: flush with the wall, looks like it was always there, takes up zero floor or visual space.
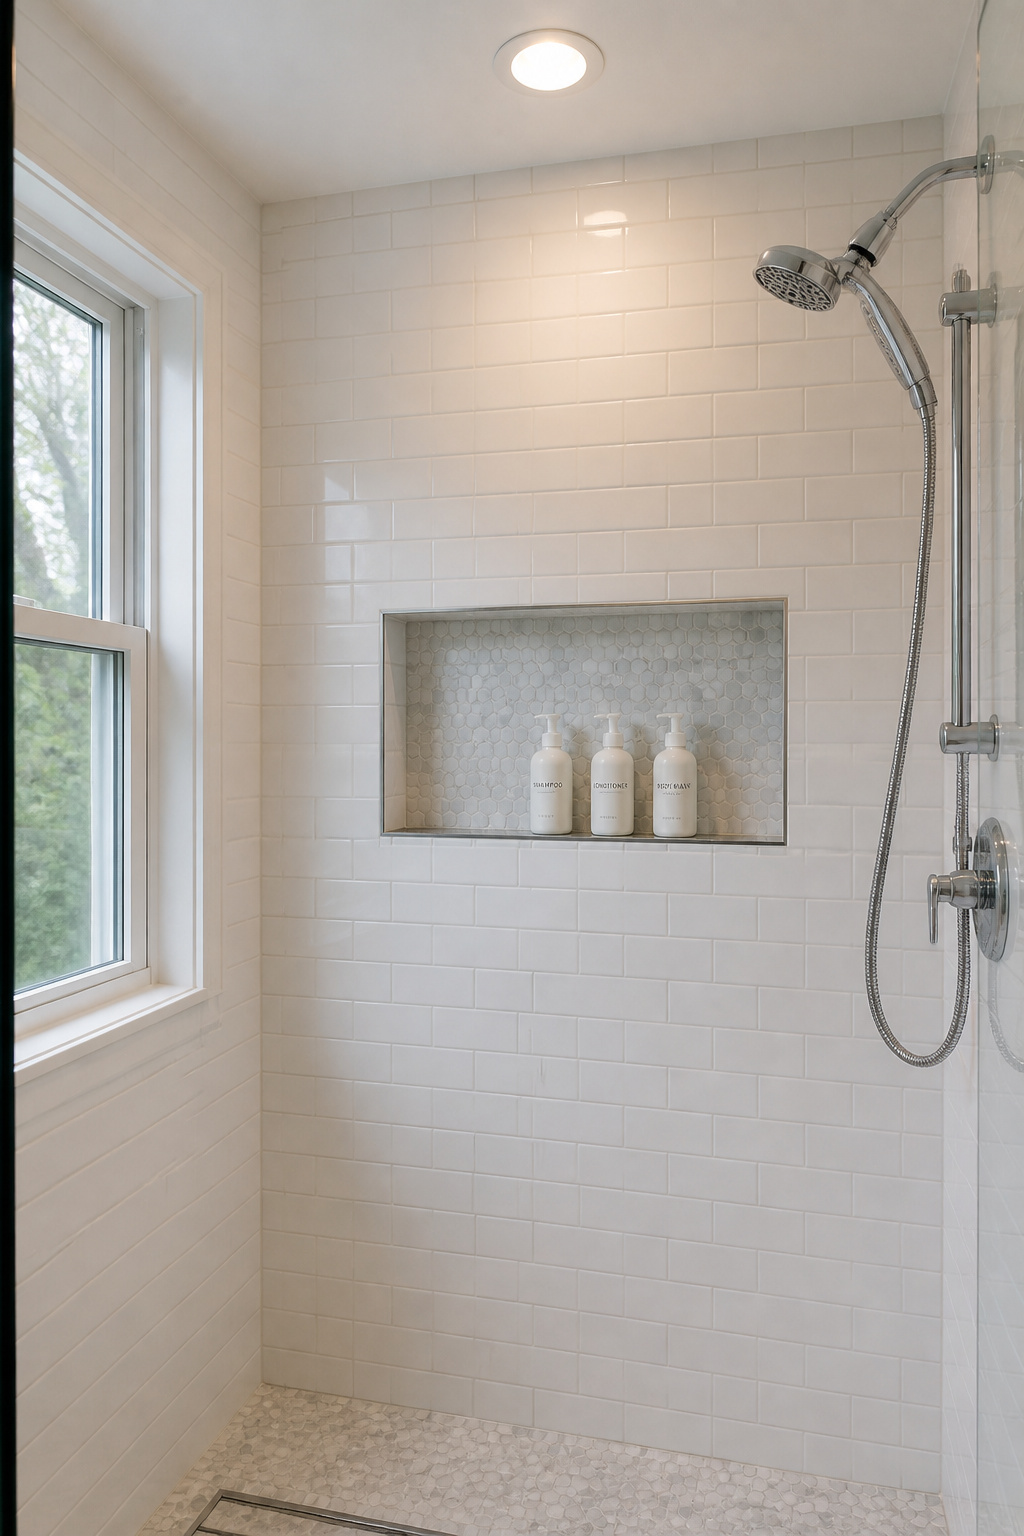
The standard single niche (12×24 inches) holds shampoo, conditioner, and 3-4 additional bottles comfortably, and fits between standard 16-inch-on-centre studs. Eye level while standing in the shower — typically 48-60 inches from floor — is the ideal placement height. Plan the niche before tiling; retrofitting one into an existing tiled shower requires removing a section of tile and replacing it, which rarely matches perfectly.
For DIY installation, prefab niche kits are the practical choice. Schluter’s KERDI-BOARD-SN ($60-$90) comes with an integrated waterproofing flange and is ready to tile immediately after installation. Noble Waterproof niches ($40-$80) are foam-based and more forgiving for first-time installers. Both fit between standard studs and can be tiled with the same tile as the surrounding shower wall.
Waterproofing is where niches fail: the inside corners between the niche sides and surrounding wall need liquid membrane before tiling. The niche bottom should slope slightly forward — about 1/8 inch — so water drains out rather than pooling. Grout inside the niche should be sealed annually. Unsealed niche grout is the most common source of slow water intrusion behind tile.
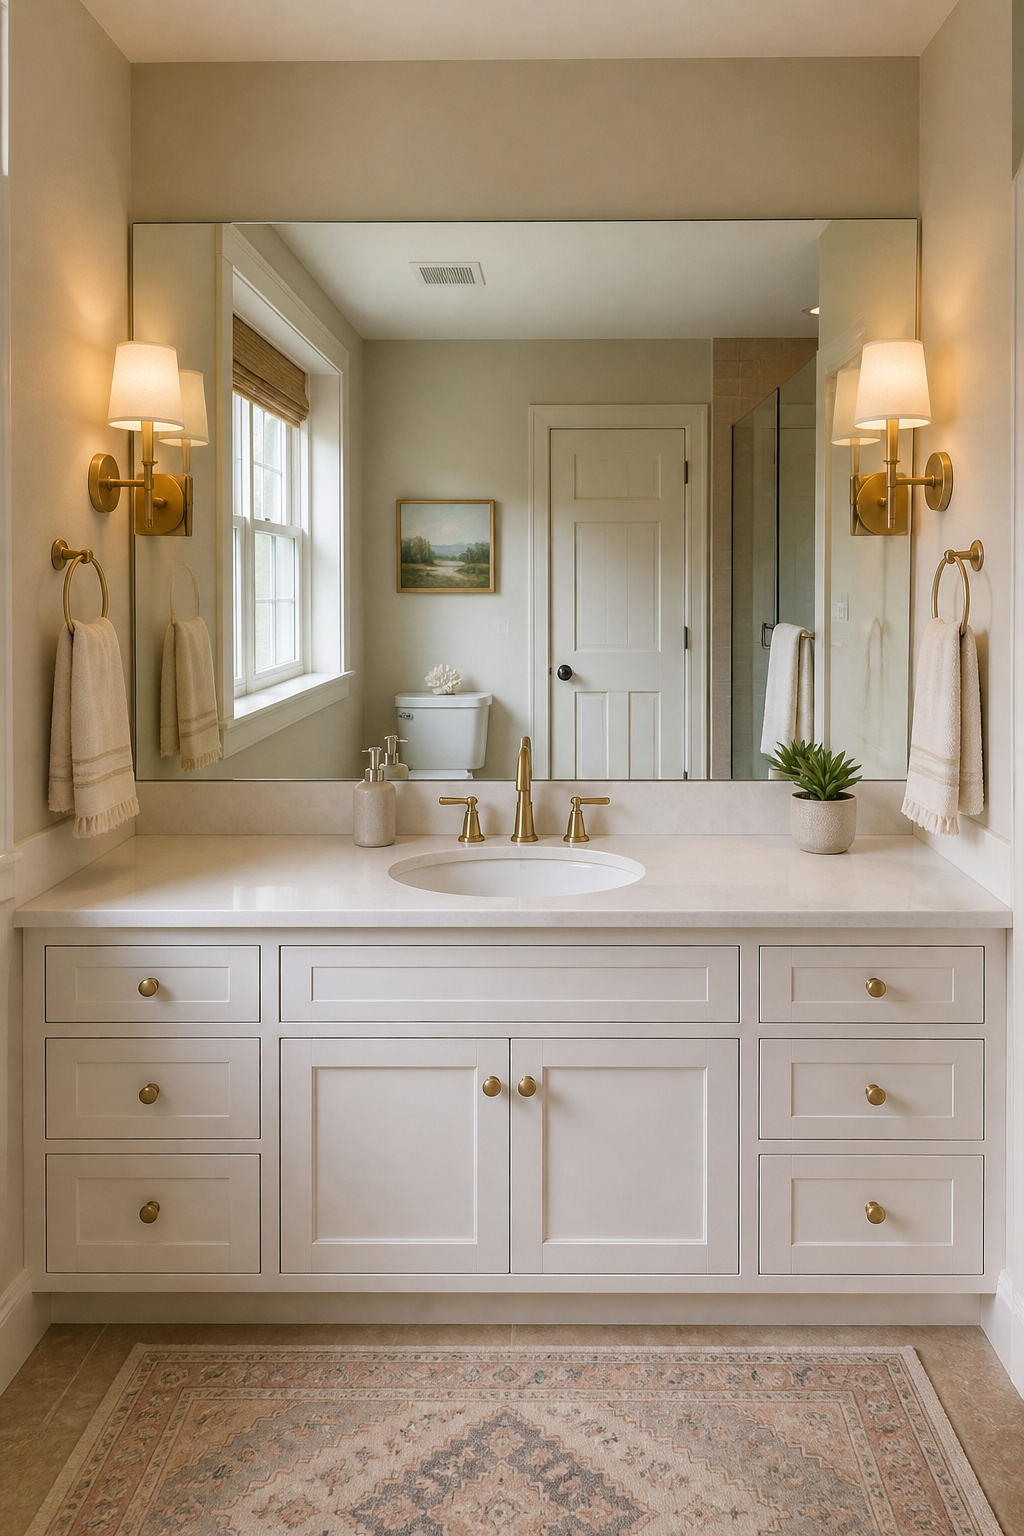
10. A Coordinated Colour Palette as Instant Small Bathroom Decor
This is the change that costs the least and gets noticed the most by people who visit your bathroom. It’s not a new fixture or a renovation — it’s a decision about which colours to use, and then actually doing it. For immediate small bathroom inspiration that requires nothing more than a shopping list, a coordinated palette is where to start.
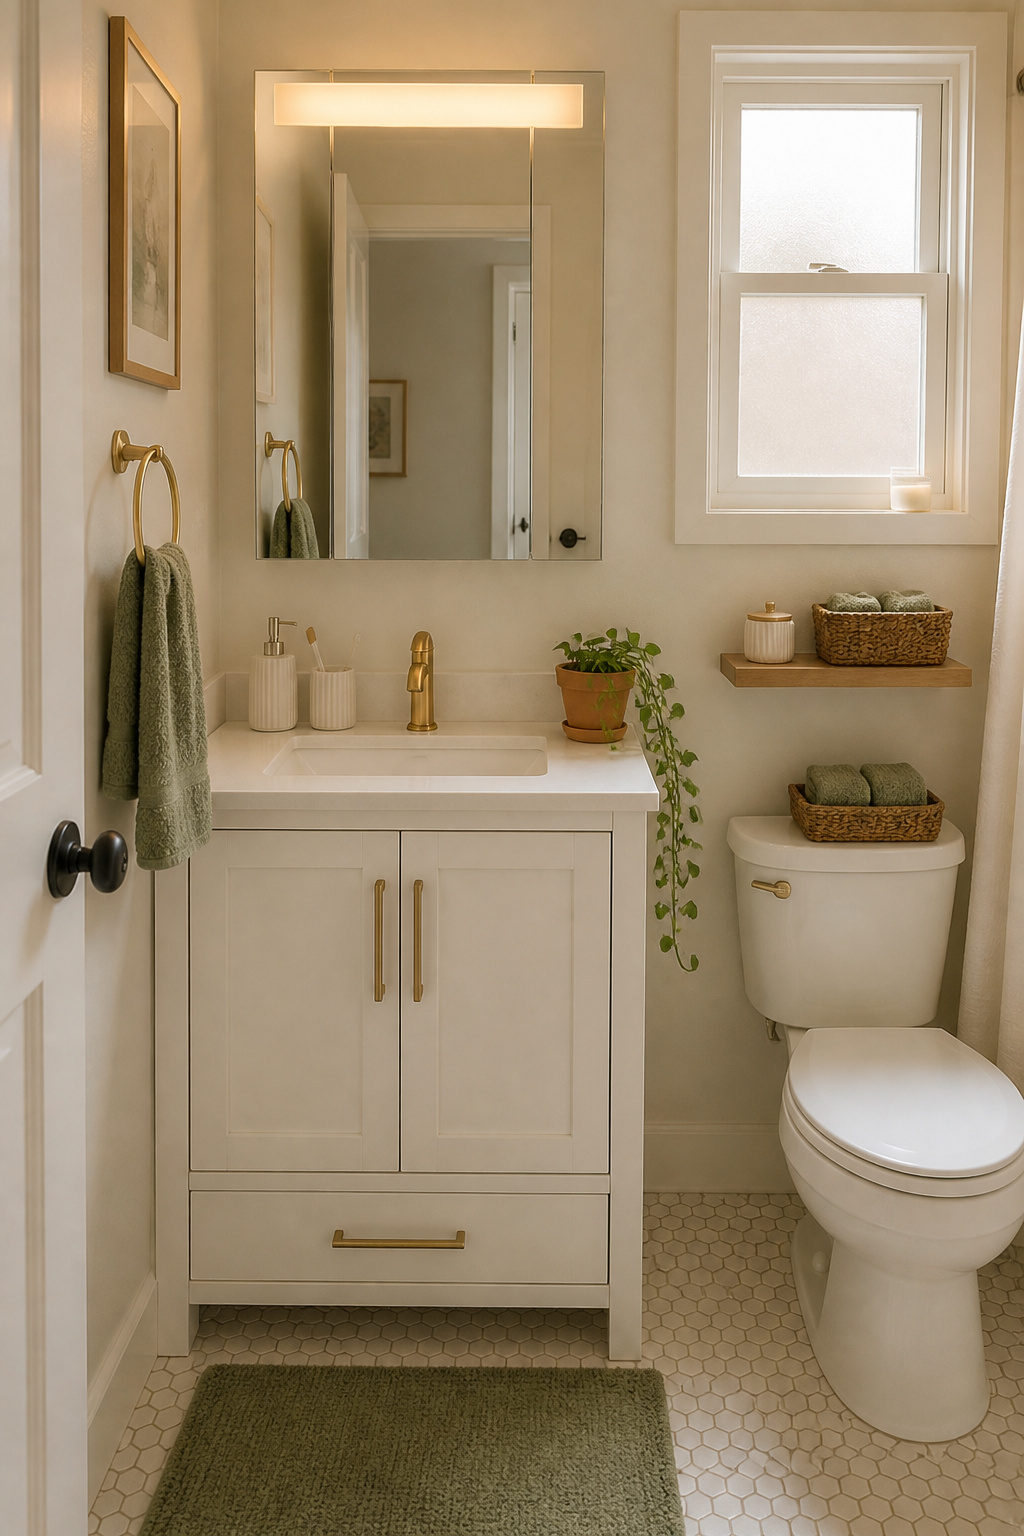
The principle is the 60-30-10 rule applied to everything in the room: 60% dominant (walls and large tile surfaces), 30% secondary (towels, vanity, larger accessories), 10% accent (hardware, plant, candle, single decorative piece). In a small bathroom, maintaining this ratio prevents the visual noise that comes from every accessory asserting a different identity.
Start with your fixed elements — the tile and floor, the bathtub or shower surround — and pick the palette from what’s already there. A bathroom with grey tile and white fixtures can go warm (blush towels, cream accessories, brass hardware) or cool (navy accents, white textiles, chrome) depending on which undertones you pull forward. The hardware finish (chrome, brass, matte black) counts as a colour in this calculation and should anchor your metallic choices throughout.
Pulling it together under $50: two matching bath towels and one coordinating hand towel ($15-$25 from Target or IKEA), a matching soap dispenser and toothbrush holder in a consistent finish ($12-$20), and one small plant. That’s it. The plant adds a natural element without requiring any design decision beyond “something living in a corner.”
11. Warm Bulbs to Replace Harsh Overhead Light
The single overhead fixture with a cool-white bulb is the design signature of every builder-grade bathroom that no one fell in love with. It creates shadows under your eyes and chin, makes tile look grey-green, and gives the whole room a clinical quality that has nothing to do with the actual tile or vanity quality. The lighting upgrade is the most accessible piece of small bathroom inspiration on this list — it costs $8-$15 and takes five minutes.

A bulb at 2700K produces the warm glow of an incandescent — flattering for skin, warm on surfaces, and spa-quality when combined with good natural tile. Anything above 3500K reads as cool-white and clinical. The sweet spot for most bathrooms is 2700K-3000K: warm enough to be flattering, bright enough to shave by. Test with one bulb before replacing all of them.
The bigger upgrade is adding lighting at eye level — specifically, sconces on either side of the mirror rather than relying on overhead light alone. Side sconces at 60 inches height from the floor eliminate the shadows that overhead fixtures cast on your face. Mount them 28-30 inches apart, centred on the mirror. For renters, plug-in sconces from IKEA (RANARP, around $30) or West Elm (~$80) can sit on either side of the mirror using an existing outlet — no wiring, immediate improvement. If you want to understand what bathroom lighting over mirror done right looks like across different configurations, it’s worth the deep dive.
12. A Skylight or Solar Tube When Window Space Is Limited
Natural light from above does something to a small bathroom that no artificial light can replicate: it makes the boundaries of the room feel soft. Corners aren’t hard-lit, the ceiling becomes a source rather than a flat surface, and the room reads larger in the same way a garden feels larger than a room of identical square footage. As small bathroom inspiration, it’s the change that people describe as transformative rather than just nice.
Homeowners who install solar tubes in windowless bathrooms consistently report forgetting to turn the light on during the day — one 10-inch tube on a sunny morning delivers the equivalent of 100-150 watts of daylight through the diffuser.
Solar tubes are the practical choice for most bathrooms: $600-$1,100 installed (average ~$850), 2-4 hour installation time, minimal ceiling opening. The flexible reflective tube can bend around joists up to 8-14 feet, making them workable in most attic situations. Traditional skylights cost $1,600-$4,200 installed and require structural work and interior finishing — appropriate for a full renovation, not a targeted upgrade.
One caution on sizing: a 14-inch tube in a 35 sq ft bathroom can be uncomfortably bright at midday in summer. A 10-inch tube is the right scale for most small bathrooms. For apartments or condos where cutting a roof opening isn’t possible, full-spectrum LED panels (5000K-6500K) installed in standard ceiling fixtures are the closest approximation — they’re not the same, but they’re dramatically better than a standard overhead bulb.
13. Vintage Hardware as Affordable Small Bathroom Decor
Hardware is the part of a bathroom you touch every day — the towel bar you grab wet-handed, the toilet paper holder, the door knob. It’s also the part most people last updated when the bathroom was built. Hardware-first small bathroom inspiration is one of the most overlooked strategies, because the impact is disproportionate to both the cost and the effort.
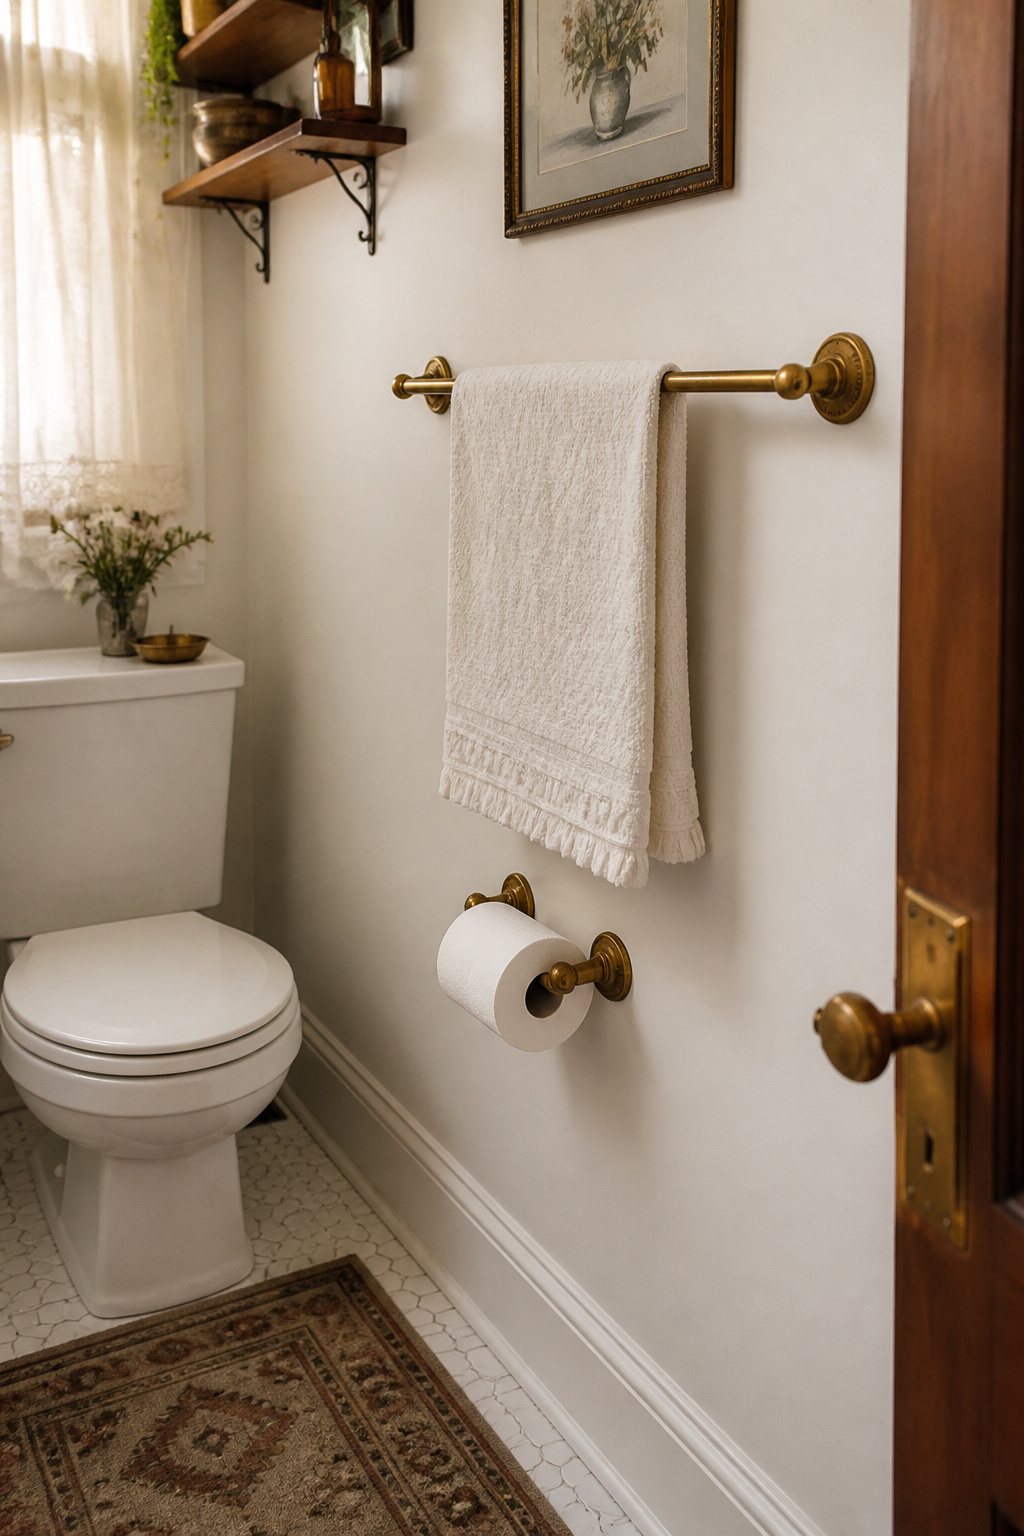
The three-piece set to target: towel bar, toilet paper holder, and door hardware. These form the visible metallic thread running through the room. Updating one and leaving the others looks like an unfinished project; updating all three reads as a design choice.
For sourcing vintage and interesting pieces: Etsy has a dedicated antique bathroom hardware category with towel bars and paper holders from $15-$80. Habitat for Humanity ReStores carry salvaged plumbing hardware at 50-70% below retail — quality varies, but that’s part of the appeal. Facebook Marketplace and estate sales surface complete vintage brass sets for $10-$30 regularly.
When mixing metal finishes — which vintage hunting makes inevitable — the two-metal rule keeps things from looking accidental: one dominant finish (70% of hardware) and one accent (30%). Warm metals (brass, bronze, gold, unlacquered brass) mix naturally together; they share an underlying warmth that makes varied pieces look collected rather than mismatched. Mixing warm and cool finishes (brass towel bar, chrome faucet) works when done deliberately but looks like an oversight when it isn’t.
14. A Wet Room Layout That Removes the Shower Enclosure
A wet room takes out the glass screen or curtain entirely. The whole floor is waterproofed, the drain handles wherever the water lands, and the shower is just the bathroom with the water on. The visual result: a bathroom that reads as twice its actual size because there are no partitions dividing the space. It’s the boldest piece of small bathroom inspiration on this list, and also the most committed.
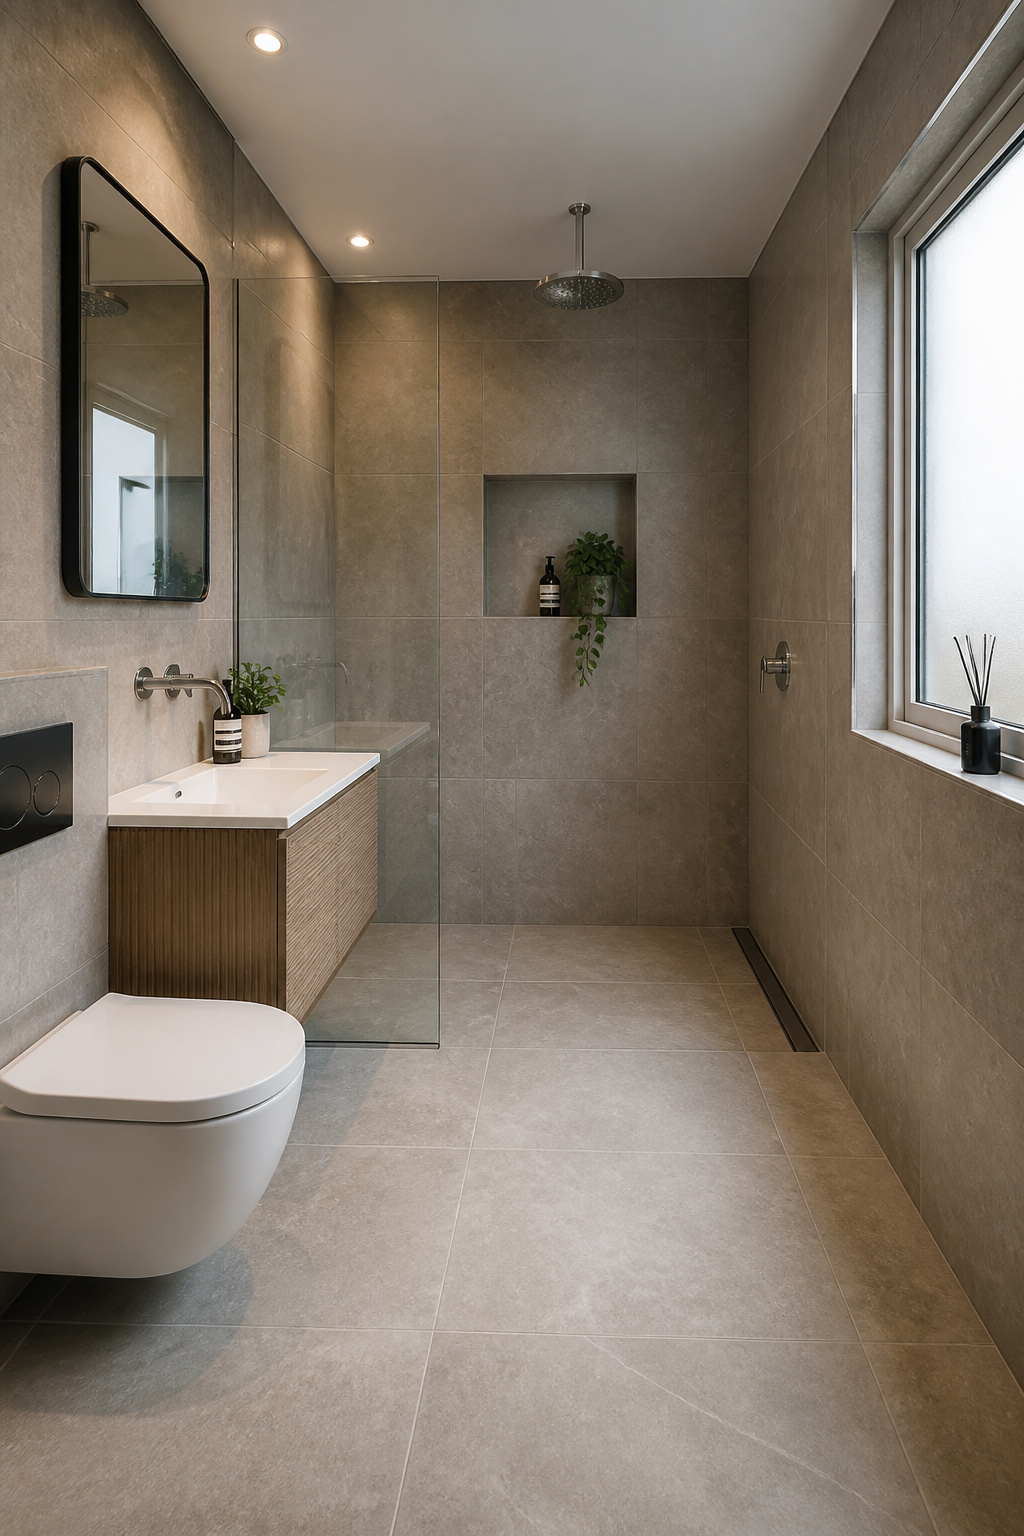
The most practical context for a wet room is a bathroom where the shower is already so cramped that the enclosure itself is the problem. Remove the enclosure and the full room width becomes usable shower space — a 3×3 shower stall becomes a 5×7 wet zone. These layouts work precisely because they make limited square footage work harder.
Structural requirements: the floor must slope 1/4 inch per foot toward the drain (this is both code and physics), and a waterproof membrane must cover the floor and walls to at least 6 feet high continuously. Linear channel drains ($80-$400) are the preferred drainage choice because they allow a single-direction slope rather than a four-way pyramid slope to a centre point.
Cost reality: a full wet room conversion averages $13,000 nationally, with a range of $5,000-$35,000 depending on size and finish. That’s not small-budget territory. A walk-in shower conversion — removing the enclosure and adding just a glass half-wall or no barrier at all — is a more accessible middle ground at $2,000-$6,000. Either way, plan for an exhaust fan upgrade; wet rooms need serious ventilation to prevent humidity from migrating to the rest of the house.
15. One Statement Piece as Bathroom Inspiration on Any Budget
A bathroom with one strong focal point reads as designed. The same bathroom with ten medium-attention decorative items reads as cluttered. In small bathrooms, visual competition between accessories is amplified — you see everything at once from a few feet away, and the eye needs somewhere to land.
The statement piece doesn’t need to be expensive. It needs to be the clear visual winner.
At $0: repositioning is the most underestimated move in home design. Moving a piece of art from a hallway to above the toilet, or hanging a mirror you already own in a new spot, creates a focal point for free. The constraint of the small bathroom is actually an advantage here — there are only so many walls.
At $20-$50: a large framed print above the toilet (IKEA RIBBA frame plus a printable from Etsy for under $30 total), a dramatic plant in a corner (a monstera or snake plant in a good pot), or a set of matching glass apothecary jars on the vanity.
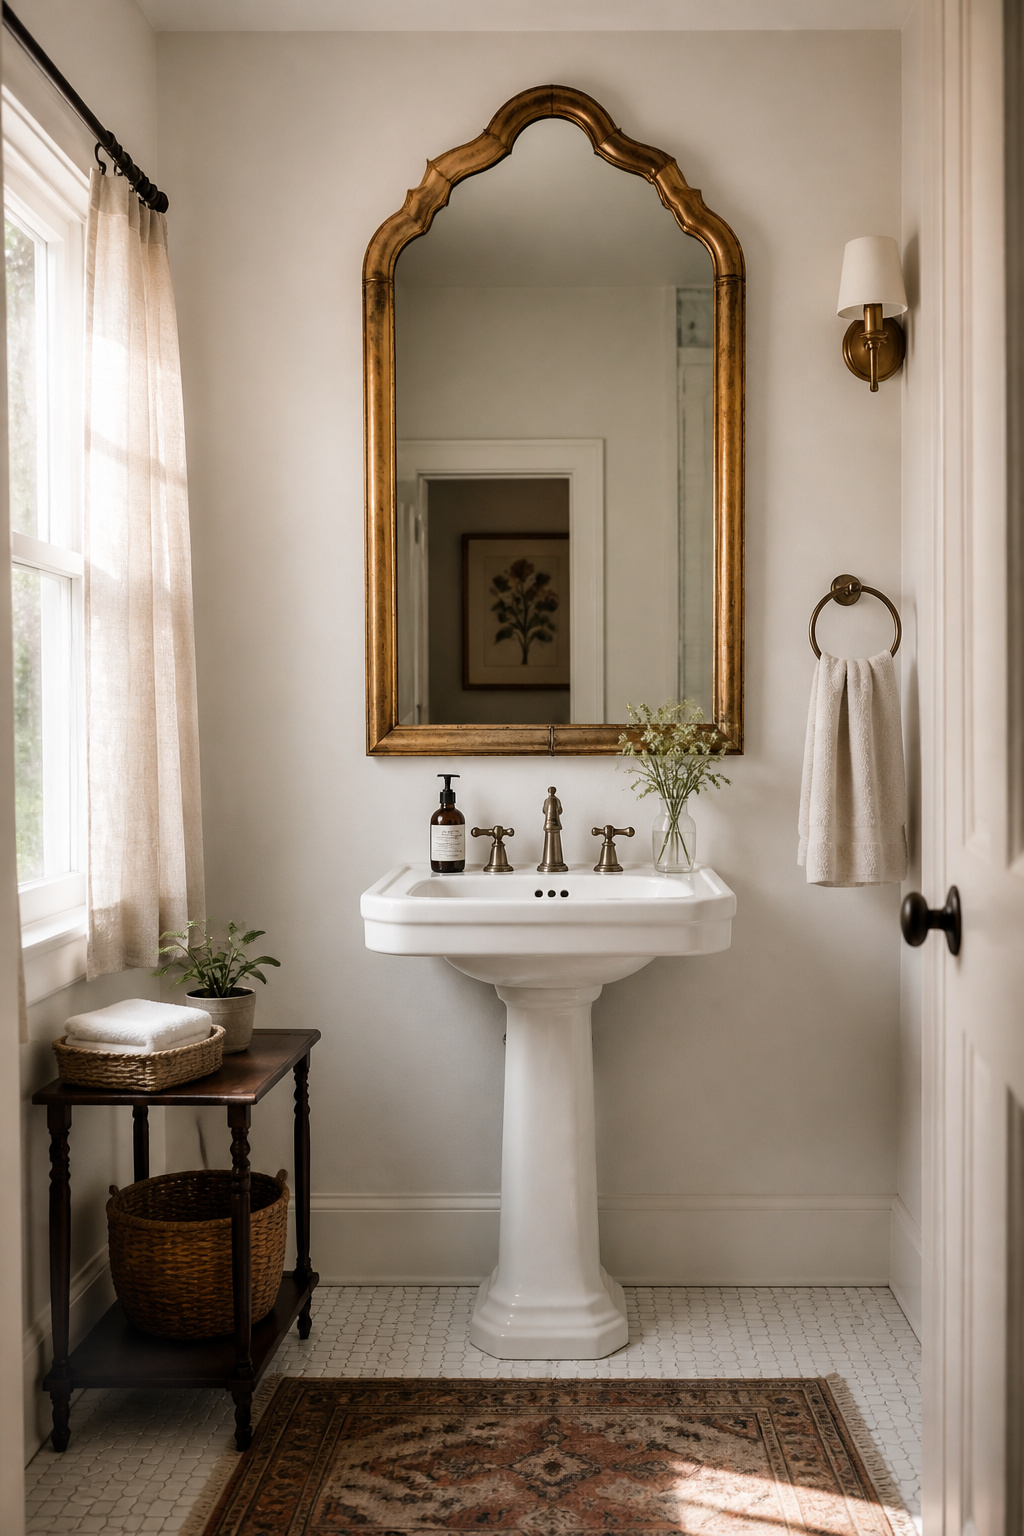
At $100-$500: a vintage mirror with architectural detail (scalloped edge, ornate frame) sourced from Facebook Marketplace or an estate sale for $20-$80 and hung as the room’s central piece. For unusual pieces at accessible prices, Facebook Marketplace and estate sales consistently surface architectural salvage — original cast-iron clawfoot tubs at $200-$800 unrestored, vintage medicine cabinets with bevelled mirrors for $50-$200.
16. Maximalist Small Bathroom Ideas for When Minimalism Isn’t Your Thing
A lot of small-bathroom advice is about reduction — fewer things, lighter colours, cleaner lines. If that’s not who you are, here’s the truth: small bathrooms are ideal for maximalism, because the financial and physical commitment is contained. You can do a lot with $300 in a 40 sq ft bathroom. The same approach in a 400 sq ft living room would cost ten times as much.
The rule that keeps maximalist small bathroom ideas from becoming chaotic is simple: one anchor element that everything else supports. A bold geometric tile floor, a dramatic wallpapered wall, a ceiling painted in a deep jewel tone — pick one. Every subsequent layer should either echo the colours in that anchor or contrast deliberately with its texture. Pattern mixing works when patterns share at least one colour in common. A large botanical print and a small geometric tile are natural partners if both carry the same shade of green.
Layering texture matters more than pattern in a small space. Glossy tiles plus matte painted walls plus rough woven textiles — these are three different textures at different scales, and the contrast between them creates visual richness without pattern overload. Jewel tones (deep teal, sapphire, emerald, plum) anchor bold patterns well; pastels and primaries tend to compete rather than harmonise.
The edit that keeps maximalism liveable: hide functional clutter, keep decorative items visible. All the art on the walls can stay; the seven products on the back of the toilet cannot. The doorway test — stand in the doorway and identify where your eye goes first. If it goes to one dominant element, the room is working. If it scatters across six things of equal weight, something needs to go into a cabinet.
17. The $100 Refresh: Paint, Hardware, and a Better Mirror
This is the one for people who want to do something this weekend without committing to a renovation. A $100 bathroom refresh, done in the right order, changes more about how a room feels than $500 spent randomly.
The right order is paint first, hardware second, mirror last. Paint transforms the room’s background — everything else is evaluated against it. Hardware is evaluated as a set — update all the matching pieces at once. The mirror swap comes last because it’s often the highest-impact single change, and you want to see it against the fresh paint.
Budgeting and Paint Selection
Paint budget: one quart of bathroom-specific satin finish covers about 100 sq ft, enough for a 5×8 bathroom in one coat. Most small bathrooms need two coats, so buy two quarts. Behr Premium Plus Ultra (around $30/quart at Home Depot) covers consistently with built-in primer. Benjamin Moore Aura Bath & Spa (~$40/quart) has an antimicrobial finish designed for high humidity and lasts longer between repaints. Sherwin-Williams Emerald Interior is worth the extra for darker colours where coverage matters.
The Hardware and Mirror Swap
Hardware update on $0-$20: Rust-Oleum spray paint on existing fixtures. Etching primer first, then two thin coats of matte black or satin brass spray paint. The result looks intentional, not spray-painted, if you prep properly. For the mirror: the builder-grade frameless mirror glued to the wall can be replaced with a thrifted find with an architectural frame for $15-$50 from Facebook Marketplace or an estate sale. A framed mirror grounds the vanity below it in a way the utilitarian glued pane never can. The related budget-friendly bathroom wall decor projects have more no-contractor ideas worth borrowing.
The one prep mistake that makes the whole project fail: skipping wall cleaning and primer before painting. New paint over grease, dust, or existing gloss without primer peels within months. Wipe walls with a damp cloth, let dry fully, and if the existing paint is glossy, sand it lightly before rolling on the new coat.
Picking Your Small Bathroom Inspiration Starting Point
Before spending anything, the most useful question is: do you own this bathroom or rent it? That single fact determines which half of this list is available to you.
Renters have more small bathroom inspiration options than most assume. Paint (most landlords allow it with notice), peel-and-stick wallpaper, plug-in sconces, open shelving with patched mounting holes, matching accessories, and warm bulb swaps are all renter-appropriate changes that leave no permanent trace. The mirror swap, the colour palette coordination, and the $100 refresh are entirely within reach.
Owners have access to the structural changes — floating vanities, pocket doors, shower niches, wet rooms, skylights, floor-to-ceiling tile. These are the moves that genuinely transform the square footage rather than just the surface.
For immediate impact in a weekend, the sequence that changes the most per dollar: paint first (the background for everything else), then the mirror swap, then matching accessories. That’s a $60-$100 investment and two days of work. It won’t fix a cramped layout, but it will fix a bathroom that looks like no one thought about it — and that’s where most small bathrooms actually sit.
The measuring tape matters more than the mood board. Before ordering anything, know the peak height, the distance between studs, the clearance from toilet to wall, and the exact vanity width. Ten minutes of measuring saves three returns and two restarts. Whatever small bathroom inspiration you take from this list, start with the room you actually have — not the one you wish you had.