Last Tuesday, I was on a call with a client, looking at photos of their half-finished porch build that had gone completely off the rails. They had this gorgeous, magazine-worthy vision in their head—a sprawling oasis for entertaining, relaxing, the whole nine yards. But they’d jumped straight to picking out furniture and fancy string lights before they’d answered a single fundamental question. Now, they were staring down a $20,000 “fix” because the foundation wasn’t right for their sloped yard and the whole structure blocked the best afternoon light into their living room.
Everyone scrolls through Pinterest and thinks a great porch is about the right rug or a cool fire pit. It’s not. It’s about the boring stuff you do before you even call a contractor. Get the bones right, and the beautiful part is easy. Get them wrong, and you’ve just built a very expensive, very permanent mistake. So, you asked me for the real story? Here it is. Forget the corporate blog posts. This is the stuff that actually matters.
Phase 1: Foundation & Planning Your Dream Porch
This is the phase everyone wants to skip. Don’t. This is where you save yourself from headaches, massive budget overruns, and a finished product you secretly hate. Think of it as creating the blueprint. Every decision you make here dictates the success of everything that follows.
1. Assess Optimal Location for Sunlight and Views
You know what people always ask me? “Where should we put the porch?” as if it’s an afterthought. As a photographer, let me tell you: the single most important material you are building with is light. You have to understand how it moves across your property before you do anything else. A west-facing porch without a serious roof is an unusable furnace every single afternoon from May to September. North-facing light is soft and beautiful but offers zero warmth on a cool day.
So, get a chair and a drink. Sit in the proposed spot at 9 AM, 1 PM, and 6 PM. Do it in different seasons if you can. See where the sun is. See where the shadows fall. Where’s the best view? Now, where’s the view of your neighbor’s overflowing recycling bin? Your design needs to maximize one and hide the other. A well-placed wall or strategic planting can be the difference between a private sanctuary and an awkward stage.
This isn’t just about aesthetics; it’s about function. Once you know how the light and sightlines work, you can define exactly what you’ll be doing in that space.
2. Define Core Purpose: Relaxation, Dining, Entertainment
I once had a client who wanted a porch that was a “zen yoga retreat, a 12-person dining area, and a kids’ splash zone.” The result was a cluttered, chaotic space that was good for nothing. The biggest mistake is trying to make one space do everything. You can’t. You have to be honest with yourself and prioritize. Is this primarily for quiet mornings with coffee and a book? Or is it for loud, messy Saturday barbecues?
The answer dictates everything. A relaxation porch needs deep, Comfortable Seating and probably some screens. A dining porch needs to be close to the kitchen, with a durable, easy-to-clean floor and task lighting. An entertainment hub needs a logical flow for guests, clear zoning, and maybe a built-in bar. Be ruthless. Pick one, maybe two, primary functions. If you design for a specific purpose, you’ll use it constantly. If you design for every possibility, you’ll end up using it for none of them.
With a clear function in mind, you can now ensure the porch looks like it belongs there, not like it crash-landed next to your house.
3. Select Porch Style to Match Home Aesthetics
My biggest pet peeve is seeing a beautiful, historic Colonial home with a clunky, modern composite deck slapped onto the back of it. It’s visual chaos. Your porch is an extension of your home’s architectural story, and its style needs to respect that. A Craftsman-style home begs for a porch with tapered columns and exposed rafters. A mid-century modern home works with clean lines, a flat roof, and slender posts.
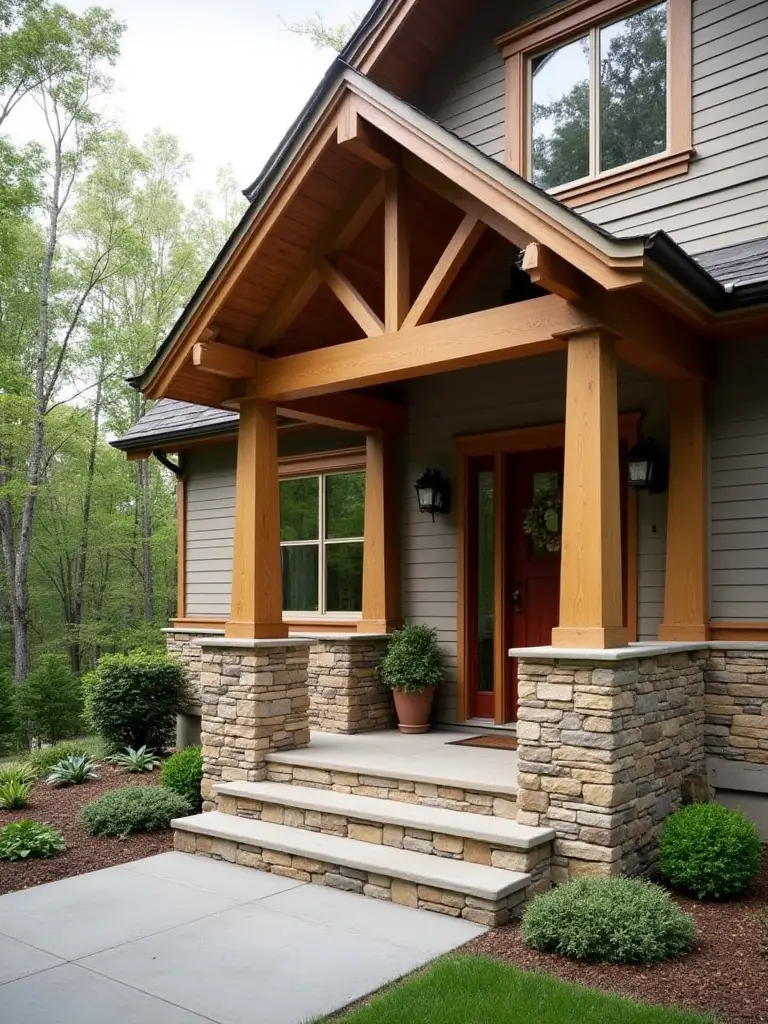
Look at the lines of your house. What are the window styles, the roof pitch, the materials? The porch should borrow from that language. This isn’t about creating a perfect historical replica; it’s about creating harmony. The scale, materials, and details—like railings and column types—should feel like they were part of the original architect’s plan. Get this right, and it adds immense visual cohesion and value. Get it wrong, and it will always look like a cheap addition.
A great-looking design is one thing, but if you can’t pay for it, it’s just a fantasy. Let’s talk money.
4. Determine Realistic Budget for Construction and Furnishings
Everyone underestimates the cost. Everyone. The numbers you see in online articles are often national averages that don’t account for your high-cost-of-living area or the fact that your yard is a muddy slope. A basic, open-air porch can start around $15,000, but a screened-in porch with electrical and a proper roof can easily hit $40,000 or more. And that’s before a single piece of furniture.

Here’s the shortcut I wish I’d known on my first project: work backwards. Figure out what you can realistically spend, then get at least three detailed quotes from reputable builders. The sticker shock is real, but it’s better to know upfront. Then, create two separate budgets: one for construction (the bones) and one for furnishings (the fun stuff). And whatever your final construction number is, add 15-20% on top for a contingency fund. You will need it. Forgetting this is the single fastest way to a half-finished project and a lot of stress.
Once your budget is locked in, you need to handle the least glamorous—but most important—step of all.
5. Evaluate Necessary Permits and Building Codes Early On
I know, your eyes just glazed over. But listen to me. This is the part that keeps your house from being red-tagged for demolition. Don’t assume anything. Don’t assume because your porch is “small” or “low to the ground” that you don’t need a permit. Just call your local municipal building department. It’s that simple. They will tell you exactly what you need.
Failing to get a permit is the definition of stepping over a dollar to pick up a dime. A neighbor reports you, an inspector drives by—suddenly you’re facing thousands in fines and might even have to tear the whole thing down. I’ve seen it happen. It’s ugly. Complying also ensures your porch is built to modern safety codes for things like railing height and structural load, which is critical for both your safety and your homeowner’s insurance.
Phase 2: Structural & Core Features for Functionality
Okay, the planning is done. Now we get to the part where you build something that will last. These are the big, expensive decisions that determine how your porch performs for the next 25 years. Don’t cheap out here.
6. Choose Durable Decking Materials for Longevity
The world of decking is complicated. You have traditional pressure-treated wood (cheapest upfront, highest maintenance), beautiful hardwoods like Ipe (gorgeous, expensive, needs regular oiling), and then the manufactured options like composite and PVC. Everyone says composite is “no maintenance.” That’s BS. It’s low maintenance. It still gets moldy if it’s in the shade and needs a good power washing.
For most people, a high-quality composite or PVC decking is the right call. It costs more upfront but saves you from the annual hell of sanding and staining a wood deck. I once recommended a stunning Cumaru hardwood deck for a client’s woodland home. The upkeep, dealing with the constant leaf stains and pollen, became their number one complaint. The real shortcut here is to match the material to your lifestyle, not just your budget. And always, always use a hidden fastener system. It gives you that clean, high-end look and prevents water from seeping into the screw holes, which is where rot begins.
With a solid floor beneath your feet, the next step is deciding what goes over your head.
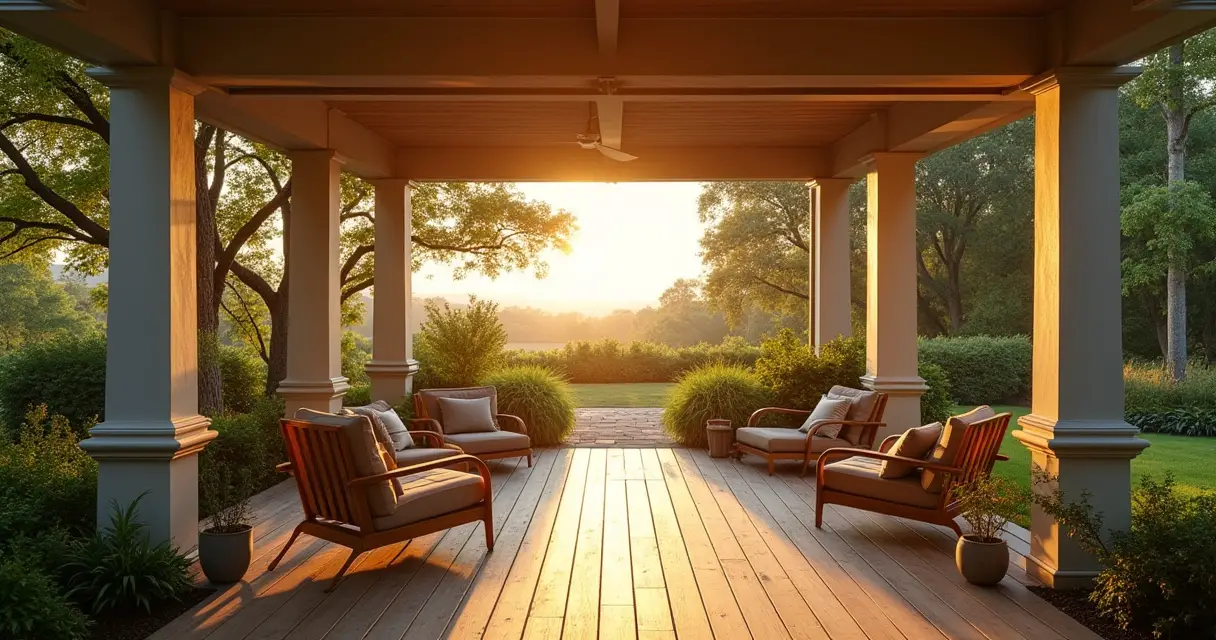
7. Integrate a Protective Roof or Pergola Design
An open deck is a fair-weather friend. It’s only usable on those perfect, 75-degree, slightly overcast days. If you want a space you can actually live in, you need a cover. Your choice is basically between a solid roof and a pergola. A solid roof provides total protection from rain and harsh sun. It truly creates an “outdoor room.” A pergola is more about architecture and atmosphere. It defines a space and creates beautiful, shifting patterns of light and shadow, but it won’t keep you or your furniture dry in a downpour.
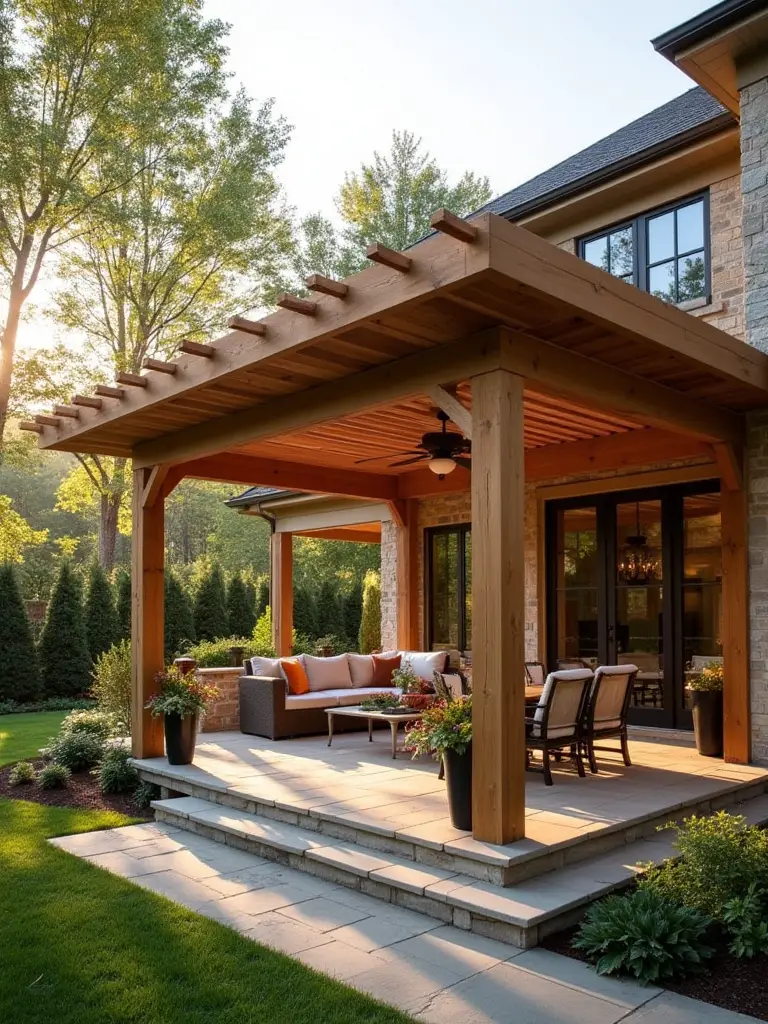
Think back to your porch’s purpose. If it’s for dining, a solid roof that lets you eat outside during a summer shower is a huge win. If it’s more of a transitional space to connect the garden to the house, a vine-covered pergola might be more poetic. And remember, a roof structure needs to be engineered to handle snow loads in colder climates and wind uplift everywhere else. This is not a DIY-weekend design job.
Whether it’s a roof or pergola, how you support that structure is just as critical.
8. Consider Elevated Foundations for Drainage and Views
Unless your yard is perfectly flat (it’s not), your porch will need to be elevated. Getting the structure up off the ground isn’t just for a better view—it’s essential for its survival. A porch built directly on a concrete slab or too close to the dirt is a magnet for moisture, rot, and termites. Elevating it on concrete piers or posts allows air to circulate underneath, keeping the entire substructure dry and healthy.
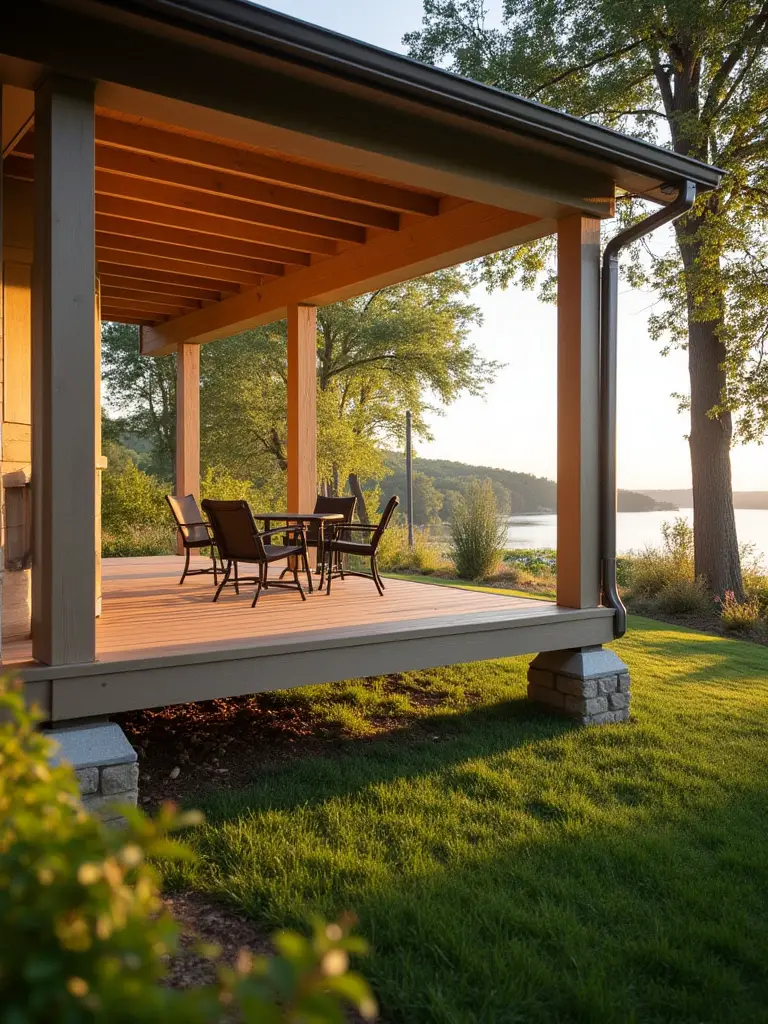
On a sloped property, this is your golden opportunity. Instead of fighting the slope, use it. An elevated “treehouse” style porch can deliver dramatic views and create a unique, floating sensation. The key is a professionally engineered foundation. A structural engineer will analyze your soil type and specify the right footing depth and pier size to ensure your porch remains stable and secure for decades. This is one of the “invisible” costs that is absolutely non-negotiable.
With all that structure, you can start building in the smart features that make life easier.
9. Add Integrated Storage Solutions for Practicality
Where do all the lumpy, damp cushions, citronella candles, and kids’ toys go when you’re not using them? If the answer is “in a pile in the corner,” you need integrated storage. This is the secret weapon of a truly functional, uncluttered porch. It’s the stuff you design in from the beginning, not what you buy later.
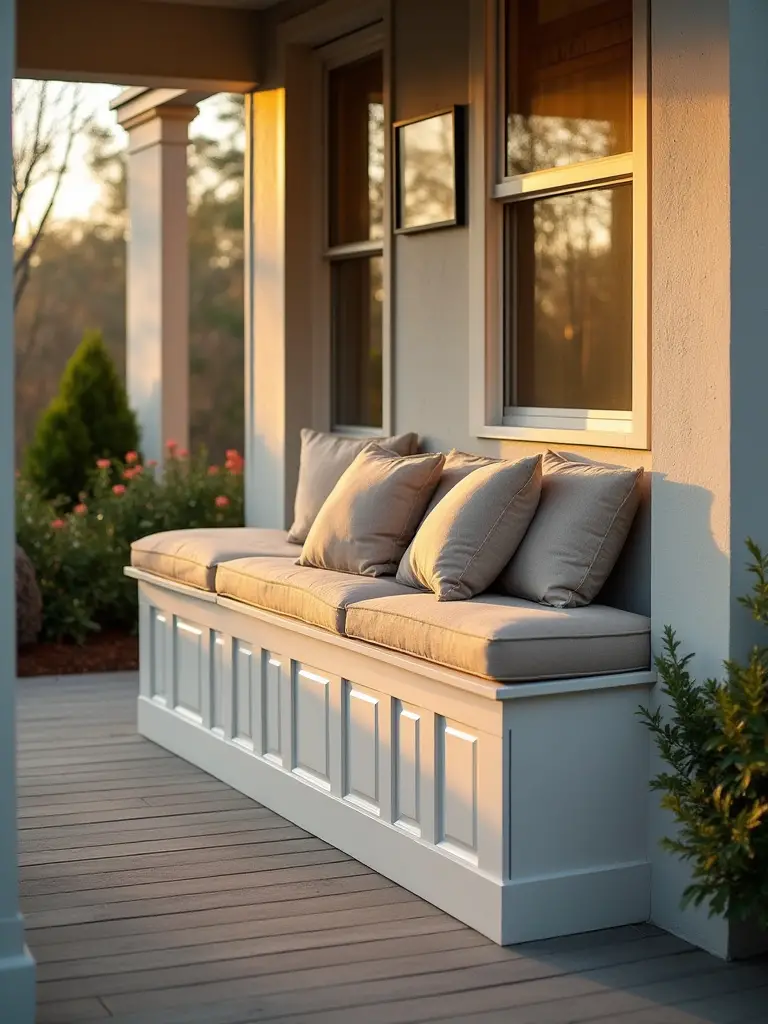
The best solutions are multi-functional. A long window-seat banquette can have a hinged lid that opens up to a massive storage chest. A solid base for a half-wall or railing can have Built-in Cabinets. Think about hiding storage under the deck itself, with a latticed access door. This is a game-changer. It keeps your porch looking clean and inviting instead of like a disorganized storage unit.
Storage is for when you’re done, but power is for when the party is just getting started.
10. Install Outdoor Electrical Outlets for Convenience
Stop running extension cords through a cracked-open door. It’s unsafe and looks terrible. Planning for electrical from day one is one of the smartest things you can do. You’ll want way more outlets than you think. Put them near seating areas for charging phones, near the dining area for a blender or crockpot, and even up in the ceiling for string lights or a fan.
The non-negotiable rule: every single outdoor outlet must be a GFCI (Ground-Fault Circuit Interrupter) outlet protected by a weatherproof “in-use” or “bubble” cover. This isn’t a suggestion; it’s a critical safety requirement that can save a life. Water and electricity are a fatal combination. The pro shortcut? Have your electrician install outlets that include USB-A and USB-C ports directly in them. You’ll thank me later.
One of the best uses for that ceiling outlet is to create your own breeze on a hot, still day.
11. Incorporate a Ceiling Fan for Optimal Air Circulation
A ceiling fan is the most underrated feature of a great porch. It does so much more than just move air around. On a hot, humid day, the gentle breeze can make the “feels-like” temperature drop by 5-8 degrees. Even better, that constant air movement is a massive deterrent for mosquitoes and other flying pests. They are weak fliers and hate the wind.
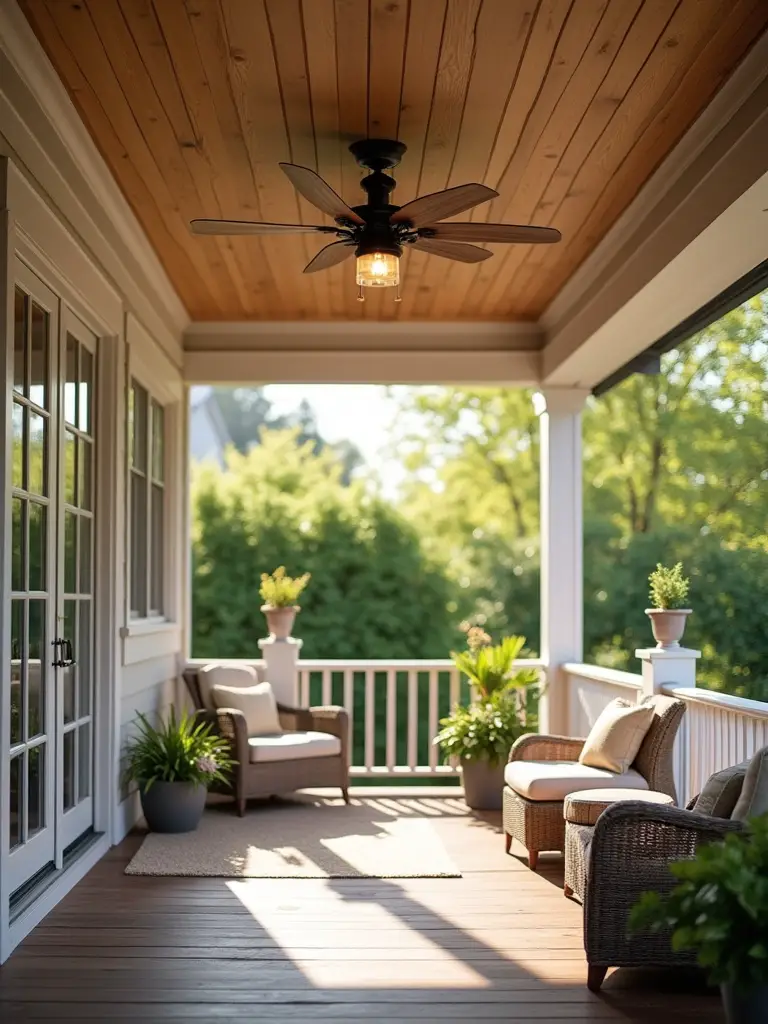
I learned this the hard way. I built a beautiful screened porch on my first house but skipped the fan to save a few hundred bucks. We barely used it in July and August because it was just a stagnant, sticky hotbox. When you buy a fan, it must be either “damp-rated” for a covered porch or “wet-rated” for a pergola or more exposed area. Installing an indoor fan outside is a recipe for a rusted, warped, dangerous failure in less than a year.
Phase 3: Enhancing Comfort, Privacy & Versatility
The structure is solid, the utilities are in. Now you get to make it a place you actually want to spend hours in. This is about layering in comfort, gaining control over your environment, and making the space flexible enough to suit any mood.
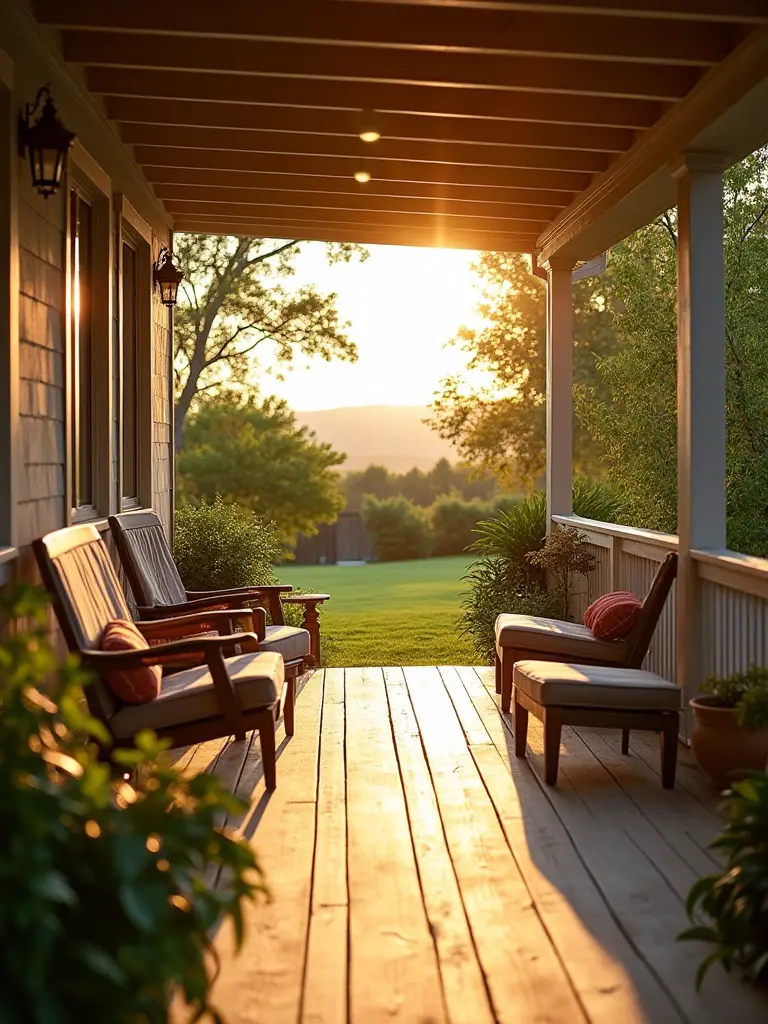
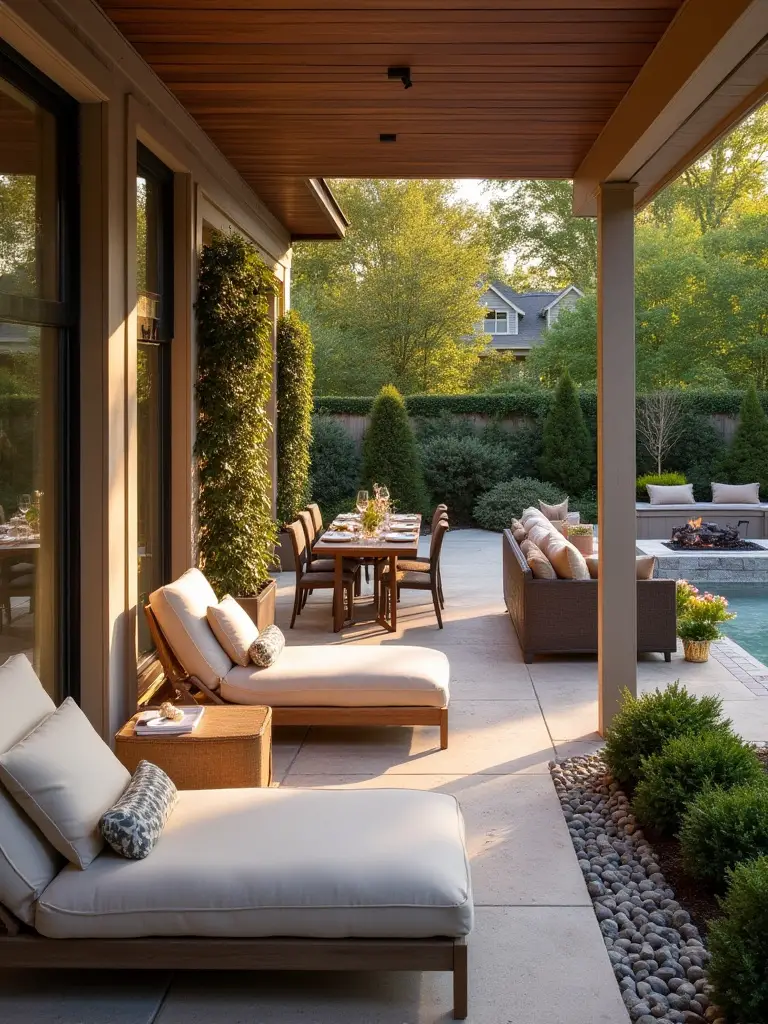
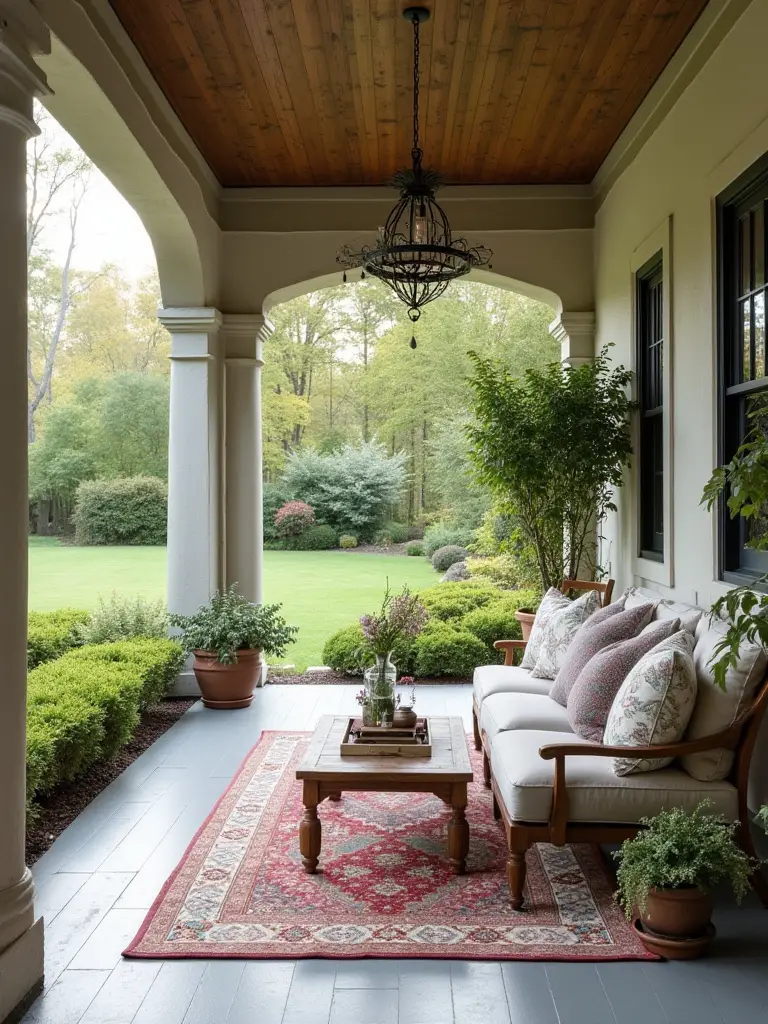
12. Select All-Weather Furniture for Lasting Comfort
Do not, I repeat, do not bring your indoor furniture outside. It will be destroyed by sun and moisture in a single season. Outdoor furniture is a true “you get what you pay for” category. Cheap metal will rust. Untreated wood will rot and splinter. The gold standard materials are things like powder-coated aluminum, teak, and high-density polyethylene (HDPE), which is a kind of recycled plastic lumber that can be left out year-round.
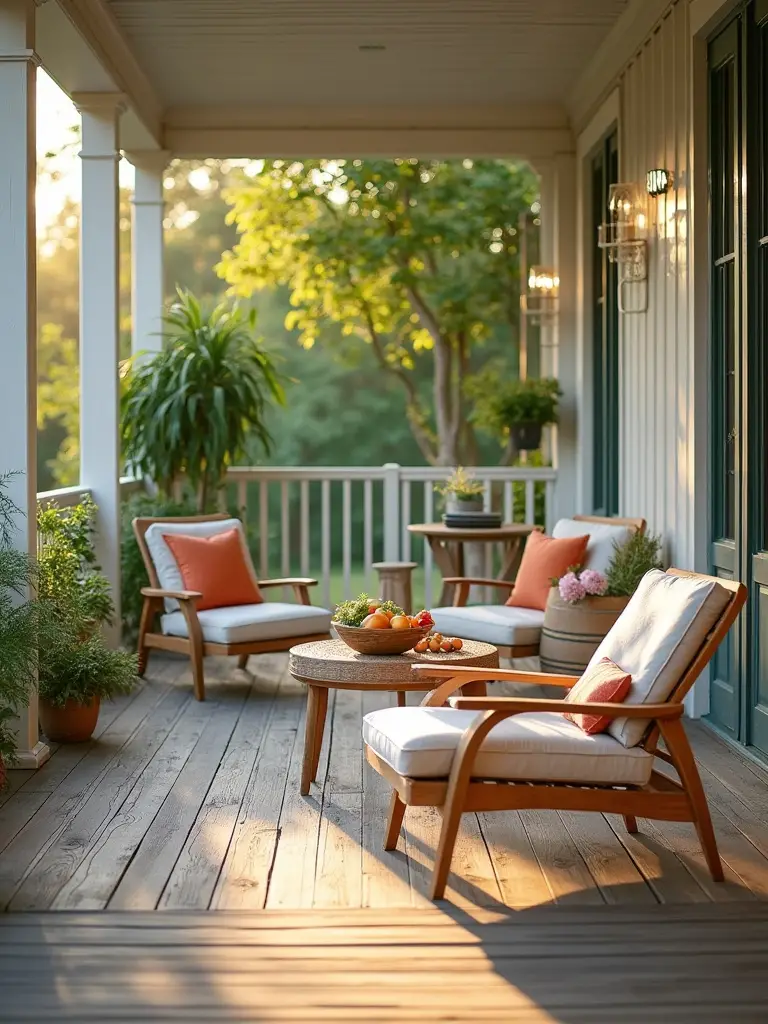
For fabrics, the only name you need to know is Sunbrella or a similar solution-dyed acrylic. This fabric is not dyed on the surface; the color is part of the fiber itself, making it incredibly resistant to fading from the sun. Yes, it’s more expensive. But buying cheap cushions that fade to a sad, pale version of their former selves in three months is a false economy. Invest in good frames and good fabric once, and you’ll have it for a decade or more.
Great furniture makes the space comfortable, but a sense of privacy makes it feel like a true retreat.
13. Add Retractable Screens or Curtains for Privacy
Your porch might feel great until your neighbor fires up their lawnmower ten feet away or their patio floodlight shines directly into your seating area. This is where dynamic, flexible privacy solutions are brilliant. Retractable screens, either motorized or manual, are the ultimate upgrade. They give you an open-air porch when you want it and a bug-free, private screened room seconds later.
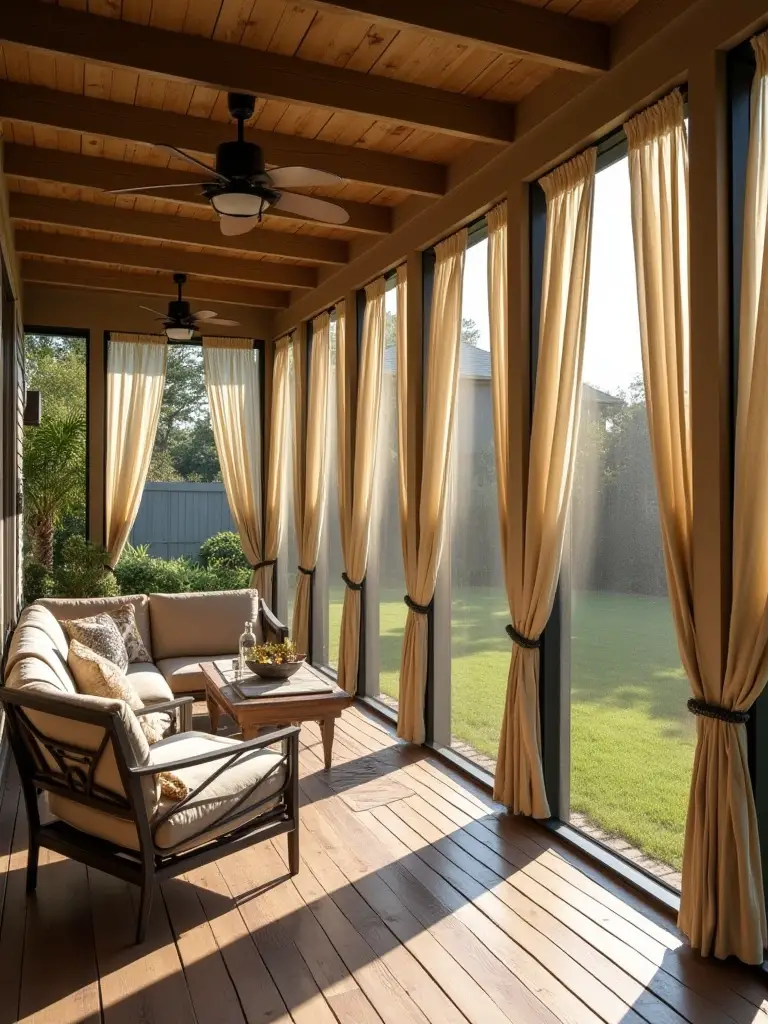
For a more affordable, softer approach, outdoor curtains are fantastic. Hung from a simple galvanized pipe or a proper track system, they can be drawn to block the hot afternoon sun, create a cozy sense of enclosure for dinner, or just hide you from view. They add texture, movement, and a resort-like vibe. Just make sure they are made from a proper outdoor fabric that resists mold and mildew, and that they are weighted at the bottom so they don’t whip around in the wind.
With comfort and privacy handled, it’s time to give the space a clear function for gatherings.
14. Design an Outdoor Dining or Bar Area
If your porch is for entertaining, you need to create a dedicated zone for it. This isn’t just about plopping a table in the middle of the space. Think about the flow. How do people get from the grill to the table? Where will you set out drinks so it doesn’t create a bottleneck near the door to the house? Use an outdoor rug to visually anchor the dining set and define it as a separate “room.”
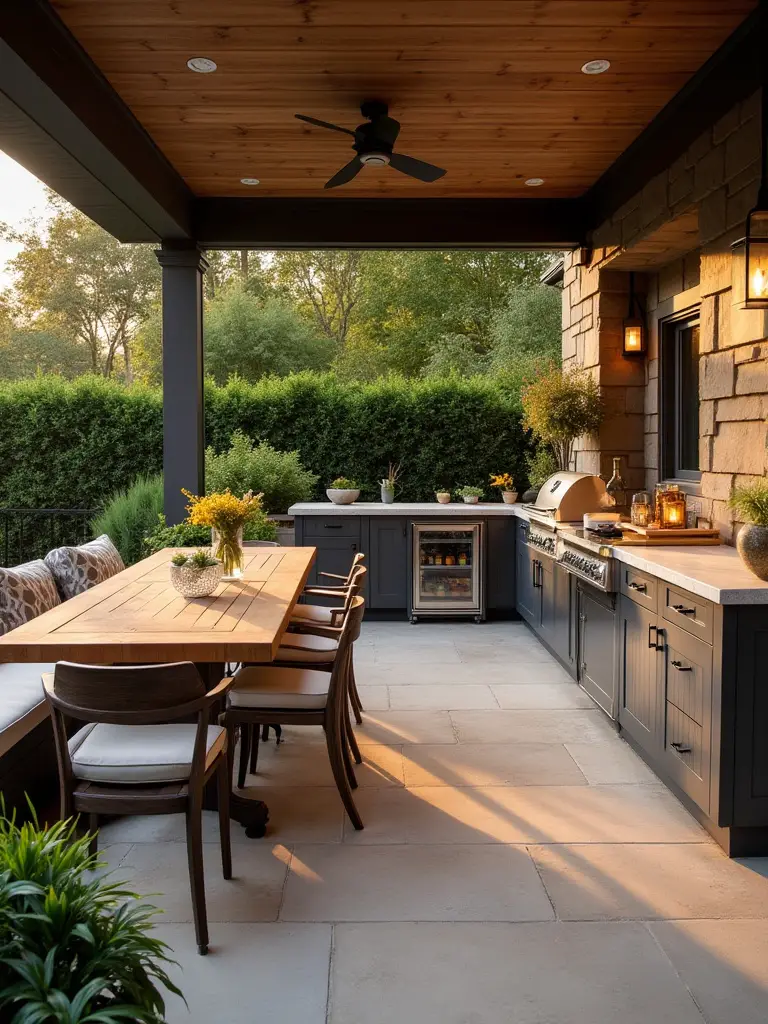
For a bar area, a simple high-top counter against a wall or railing can be enough. It gives people a place to lean and set a drink down, creating a natural social hub. The key is planning for the utilities. If you dream of an outdoor fridge or sink, that plumbing and electrical needs to be part of the initial construction plan. Retrofitting it later is a nightmare.
A great meal and good company deserve a proper soundtrack.
15. Install an Outdoor Sound System for Ambiance
Please, stop using that one tiny Bluetooth speaker. It’s either too loud for the people sitting next to it or too quiet for everyone else. Good outdoor audio is about creating an even, ambient blanket of sound, not a single point of noise. The secret is using a system of multiple, smaller, weather-proof speakers that are designed to work together.
You can mount them under the eaves of your roof, or for a more integrated look, use “rock speakers” that blend into your garden beds or even in-ground subwoofers. By distributing the sound, you can play music at a much lower, more pleasant volume and still have it audible everywhere. It’s a subtle luxury that makes a massive difference in the overall vibe, turning a simple get-together into a more sophisticated event.
As evening approaches or the seasons change, you’ll want to add some warmth.
16. Integrate a Cozy Fire Pit or Heat Source
A fire feature is the ultimate anchor for an outdoor living space. It’s primal. People are naturally drawn to the warmth and flicker of a flame, and it becomes an instant centerpiece for conversation. Your main choice is between a wood-burning pit and a gas-powered fire table. Wood is more authentic—the smell, the crackle—but it’s also messy, smoky, and subject to local burn bans.
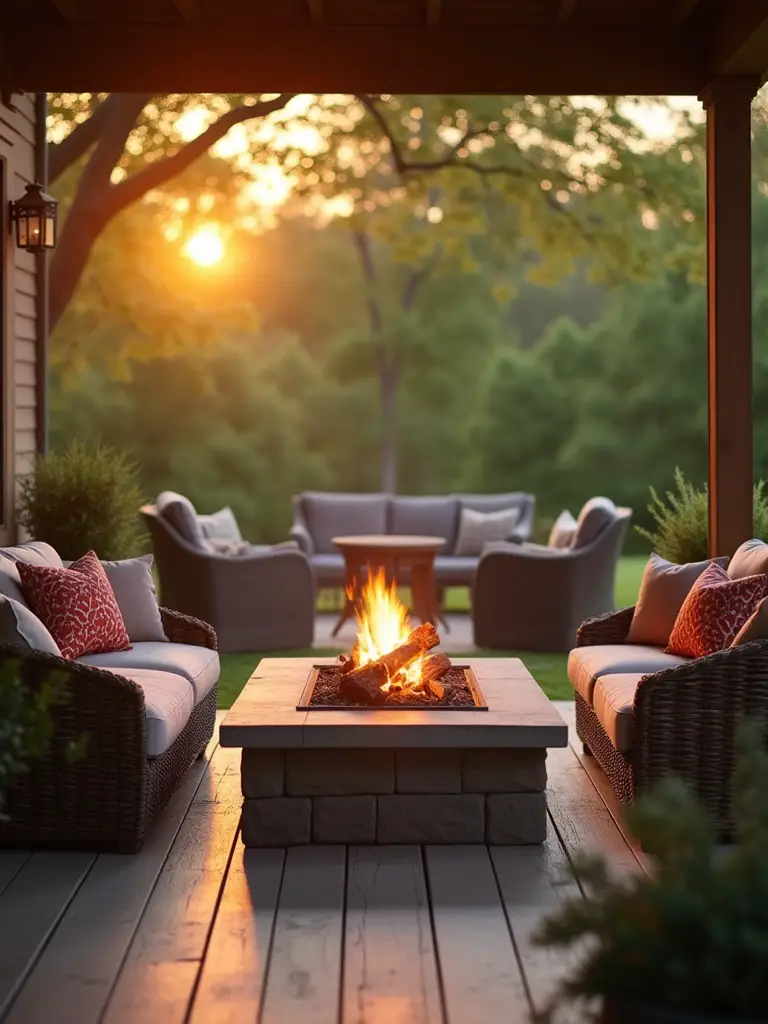
For a porch, especially a covered one, a propane or natural gas fire table is almost always the better, safer choice. It’s clean, instant on/off, and produces no dangerous embers that could ignite your decking. Safety is paramount here. Check your local codes for required clearances from walls and ceilings—they are strict for a reason. And remember, a fire feature provides warmth, but it won’t heat an entire porch. Think of it as a “campfire” for those gathered immediately around it.
For more flexible and widespread warmth, you need a different tool.
17. Incorporate Portable Heaters for Extended Season Enjoyment
This is the simplest way to add a couple of extra months to your porch season. Those tall, mushroom-shaped propane heaters you see at restaurants are powerful and can raise the temperature in their immediate vicinity by 10-25 degrees. There are also electric infrared options that can be mounted on a wall or ceiling, which are great for covered porches as they heat objects (like you), not the air.
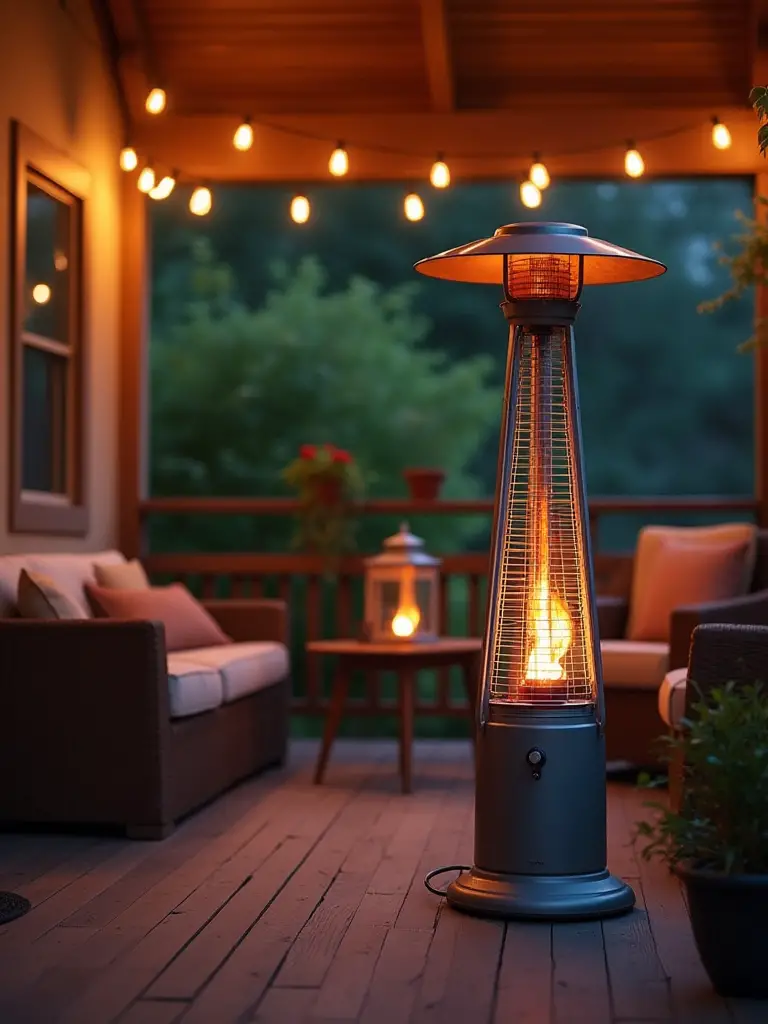
The key is understanding BTUs (British Thermal Units). You need enough power for your space. Don’t buy a small electric heater and expect it to warm up your large, open-air deck—you’ll just be disappointed. A couple of strategically placed portable heaters can make a crisp October evening feel like a pleasant September one, dramatically increasing the number of days you can comfortably use your investment.
Phase 4: Aesthetic Touches & Ambiance Creation
Alright, the hard work is done. The porch is functional, comfortable, and safe. This is the final, fun layer. It’s about adding personality, color, and texture to transform the well-built structure into a beautiful space that truly feels like you.
18. Layer Lighting Options for Versatile Evening Moods
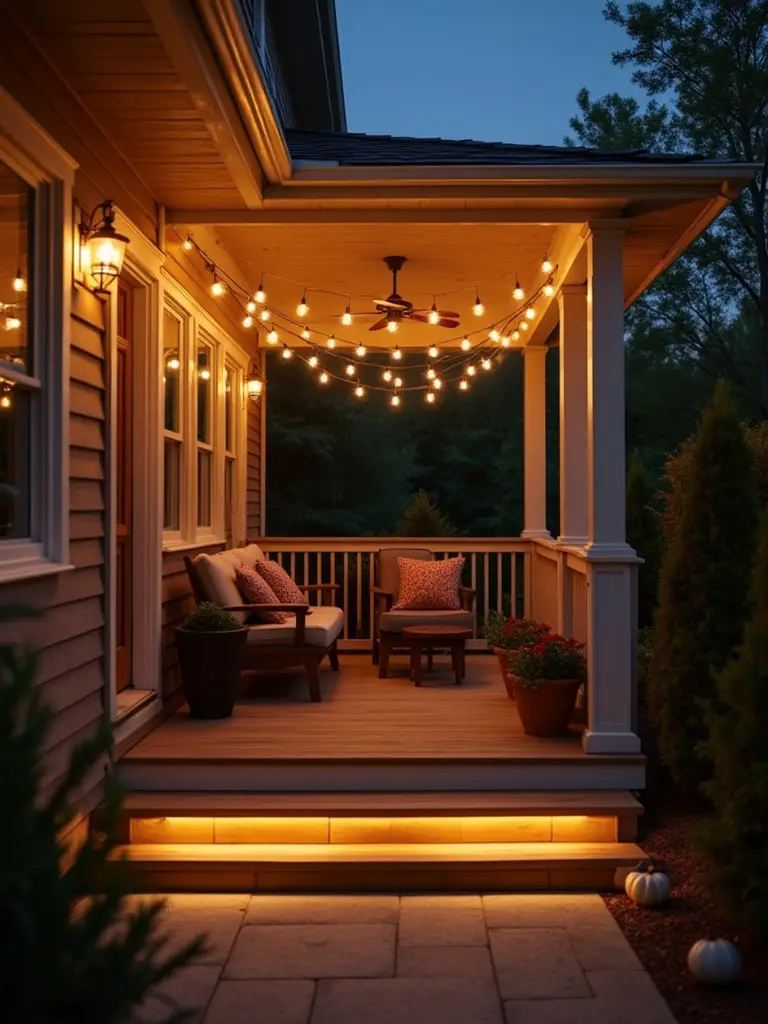
- Ambient Light: This is the overall base glow. String lights or uplighting into the roof structure are perfect for this. It sets the mood.
- Task Light: This is for doing things. A wall sconce over the grill, a pendant light over the dining table. It’s focused and functional.
- Accent Light: This is the drama. Small spotlights pointed at a beautiful plant, a stone column, or a piece of art. It creates depth and visual interest.
The most important tool you can install is a dimmer switch. On every single layer. This allows you to dial in the perfect mood, going from bright and functional for a dinner party to a soft, warm glow for a quiet nightcap. This is the single highest-impact, lowest-cost way to create a high-end feel.
Just as lighting defines the mood, a rug can define the space.
19. Select Cohesive Outdoor Rugs to Define Zones
An outdoor rug is the fastest way to make a porch feel like a room. Without one, furniture can feel like it’s just floating in space. A rug acts as an anchor, visually grounding your seating or dining arrangement and telling people, “This is a designated area.” It also adds a much-needed layer of softness and color underfoot.
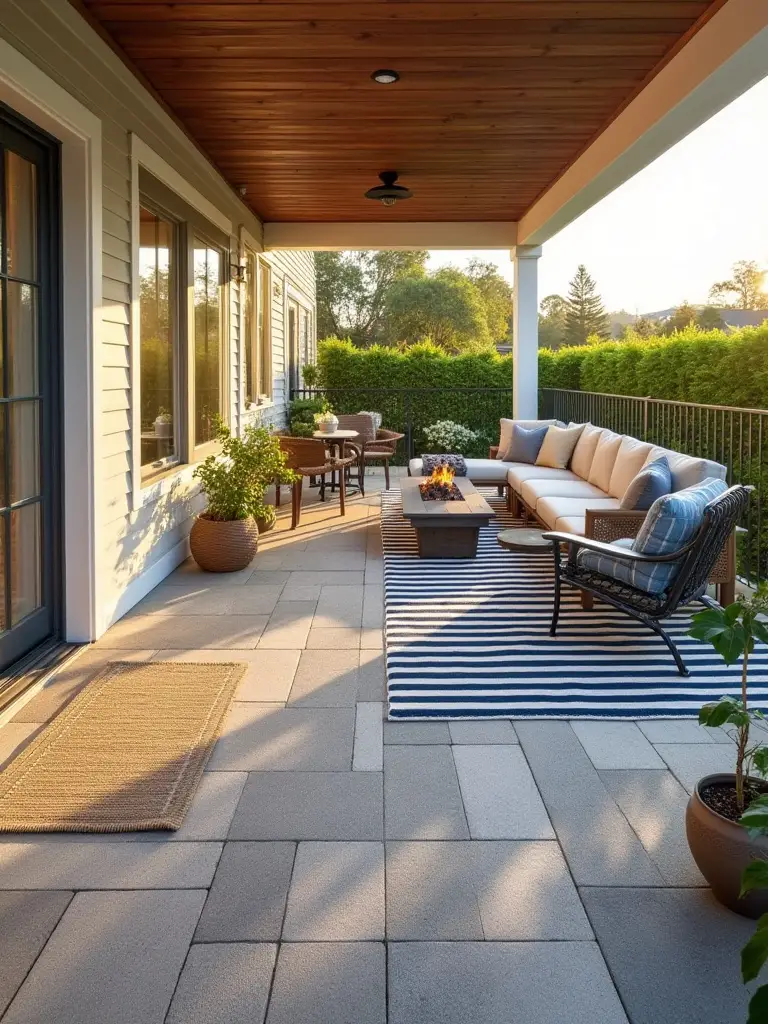
The only rule that matters: use a rug made from a synthetic material like polypropylene. They are essentially plastic, so they don’t absorb water, they resist mildew, and you can literally hose them off. Do not use a natural fiber rug like jute or seagrass unless your porch is 100% protected from rain; they will turn into a soggy, moldy mess. And make sure the rug is big enough. At least the front legs of all your furniture pieces should be sitting on it.
With the floor anchored, it’s time to bring in some life.
20. Incorporate Vibrant Greenery with Strategic Planters
A porch with no plants looks sterile and lifeless. Greenery is the bridge between the man-made structure and the natural world around it. It softens hard edges, adds color and texture, and makes the space feel alive. You don’t need to be a master gardener. A few well-chosen, strategically placed planters can make a huge impact.

Here’s the designer’s trick: use the “Thriller, Filler, and Spiller” rule for your containers. The Thriller is a tall, dramatic plant in the center (like a grass). The Fillers are mounding plants that fill out the middle (like coleus or petunias). The Spillers are trailing plants that cascade over the edge (like sweet potato vine or bacopa). This simple formula creates a lush, professional-looking arrangement every time. And choose planters that complement your home’s style—they are as much a part of the decor as your pillows.
Next, layer in those soft touches that scream “comfort.”
21. Add Decorative Pillows and Throws for Coziness
This is the easiest, most cost-effective way to inject personality and comfort. Pillows and throws transform hard-angled furniture into inviting, lounge-worthy spots. They are your chance to play with color and pattern without a major commitment. You can swap them out seasonally to completely change the vibe of your porch.
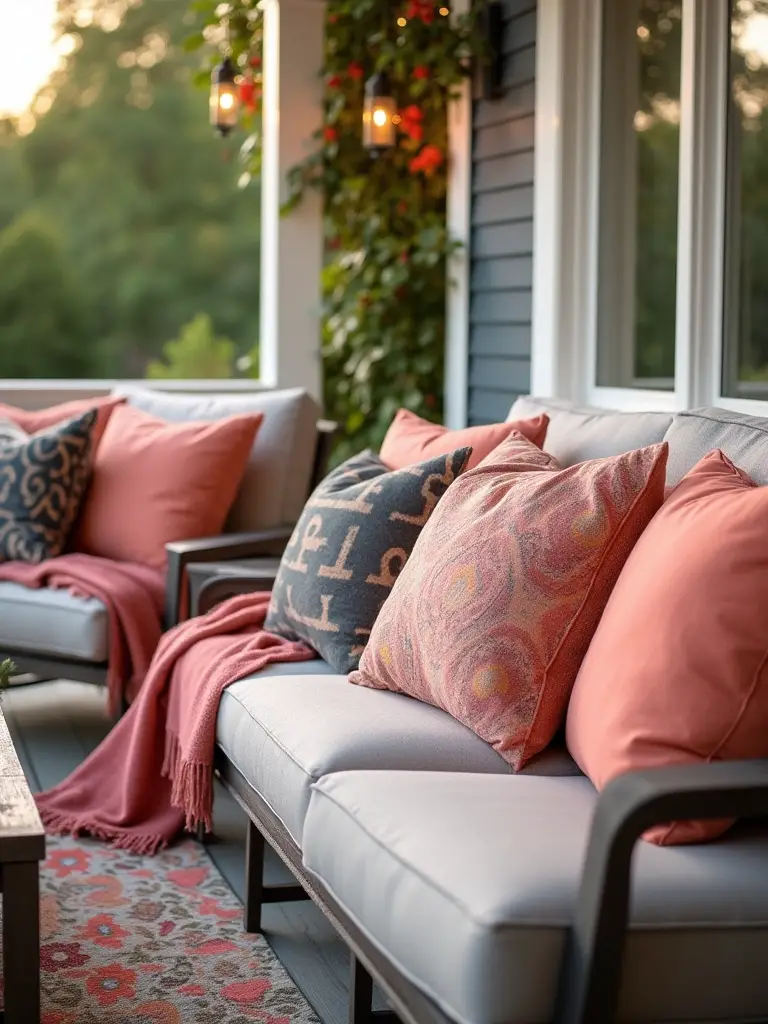
Just like with your cushions and rugs, the material is everything. Look for pillows and throws made from outdoor-rated, solution-dyed fabrics. They will resist fading and won’t turn into moldy sponges after the first rainstorm. I recommend having a stylish, waterproof deck box nearby to toss them into before a big storm or at the end of the season. It will double their lifespan.
Now let’s address that big, blank wall you’ve been staring at.
22. Choose Stylish Wall Decor or Outdoor Art
A porch doesn’t just have a floor and a ceiling; it has walls. Leaving them bare can make the space feel unfinished. Treating one of them as a feature wall with art or decor creates an immediate focal point and extends your home’s interior style outside. This could be anything from a large, laser-cut metal art piece to a triptych of weather-resistant canvas prints or even an architectural salvage find like an old iron gate.
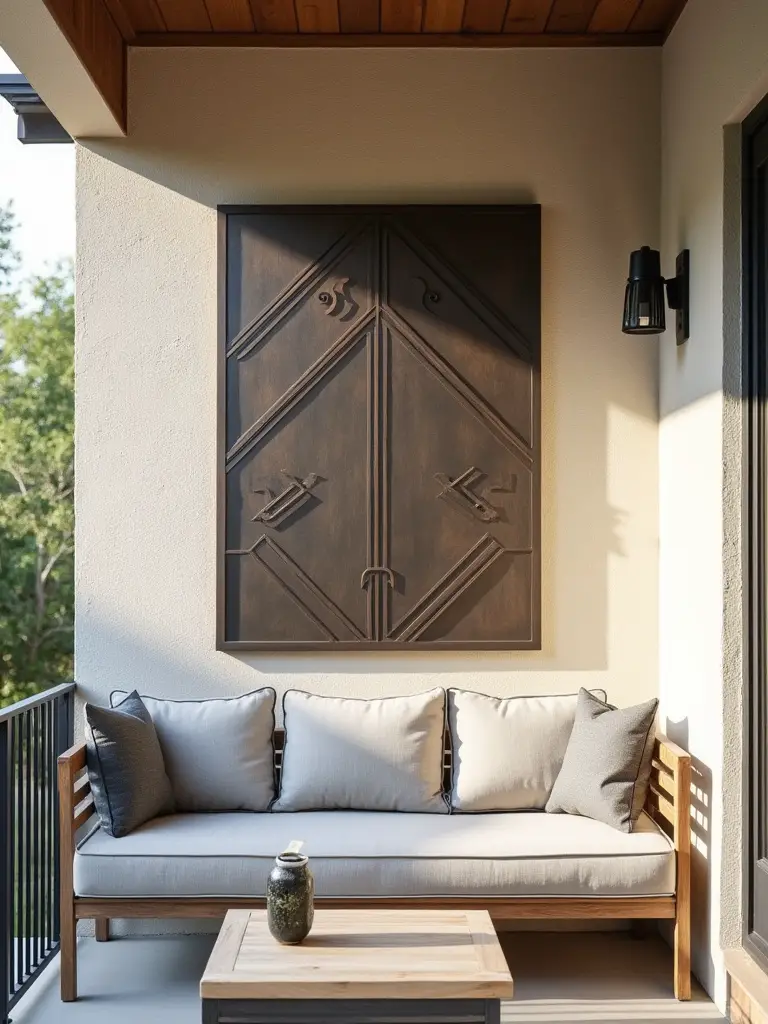
The key, as always, is weather resistance. Metal should be powder-coated or stainless steel. Wood needs to be properly sealed. Canvas needs to be rated for outdoor use. This visual anchor draws the eye, adds a layer of sophistication, and makes the porch feel like a deliberately curated gallery, not just a structural add-on.
Finally, let’s tie all these individual elements together with a unified vision.
23. Design an Inviting Color Palette for Porch Elements
Color sets the entire mood. It’s the first thing your brain registers. A good porch color palette doesn’t fight with your house or the surrounding landscape; it harmonizes with them. Start with the fixed colors you can’t change: your home’s siding, trim, and roof. Your palette should complement these.
A great rule of thumb is the 60-30-10 rule.
- 60% is your dominant color (e.g., the decking and main wall color).
- 30% is your secondary color (e.g., the furniture and a large rug).
- 10% is your accent color (e.g., the pillows, throws, and flowering plants).
One of my favorite pro tricks is to paint a covered porch ceiling a very light, soft blue, often called “Haint Blue” in the South. It’s thought to ward off spirits, but practically speaking, it mimics the sky, subtly making the space feel more open and airy. A thoughtful palette is the final thread that ties everything together, creating a space that feels intentional, cohesive, and deeply inviting.
Conclusion: Your Dream Outdoor Oasis Awaits
So there you have it. The real blueprint. It’s not about just picking 23 ideas off a list. It’s about a methodical process: planning the foundation, building a solid structure, layering in comfort and versatility, and finally, adding the aesthetic touches that make it yours. The difference between a porch you love and a porch you regret is almost always hidden in that first phase of planning.
By focusing on light, function, and solid construction first, you create a canvas that’s ready for anything. The furniture, the plants, the lighting—that’s you putting your signature on a space that you know is built to last. Your dream outdoor oasis isn’t just a fantasy on a screen; it’s a series of smart, deliberate decisions. Now you know what they are. Go build something incredible.