Can we talk about one of my biggest pet peeves? It’s when someone decides they’re going to organize their kitchen and the very first thing they do is rush out to buy a cart full of beautiful, matching, acrylic containers. I see it all the time. But here’s the secret the pros know: that’s actually the last thing you should do. Buying organizers before you know exactly what you need to store and where it needs to go is like buying a picture frame before you’ve even painted the picture. It’s a recipe for frustration and wasted money.
The real story behind a kitchen that feels amazing to work in—a kitchen where you can actually find the paprika without an archeological dig—isn’t about spending a fortune. It’s about being a little clever. It’s about looking at your space with fresh eyes, just like we used to do in art class when we’d turn our canvases upside down to see them differently. So forget the expensive overhaul for now. Let’s talk about how to make the kitchen you already have work so much better for you.
The Foundational Audit: Preparing Your Space
Alright, before we get to the fun stuff, we have to do the groundwork. I know, I know, it sounds like homework, but I promise this is the part that will save you the most time, money, and sanity down the line. This is about understanding what you’re working with, clearing out the junk, and setting up a game plan so the clutter doesn’t just creep back in two weeks later.
1. Conduct a Full Pantry and Fridge Purge
You want to make a huge impact in about an hour? Do this. Pull everything out of your pantry, your fridge, your cabinets. Everything. Yes, it will look like a grocery store exploded for a little while, but trust the process. Create piles: Keep, Toss (check those expiration dates!), and Donate (that unopened can of artichoke hearts you’ll never use). You’ll be shocked by how much space you instantly get back.
I did this last spring and found three half-empty bags of quinoa and a jar of chutney from 2018. It happens to all of us! Once you’ve purged, you can see what you actually own, which stops you from buying a fourth bottle of soy sauce when you already have three hiding in the back. This isn’t just cleaning; it’s a strategic first strike against chaos.
Now that you have a clean slate and only the items you actually want, we can start putting things back in a way that makes sense.
2. Implement the Zone Method
This is where my art teacher brain kicks in. Just like we have a station for painting and a station for clay, your kitchen needs zones for different tasks. Think about it: a “Breakfast Zone” with the coffee, mugs, sugar, and toaster all in one spot. A “Prep Zone” by your biggest counter with cutting boards, knives, and mixing bowls. A “Cooking Zone” near the stove with your favorite pans, oils, and spices.
You’re just grouping related items together so you’re not trekking across the kitchen to grab a spatula while your onions are burning. Take a minute to think about how you move when you cook a meal. Put things where you use them. It sounds so simple, but it’s a total game-changer for making your kitchen flow feel intuitive instead of frustrating.
With your zones mapped out, you’re ready for the most critical (and most-skipped) step of all.
3. Measure Cabinets Precisely
Please, please, please do not skip this step. Before you buy a single organizer, grab a tape measure and get the exact interior dimensions of your cabinets and drawers—width, depth, and height. Write them down in a notebook. And here’s the pro tip: measure in a few different spots, because old cabinets are rarely perfectly square. Always use the smallest measurement.

I once had a friend, Jen, who was so excited about this gorgeous, fancy pull-out wire drawer she bought online. She went to install it and… the door wouldn’t close. The hinge was in the way, by less than half an inch. A mistake that could have been avoided with five minutes of measuring. For a foolproof check, cut a piece of cardboard to the organizer’s dimensions and see if it actually fits inside the space.
Your trusty measurements will now be your shopping guide, starting with a spot for the stuff you use every single day.
4. Create a Dedicated ‘Landing Strip’
You know that one corner of the counter that becomes a magnet for mail, keys, sunglasses, and random clutter? Let’s lean into it, but with purpose. Designate a specific, contained spot as your “landing strip.” This is the official home for the stuff you bring in and take out of the house every day. It doesn’t have to be big—a small tray, a shallow basket, or a simple wall-mounted mail sorter works perfectly.

The magic of the landing strip is that it corrals the chaos. It stops the daily clutter from spreading across your entire kitchen and frees up your mental energy because you’re not constantly deciding where to dump your keys. Everything has a home, even the transient stuff. It’s a tiny change that makes your whole kitchen feel instantly calmer and more under control.
This same “a home for everything” principle is about to revolutionize your pantry.
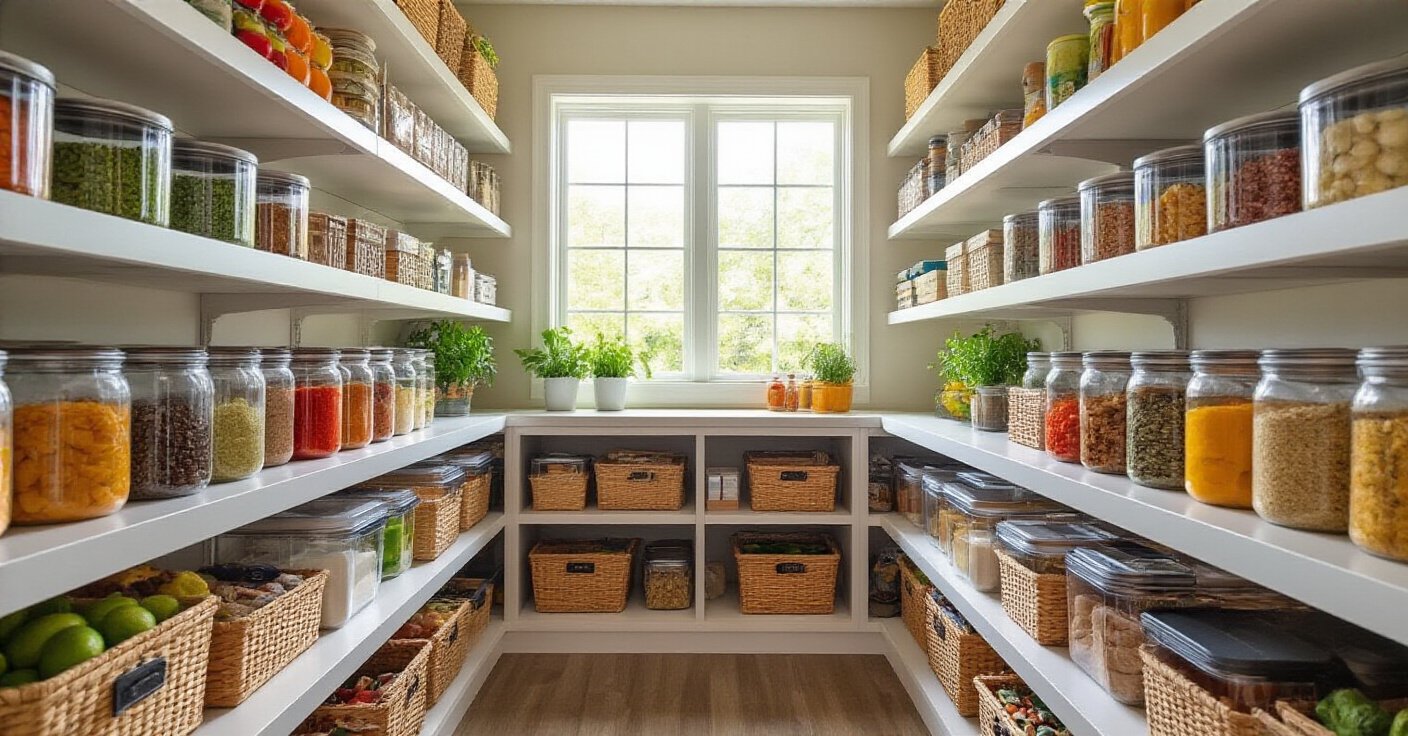
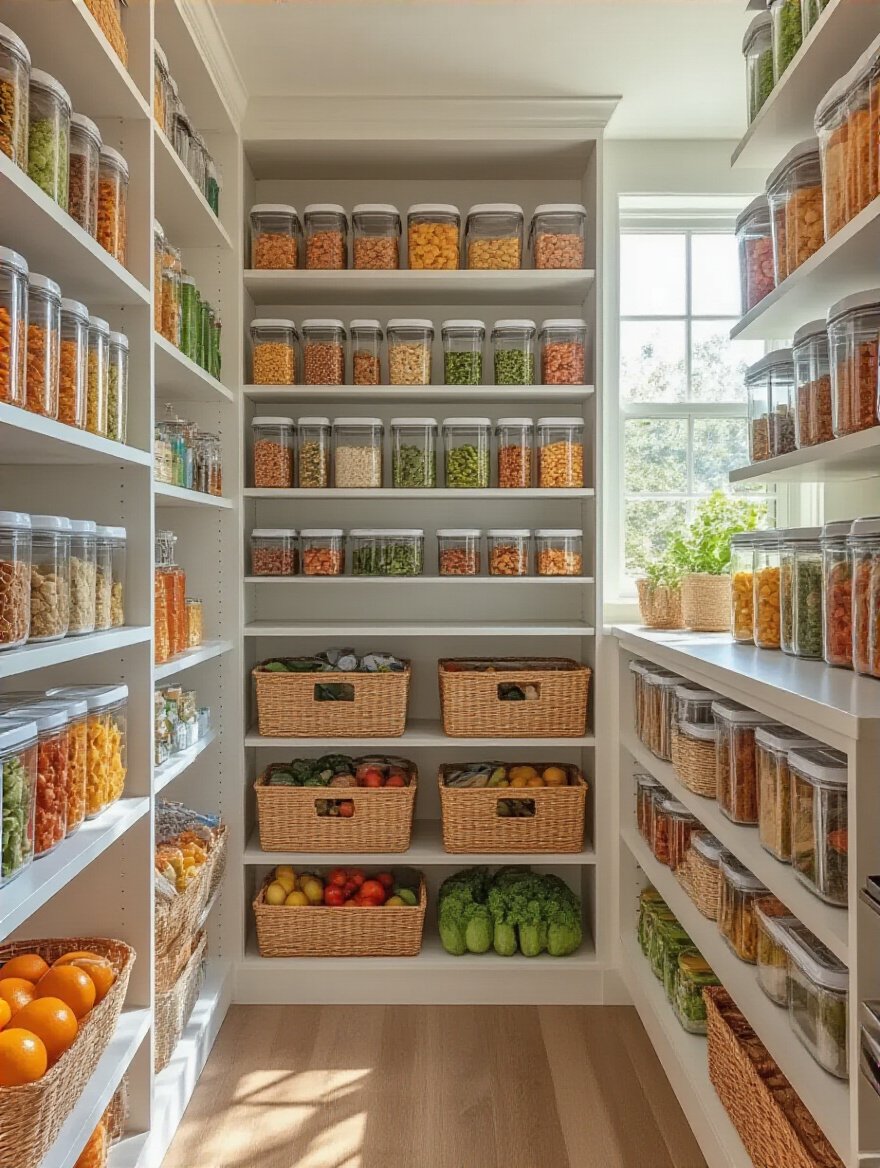
5. Decant Bulk Goods into Uniform, Stackable Containers
Okay, this is where you finally get to buy those pretty containers, but only for the things that make sense. Transferring things like flour, sugar, rice, and pasta from their bulky, awkward bags into clear, airtight, stackable containers is about so much more than looks. Square or rectangular containers eliminate the wasted space that weird-shaped boxes and floppy bags create. You can easily reclaim 25% more shelf space this way.
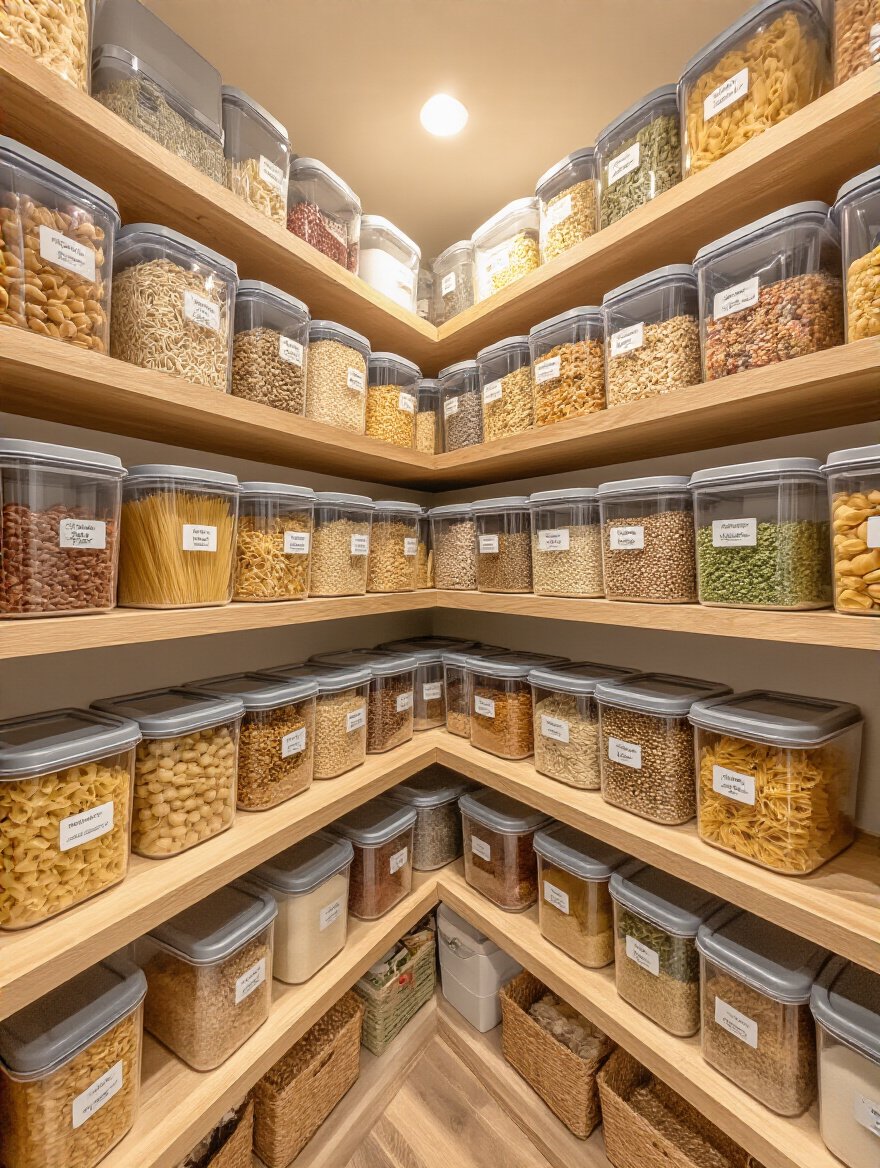
Plus, you can see exactly how much you have left, so you don’t run out of spaghetti halfway through making dinner. And a quick tip from someone who’s learned the hard way: you don’t need a fancy label maker right away. Just use a strip of painter’s tape and a Sharpie to label the container with what’s inside and the expiration date. It’s cheap, easy, and totally effective.
Inside the Cabinets: Maximizing Existing Space
This is where we get into the really clever stuff—turning those dark, cavernous cabinets from frustrating black holes into hyper-organized storage powerhouses. You don’t need a contractor; you just need a few brilliant inserts.
6. Utilize Tiered Cabinet Shelves
Think of these as stadium seating for your canned goods and mugs. A tiered shelf, also called a shelf riser, instantly doubles the usable surface area on a single shelf. Suddenly, you can see the can of diced tomatoes hiding behind the black beans. No more unstacking a wobbly tower of plates to get to the one you want.
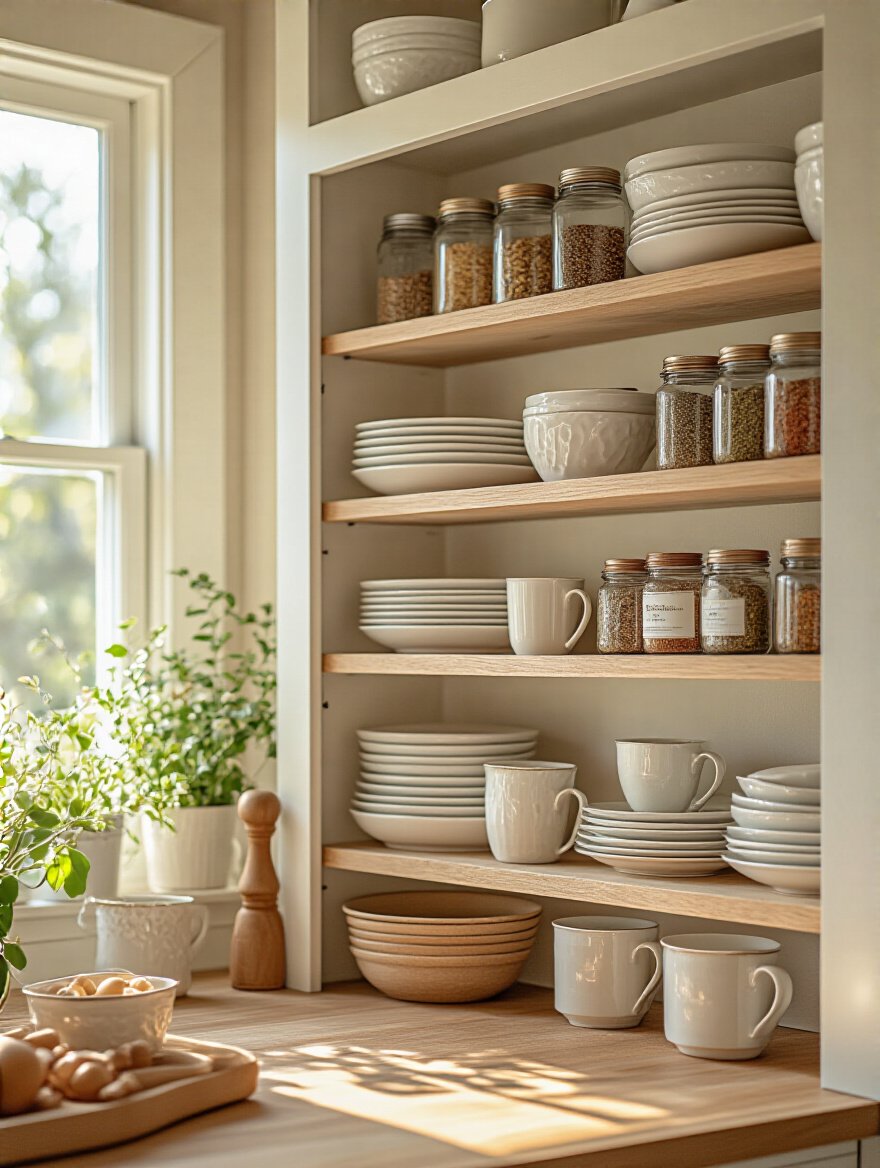
These little shelves are one of the cheapest, fastest upgrades you can make. You can find them in wire, bamboo, or acrylic. I love using them for my dishware—dinner plates on the bottom, with salad plates and bowls on the tiered shelf above. It’s a simple fix that makes a world of difference for an overstuffed dish cabinet.
From maximizing height, we now move to conquering depth.
7. Install Deep Drawer Dividers
We all have it: the “utensil-mageddon” drawer. The one where whisks and spatulas go to get tangled up in a chaotic mess. The solution is simple: deep drawer dividers. These aren’t your grandma’s shallow little silverware trays. I’m talking about adjustable, spring-loaded bamboo or plastic dividers that create custom-sized compartments for all your tools.
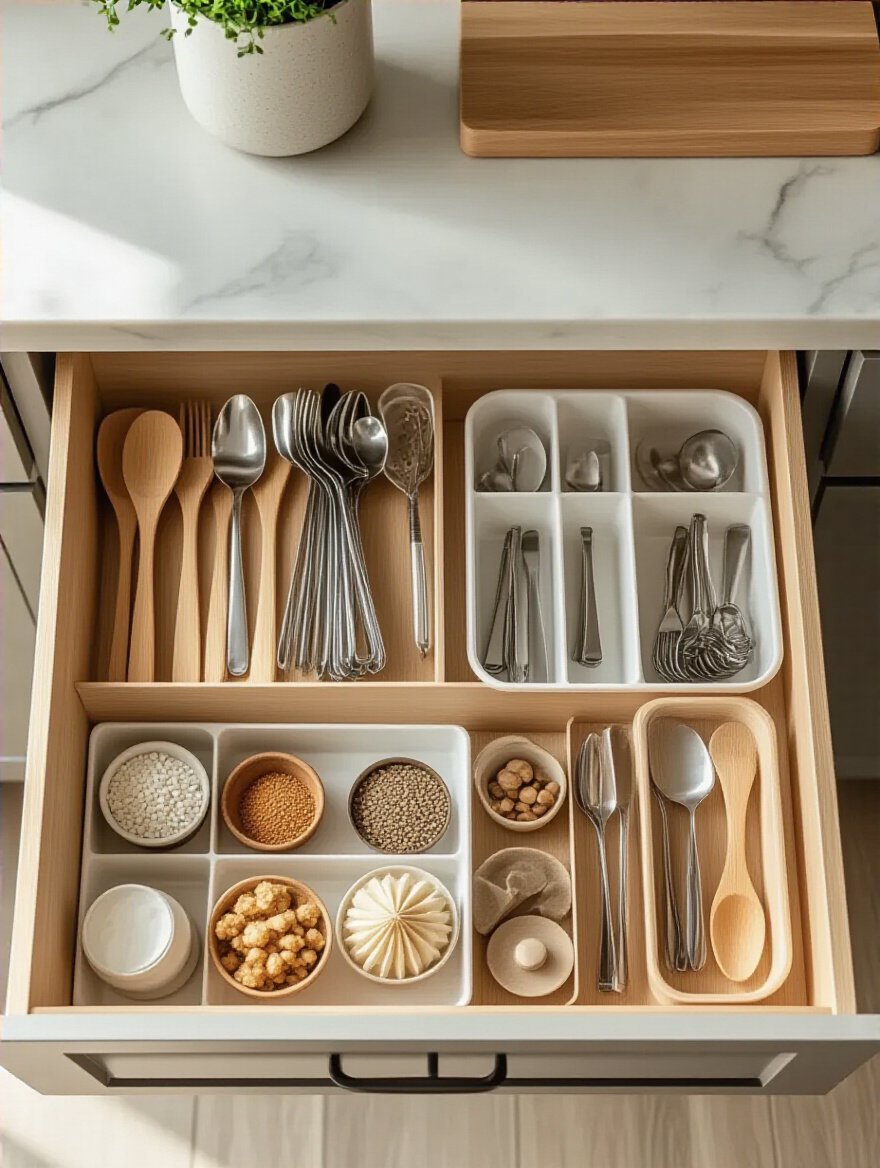
You can create a section for spatulas, one for whisks, one for measuring spoons. It feels so satisfying to open a drawer and see every single tool lying in its own neat little spot, ready to grab. No more wrestling with a ladle that’s gotten stuck. This is another small investment that pays you back every single day in saved time and reduced frustration.
Next up, we’re tackling the most dreaded cabinet in the entire kitchen.
8. Employ Under-Sink Expandable Racks
Ah, the cabinet under the sink. The land of looming garbage disposals and awkward pipes. It’s usually a chaotic jumble of cleaning sprays and damp sponges. But you can tame it with an expandable under-sink organizer. These are cleverly designed with shelves that can be adjusted or even removed to fit perfectly around your plumbing.
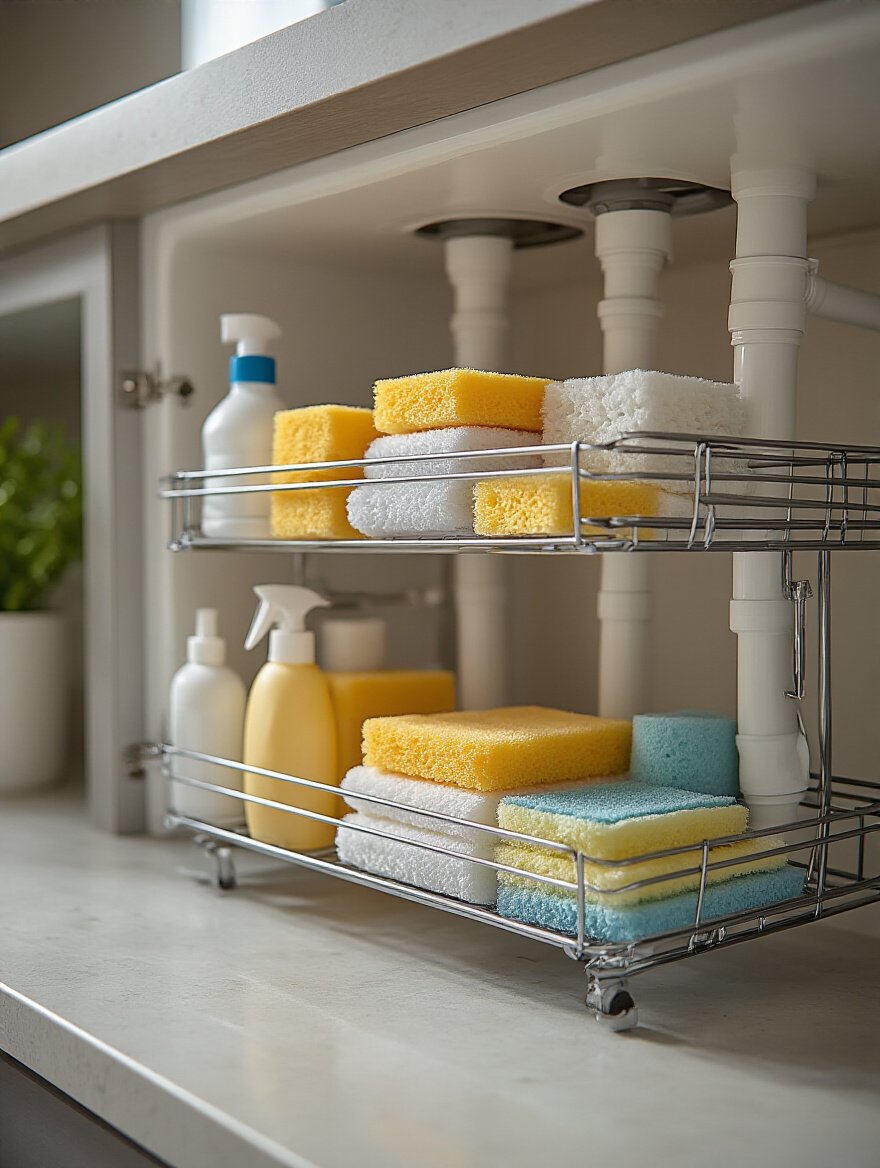
This lets you use all that vertical space that usually goes to waste. You can have a tier for sponges and dish soap, and another for cleaning bottles. I highly recommend getting a model with pull-out bins or trays; it makes grabbing that bottle of Windex from the back so much easier. You’re turning one of the most awkward spots in your kitchen into a functional, organized cleaning station.
Let’s apply that same pull-out logic to the rest of your deep cabinets.
9. Add Pull-Out Baskets or Bins
Deep base cabinets are basically caves. The stuff that gets pushed to the back might as well be on a different continent. The best way to fix this is by installing pull-out shelves or baskets. With a gentle tug, the entire contents of your cabinet slide out to greet you. It’s magical.

No more getting on your hands and knees with a flashlight to find the right pot. This is probably the most “project-y” hack on this list, but it’s easier than you think and the payoff is huge. If you’re storing heavy things like small appliances or pots and pans, this is a non-negotiable upgrade. Suddenly, every single inch of that deep cabinet is perfectly usable space.
And for that other tricky spot—the corner—we’ve got a spinning solution.
10. Implement a Corner Cabinet Lazy Susan
The corner cabinet is the Bermuda Triangle of the kitchen. Things go in and are never seen again. A Lazy Susan is the absolute best way to conquer this space. A two-tiered rotating shelf system lets you spin everything from the back right to the front. It’s perfect for pots and pans, mixing bowls, or even bulk pantry items.

You might think you’re losing space by putting a round shelf in a square cabinet, but you’re actually gaining a ton of accessible space, which is what really matters. No more unloading half the cabinet just to get to that one bundt pan you use twice a year. Everything is just a quick spin away.
Creative & Vertical Storage: Unlocking Hidden Potential
Now it’s time to look up! So much of a kitchen’s storage potential is hiding in plain sight on your walls and doors. By going vertical, you can free up an incredible amount of counter and drawer space, making your kitchen feel bigger and work smarter.
11. Mount Magnetic Knife Strips
That bulky knife block is eating up a huge chunk of prime real estate on your countertop. Ditch it and install a Magnetic knife strip on the wall near your prep area. It looks incredibly professional, keeps your knife blades from getting dull from banging around in a drawer, and makes it so easy to grab the exact knife you need.

Just make sure to install it high enough to be out of reach of little hands, and use drywall anchors or screw it into a stud so it’s extra secure. This is one of my all-time favorite hacks for Small kitchens. It’s functional, it looks great, and it instantly frees up so much counter space.
Speaking of using wall space, let’s talk about the unsung heroes of organization.
12. Attach Adhesive Hooks to Cabinet Doors
Don’t underestimate the power of a few little hooks! The inside of your cabinet doors is some of the most underutilized real estate in your whole kitchen. Use small, strong adhesive hooks (the kind that peel off without damage, perfect for renters!) to hang measuring cups, measuring spoons, pot holders, or small cleaning brushes.

This gets all those little, frequently-used items out of your crowded utensil drawer and puts them right where you can see them. I have my measuring cups hanging inside my baking cabinet door, and it makes grabbing the one I need so much faster. It’s a tiny, ridiculously cheap trick that has a surprisingly big impact.
We can take this door-storage concept even further.
13. Utilize Over-the-Door Organizers
For your pantry or a larger kitchen cabinet door, an over-the-door organizer is an absolute workhorse. These multi-tiered racks are perfect for storing all your spices, small jars, condiments, or snack bags. They basically add an entire extra pantry’s worth of shallow, super-accessible shelving.

By moving all those little items to the door, you free up your main pantry shelves for the big, bulky stuff like cereal boxes and bags of flour. It makes your entire pantry feel more spacious and orderly, and you’ll never have to hunt for the cumin again.
Let’s find a home for another common clutter culprit.
14. Install Wall-Mounted Pot Lids Organizers
Oh, pot lids. They’re noisy, they’re awkward, and they never stack neatly. It’s time to get them out of that precarious pile in your cabinet. A simple wall-mounted pot lid rack—either on an open stretch of wall or, my personal favorite, on the inside of a cabinet door—is the perfect solution.

Each lid gets its own little slot, so there’s no more clattering or searching. You just grab the one you need. This frees up a ton of space in your pot-and-pan cabinet for, you know, the actual pots and pans. It’s one of those “why didn’t I do this sooner?” fixes.
Last but not least in our vertical journey, let’s get those tools in easy reach.
15. Hang Utensil Caddies from Shelves
If you have any open shelving or even a sturdy wire shelf in your pantry, you can create instant tool storage by hanging utensil caddies. Use simple S-hooks to hang small wire or mesh buckets and fill them with your most-used spatulas, whisks, and wooden spoons.

This gets your go-to tools out of the drawer and right where you need them, within arm’s reach of the stove. It frees up drawer space for other things and makes your cooking process feel so much smoother and more efficient.
Smart Systems & Long-Term Maintenance: Keeping Clutter at Bay
Okay, you’ve done the hard work of organizing. Amazing! But now we need to talk about how to keep it this way. These final tips are about creating simple habits and systems that prevent the clutter from coming back, so all your hard work pays off for years to come.
16. Label All Containers Clearly
This is the step that makes your whole system work long-term. When you decant things into those pretty containers, you have to label them. You think you’ll remember which one is baking soda and which is baking powder, but I promise you, one day you won’t. And it will be a sad day for your muffins.

Use a label maker, chalkboard labels, or my trusty painter’s-tape-and-sharpie method. Whatever you choose, be consistent. Label what it is and the date you opened it or its expiration date. This takes the guesswork out of cooking and grocery shopping and is your number one weapon against food waste.
Labeling leads directly into our next smart system.
17. Implement FIFO (First-In, First-Out)
This sounds like a fancy business term, but it’s super simple: First In, First Out. It just means when you buy new groceries, you put the new stuff in the back of the shelf and move the older stuff to the front. That way, you’re always using up the older items before they have a chance to expire.

My favorite way to do this is to have a small basket in the fridge and pantry labeled “Eat Me First!” Anything that’s getting close to its date—yogurt, leftover vegetables, an open jar of salsa—goes in the basket. It’s a clear visual reminder to use things up, and it will drastically cut down on how much food and money you waste.
Now, for the things you just don’t use…
18. Designate a ‘Donation Box’
Keep a sturdy box or a reusable bag in a corner of your pantry or a nearby closet. This is your kitchen’s “outbox.” As you’re cooking or cleaning and you come across a gadget you haven’t used in a year (looking at you, apple corer), a duplicate measuring cup, or a mug you just don’t love anymore, toss it directly into the donation box.

Don’t overthink it. Just get it out of your prime real estate. Then, set a reminder on your phone or calendar to take the box to a donation center once every three months. This creates a painless, continuous decluttering cycle, so your kitchen never gets overrun with stuff you don’t actually use or need.
Finally, a tip about buying new things for your kitchen.
19. Invest in Multi-Functional Small Appliances
Before you buy another single-use gadget, think about what you could replace with a multi-functional appliance. Instead of a separate toaster, air fryer, and convection oven, maybe a high-quality air fryer toaster oven is a better investment. Instead of a slow cooker, pressure cooker, and rice cooker, one Instant Pot can do it all.

This strategy is about curating your collection of tools. It saves a massive amount of counter and cabinet space and often saves you money in the long run. The goal isn’t to have the most gadgets; it’s to have the right gadgets that work hard for you and earn their spot in your beautifully organized kitchen.
Your Kitchen, Your Sanctuary
See? It’s not about having a perfect, magazine-worthy kitchen. It’s about creating a space that feels good to be in, that works for you instead of against you. By purging, planning, and using a few of these clever hacks, you can turn a space that feels frustrating and chaotic into one that’s calm, efficient, and genuinely joyful to cook in.
Don’t feel like you have to do all 19 of these things this weekend. That’s overwhelming! Just pick one. Maybe start with that messy utensil drawer or finally hang up your knives. Once you feel that little spark of satisfaction from one small victory, you’ll be inspired to try another. You have all the tools you need to reclaim your kitchen. You’ve got this!