Can we just talk for a minute about why so many DIY cabinet makeovers look terrible after two years? I see it all the time. Someone gets a burst of weekend inspiration, slaps a trendy color on their old cabinets, and six months later, it’s chipping around the knobs and peeling near the dishwasher. They followed the five-second tutorial on social media, but they missed the 90% of the work that actually makes the finish last.
From my years as an architectural photographer, I can tell you that the camera—and the naked eye—is brutally honest. It sees every flaw. It knows when you cut corners. The texture of a finish, the precision of a paint line, the way light reflects off a surface… that’s what separates a project that looks cheap from one that looks like a high-end custom job. A cabinet makeover isn’t just about changing a color. It’s about fundamentally changing the quality of the largest visual element in your kitchen. This guide is my brain dump of 15 years in the design industry—the real stuff, no corporate fluff—to make sure your project ends up in the “looks amazing” category and stays there.
Phase 1: Strategic Planning & Foundation
Before you even think about picking up a paintbrush, you need a plan. This is the phase everyone wants to rush through, and it’s where most of the critical mistakes are made. Getting this part right saves you time, money, and a world of frustration. It’s the difference between a project you’re proud of and a project you have to redo.
1. Understand Your Options: Paint, Stain, Reface, or Replace Cabinets?
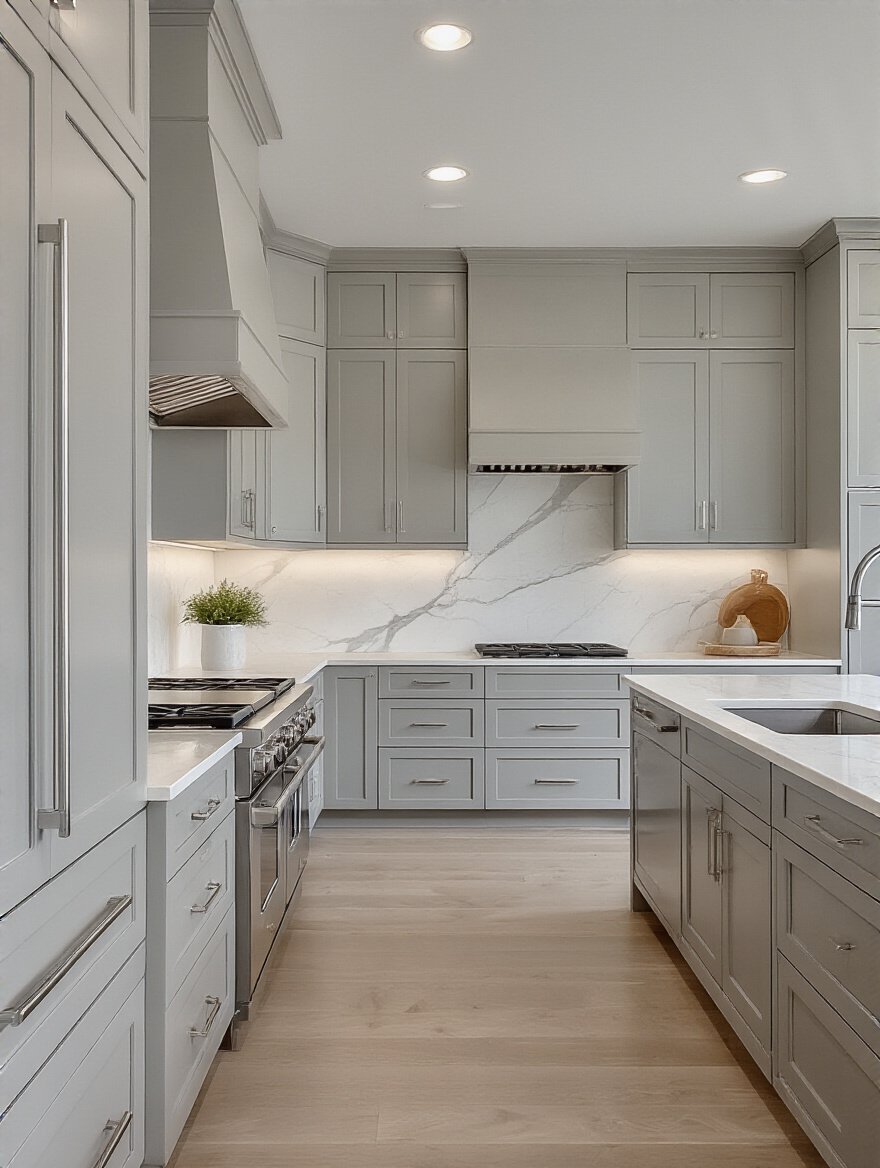
This is the big fork in the road, and your choice dictates everything else. Don’t just default to “paint” because it seems easiest. Painting is great for a color change on structurally sound cabinets. Staining is for when you love the wood grain but hate the color. Refacing is when your cabinet boxes are solid, but the doors are dated or damaged—you get a whole new look without a full tear-out. And Replacement is the nuclear option, for when the boxes themselves are falling apart.
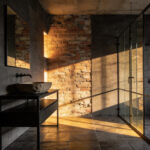
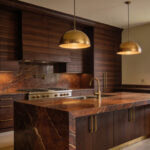
 Kitchen Cabinets showcasing paint, stain, and refacing options in warm lighting.” class=”wp-image-11021″/>
What most people don’t grasp is the material science here. You can’t paint peeling thermofoil and expect it to last. You can’t stain a cabinet that’s already been painted without stripping it down to bare wood, which is a monstrous job. The real story is this: if your cabinet boxes—the frames attached to the wall—are in good shape, you can save a fortune. A client of mine with a solid but horribly dated 1980s oak kitchen spent about $8,000 on professional refacing. New Shaker-style doors, new veneers on the boxes, new hardware. It looked like a $30,000 kitchen, and it was done in four days. A full replacement would have been a month-long nightmare.
Once you know your path, you need to know what it’s going to cost.
2. Set a Realistic Budget: Estimate Costs for DIY vs. Professional Makeovers
Let’s be real about money. A DIY paint job isn’t “basically free.” Quality materials—a gallon of top-tier cabinet paint like Benjamin Moore ADVANCE is nearly $100—plus good primer, sandpaper, rollers, and brushes can easily hit $400-$500. Then there’s your time. If it takes you 40 hours to do it right (and it will), what’s your time worth? A professional painter might quote you $4,000, but they’ll be done in a week and the finish will be bulletproof.

The BS everyone tells you is that DIY is always cheaper. It’s only cheaper if you don’t have to do it again in three years because it’s peeling. I learned this the hard way on my first apartment. I used cheap latex paint on the cabinets without the right primer. It looked great for about six months. Then every time a pot lid hit a door, it left a huge chip. The shortcut I wish I’d known is this: create a simple spreadsheet. Column A: every single item you need for DIY, down to the painter’s tape and tack cloths. Column B: a professional quote. Then honestly assess if the cash you’re saving is worth the time you’re spending. And always—always—add a 15% contingency fund to your budget for the things that inevitably go wrong.
With a budget in hand, it’s time to talk about what this will actually look like.
3. Select Your Style: Matching Cabinet Finishes to Kitchen Aesthetics
You know what drives me crazy? Seeing a beautiful, warm-toned granite countertop paired with a cool, sterile gray cabinet paint. It’s a subtle clash that makes both elements look worse. Your cabinets don’t exist in a vacuum. They have to play nice with your countertops, backsplash, floor, and even the light that comes through your windows. This is where my photographer’s eye kicks in. Light and color are everything.
Here’s the deal: fixed elements are the boss. Your countertop and floor aren’t changing, so their undertones (warm yellow/beige or cool blue/gray) dictate your cabinet color. Grab a bunch of paint swatches—big ones, not those tiny chips—and tape them to your cabinets. Look at them in the morning light, at midday, and at night under artificial light. The color will change dramatically. Joanna Gaines isn’t kidding when she says lighting is a game-changer; a perfect greige in the store can look purple in your kitchen. A good rule of thumb is to create harmony or deliberate contrast. Don’t just pick a color you saw online and hope for the best.
Before you get too attached to that perfect color, you need to make sure your cabinets can even take it.
4. Assess Cabinet Condition: Identifying Repair Needs Before Starting
Picture this: You spend a week meticulously painting your cabinets, and they look stunning. Two months later, you notice the paint is bubbling up around the sink. Why? Because you painted over a slow, long-term water leak that turned the particleboard cabinet base to mush. All that work, wasted. You absolutely have to give your cabinets a full physical before you start any cosmetic work.

Open every door. Pull out every drawer. Are the hinges rusty or loose? Do the drawer glides catch? Are the corners of the cabinet boxes solid, or are they starting to separate? Pay special attention to the sink base. Press firmly on the bottom—is it solid, or does it feel soft and spongy? That’s water damage. Cosmetic fixes will not hide structural problems. You have to fix loose joinery with wood glue and clamps, reinforce sagging shelves, and replace any water-damaged sections before you even think about sanding. This isn’t the fun part, but skipping it is the #1 reason a makeover fails.
Once your cabinet “bones” are declared healthy, the real work begins.
Phase 2: Essential Preparation & Tools
This is where 80% of your effort should go. If you nail the prep, the actual painting or finishing is the easy victory lap. If you skimp on prep, you are setting yourself up for failure. I can’t say it enough. The difference between a pro job and an amateur one is almost entirely in the preparation.
5. Deep Clean Like a Pro: Removing Grease for Flawless Adhesion
Kitchens are greasy. It’s a fact. Cooking vapors deposit a fine, invisible layer of grime over everything. Paint will not stick to grease. It’s like trying to put a sticker on an oily surface—it will peel right off. A simple wipe-down is not enough. You need to declare war on that grime with a serious degreaser. Professionals use products like TSP (Trisodium Phosphate) or a strong substitute like Krud Kutter.

Get a scrubby sponge (the non-scratch kind) and get to work. Pay extra attention to the cabinets around the stove and the sink. After you degrease, you have to rinse it all off thoroughly with clean water and a clean rag. Any leftover cleaner residue is just as bad as the grease itself; it creates a film that blocks paint adhesion. The shortcut? The white rag test. After you think you’re done cleaning and the surface is dry, wipe it firmly with a clean white rag. If it comes back with any yellow or brown tint, you’re not done. Clean it again.
Now that they’re clean, it’s time to take them apart.
6. Master Disassembly & Labeling: Organizing Doors and Hardware Systematically
Here’s a little scene I’ve witnessed a dozen times: a frustrated homeowner standing in a sea of identical-looking cabinet doors, trying to figure out why door #12 won’t close properly on cabinet #15’s frame. It’s because even in factory-made kitchens, hinges and doors settle in unique ways. They are not perfectly interchangeable. Taking the time to label everything methodically will save your sanity during reassembly.

This is my bulletproof system: use a roll of blue painter’s tape and a Sharpie. Start at one end of the kitchen and number each opening (e.g., U1 for “upper 1,” L1 for “lower 1”). When you take off a door, put a corresponding piece of tape on the inside edge where it won’t be painted. Then, put all the hinges and screws for that specific door in a small Ziploc bag and label it “U1 Hardware.” Don’t just throw all the screws in a bucket! They can have minor differences. It seems tedious, but this 30-minute organizational step will save you hours of frustrating guesswork later.
With everything organized, you can finally make some dust.
7. Achieve Smooth Finishes: Proper Sanding Techniques for Painting Success
Sanding isn’t about stripping the old finish off completely. It’s about “scuffing” the surface to give it microscopic teeth for the primer to grab onto. Think of it as creating a mechanical bond. A smooth, glossy surface offers nothing for the primer to grip. You need to dull that sheen and knock down any existing imperfections. Start with a medium grit sandpaper (120-150 grit) to do the initial scuffing and finish with a finer grit (220 grit) to get it smooth.

A random orbital sander is your best friend for flat areas like door panels and cabinet sides. It does the work quickly and evenly. But the most important rule is this: clean up your dust. After sanding, the surface will be covered in a fine powder. If you paint over that, you’re basically mixing dust into your paint, and you’ll get a gritty, bumpy finish. Use a shop vac with a brush attachment first, then follow up with a tack cloth—a sticky piece of cheesecloth that picks up the finest particles. Don’t skip the tack cloth.
Now your surface is ready for the most critical coat of all.
8. Prime for Perfection: Choosing and Applying the Right Adhesion Primer
Primer is not just thin paint. It’s the glue that holds your entire project together. Its job is twofold: one, to stick like crazy to the surface you just prepped, and two, to create the perfect uniform surface for your paint to stick to. Using the wrong primer, or skipping it, is the cardinal sin of cabinet painting. If you’re painting over dark wood or a wood that bleeds tannins (like oak or mahogany), you absolutely need a stain-blocking primer.

For most situations, a quality water-based bonding primer like Zinsser Bulls Eye 1-2-3 or KILZ Adhesion is fantastic. But for tricky surfaces like laminate or old oak that might bleed tannins, a shellac-based primer like Zinsser B-I-N is the nuclear option. It sticks to anything and blocks everything. It stinks to high heaven and requires denatured alcohol for cleanup, but it’s foolproof. Apply one or two thin, even coats. Don’t glop it on. The goal is an even, consistent foundation.
With everything primed, it’s time to protect the rest of your kitchen from yourself.
9. Protect Your Kitchen: Taping and Draping for Mess-Free Makeovers
You know the difference between a pro job and a DIY one? Clean paint lines. Nothing screams “I did this myself” more than sloppy edges where the cabinet frame meets the wall or countertop. Invest in good painter’s tape, like FrogTape. It creates a seal that prevents paint from bleeding underneath. Take your time applying it. Run a putty knife or a credit card along the edge to seal it down tight.

Drape everything you don’t want paint on. Everything. Use plastic sheeting for the counters and appliances and canvas drop cloths for the floor. A common mistake is thinking a little overspray from a roller won’t travel. It will. It creates a fine, gritty dust that will settle on every horizontal surface in the room. A little extra time spent masking and draping will save you hours of cleanup and the heartache of finding specks of paint on your stainless-steel fridge.
Now, at long last, it’s time to bring your vision to life.
Phase 3: Executing Your Cabinet Transformation
This is the fun part, where all that painstaking preparation pays off. The application is where artistry meets technique. Whether you’re spraying, brushing, or refacing, precision is key.
10. Paint Like a Pro: Achieving Smooth, Durable Finishes with Spray or Brush
If you want that flawless, factory-like finish, a sprayer (specifically an HVLP—High Volume Low Pressure—sprayer) is the way to go. It atomizes the paint, laying down a perfectly even coat with no brush or roller marks. But there’s a learning curve and it requires a lot of masking. For most DIYers, a high-quality brush-and-roller combo is the more practical path. The key is to use the right tools and a pro-grade paint.

Don’t use wall paint on your cabinets. You need a paint designed to cure to a hard, durable finish. I recommend a water-based alkyd enamel like Benjamin Moore ADVANCE or Sherwin-Williams Emerald Urethane Trim Enamel. They self-level to minimize brush strokes and cure to a rock-hard finish. Use a high-quality angled brush for cutting in corners and a mini foam or mohair roller for flat surfaces. Apply 2-3 thin coats. Thick coats take forever to cure and will be soft and easy to dent. Lightly sand with 320-grit paper between coats for the smoothest possible finish.
If a whole new look is in order, painting might not be enough.
11. Reface with Confidence: Installing New Veneers or Doors for a Modern Look
Refacing is the ultimate design hack for a kitchen with good bones but an ugly face. It’s like getting a whole new kitchen for about half the price of a full tear-out. A professional will come in, remove your old doors and drawer fronts, apply a thin wood veneer or laminate to the exterior of your cabinet boxes that perfectly matches your new doors, and then install brand-new doors, drawers, and hardware.

This isn’t something I’d recommend as a first-time DIY project; getting the veneer applied perfectly without bubbles or crooked seams requires a lot of skill. But if you’re hiring it out, it’s a brilliant option. You can go from a dated raised-panel oak door to a sleek, modern flat-panel or a classic Shaker style in just a few days, with minimal disruption to your life. The visual impact is total, but you didn’t have to touch your countertops, plumbing, or floors.
For those who love their wood, there’s another path.
12. Restore Wood Beauty: Expert Tips for Staining or Refinishing Cabinets
If you have solid wood cabinets and you want to celebrate the grain rather than cover it with paint, refinishing is a beautiful option. But be warned: this is the most labor-intensive of all the makeovers. It involves chemically stripping the old finish, neutralizing the stripper, and then sanding the wood back to its raw, clean state before applying a new stain and multiple coats of a protective topcoat like polyurethane.

The most common mistake people make is getting an uneven stain. This usually happens on soft woods like pine, or from not sanding evenly. A pro tip is to use a pre-stain wood conditioner. It’s a thin, clear liquid that you wipe on before staining. It helps the wood absorb the stain evenly, preventing blotchy, unprofessional results. I once had to rescue a client’s project where they skipped this step on maple cabinets—it looked like it had a bad case of the measles. A simple coat of conditioner would have saved the whole project.
Once the main finish is done, it’s time to add the architectural jewelry.
13. Add Architectural Detail: Installing Crown Molding or Base Trim Effectively
This is the secret weapon for making stock or builder-grade cabinets look custom. Adding crown molding to the top of your upper cabinets visually connects them to the ceiling, giving them a much more substantial, built-in presence. It closes that awkward dust-collecting gap and adds a layer of architectural sophistication. It’s the kind of detail that, from a photographer’s perspective, composes the shot and gives it a finished, intentional feel.

You’ll need a compound miter saw for this. The trick to perfect inside corners isn’t just a 45-degree miter cut; it’s a technique called “coping.” You cut one piece straight into the corner and cut the profile of the molding into the other piece with a coping saw, so it fits perfectly against the face of the first. It’s more forgiving and creates a tighter joint than a simple miter. A brad nailer is essential for attaching the molding without splitting the wood. Fill the nail holes, caulk the seams, and paint it to match. The impact is huge.
Another way to elevate the look is by introducing new materials.
14. Update Glass Inserts: Swapping Out Panels for a Fresh Visual Appeal
If you have some cabinet doors with glass panels, swapping them out is a fast and relatively inexpensive way to update the whole look. That dated, wavy amber glass from the 90s can be replaced with something modern and clean. Clear glass is classic, but it means you have to keep your cabinets perfectly staged. For a more practical but equally stylish option, consider reeded or fluted glass. It’s a huge trend right now for good reason.

Reeded glass offers a beautiful vertical texture that plays with light, obscuring the contents of the cabinet just enough to hide clutter while still feeling light and open. It’s a fantastic way to break up a long run of solid cabinet doors and add a touch of texture and sophistication. A local glass shop can cut new panels to size for you. It’s usually a simple job of prying off the old retaining clips, swapping the glass, and putting them back in.
For those who want to push the style envelope, a single color might not be enough.
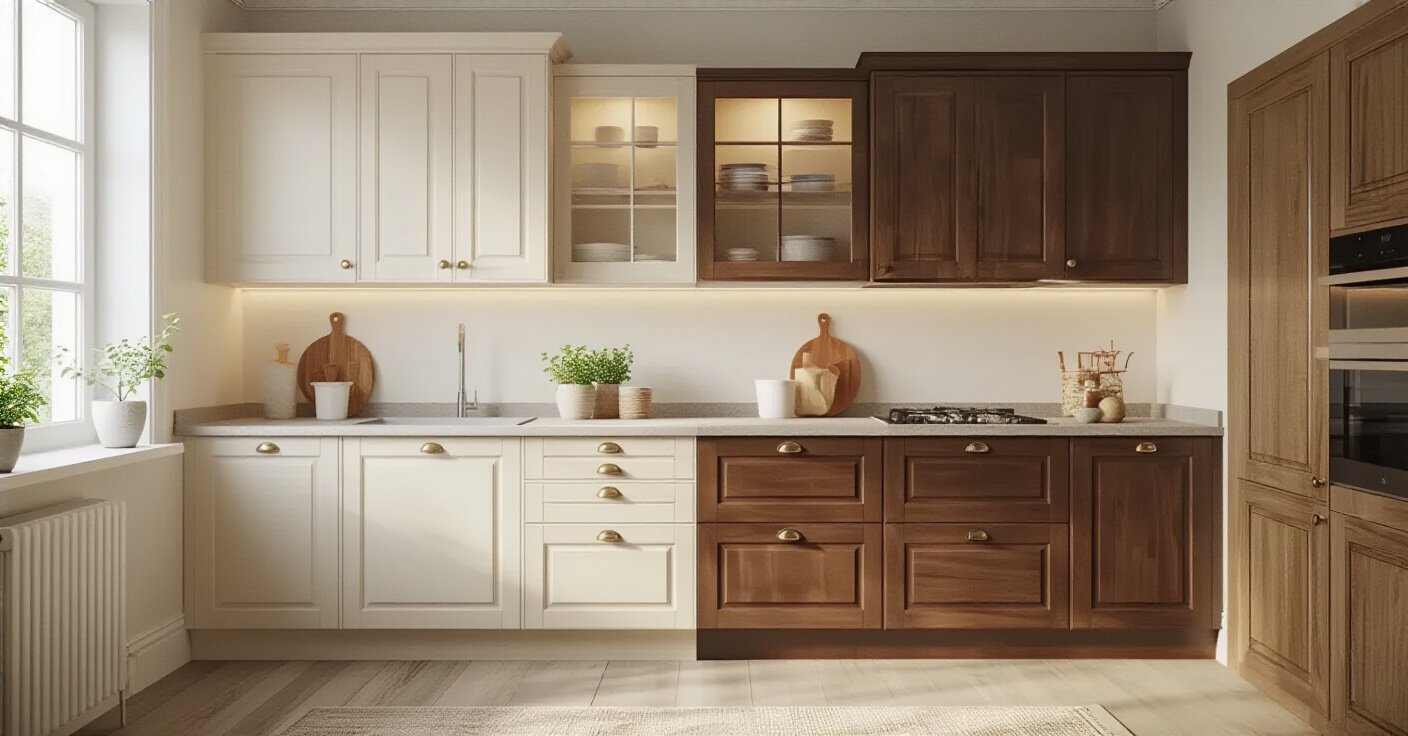
15. Creative Techniques: Distressing, Glazing, or Two-Tone Cabinet Ideas
This is where you can really inject personality. A two-tone look—typically dark lower cabinets and light uppers—is a fantastic way to ground the kitchen while keeping it feeling airy. It adds depth and makes a space feel more custom-designed. An island painted in a bold, contrasting color can serve as a stunning focal point. A glaze, which is a thin, translucent color applied over a base coat of paint, can be used to add an ‘aged’ or antiqued look, settling into the crevices and giving the cabinets a soft, time-worn character.

Distressing—sanding the edges and high-traffic spots to reveal a layer of wood or a different paint color underneath—can create a rustic, farmhouse vibe. But here’s the BS to watch out for: it’s very easy to overdo these techniques and make them look contrived or just plain dirty. Less is more. The key is subtlety. Focus distressing on areas that would naturally show wear. For glazing, wipe most of it back, leaving just a hint of color in the details. These are advanced techniques; I recommend practicing on a scrap piece of wood first.
With the big surfaces transformed, the magic is now in the finishing touches.
Phase 4: Hardware & Functional Upgrades
This is what takes your project from just “painted cabinets” to a truly renovated kitchen. The functional and tactile details are what you’ll appreciate every single day.
16. Choose the Perfect Hardware: Knobs, Pulls, and Hinges That Elevate Design
Hardware is the jewelry of the kitchen. It’s a small detail that has an enormous impact on the final look. Old, tarnished brass knobs can make a freshly painted cabinet look dated. Swapping them for sleek, matte black bar pulls or modern champagne bronze knobs can completely change the vibe. Think about scale and style. Long pulls can make drawers look wider and more contemporary. Simple knobs can feel more traditional or minimalist.

Here’s the shortcut you need: an installation jig. It’s a plastic template with pre-drilled holes that ensures you drill the holes for your new pulls in the exact same spot on every single door and drawer. It costs about $15 and will save you from the nightmare of crooked hardware and extra holes you have to fill. Also, consider upgrading to soft-close hinges while you’re at it. The satisfying, silent thump of a cabinet door closing on its own is a small luxury that makes a kitchen feel incredibly high-end.
Function isn’t just about what you see on the outside.
17. Enhance Internal Organization: Adding Pull-Outs, Dividers, or Drawer Inserts
What’s the point of beautiful cabinets if the inside is a chaotic mess? Upgrading the interiors is an invisible change that has a massive impact on your daily life. That deep, dark base cabinet where you have to get on your hands and knees to find a pot lid? It can be transformed with a two-tiered pull-out shelf system from a brand like Rev-A-Shelf. Now, everything slides out to you in the light.

Think about dedicated storage. Vertical dividers for baking sheets and cutting boards. Tiered spice rack inserts for drawers. Pegboard systems that let you customize the layout for your dishes. I’ve seen clients feel like they gained 30% more storage space just by optimizing the interior of their existing cabinets. It reduces countertop clutter and makes your kitchen workflow ten times more efficient. This is the stuff that makes a kitchen a joy to actually use.
Now let’s shine a light on all your hard work.
18. Illuminate with Lighting: Strategic Under-Cabinet and In-Cabinet Solutions
A kitchen without proper lighting is a miserable place to work. Under-cabinet lighting is, in my opinion, a non-negotiable feature in any modern kitchen. It illuminates your countertops, eliminating shadows and providing crucial task lighting for chopping and prep work. It makes the entire space feel brighter and more functional. LED strip lighting is inexpensive, easy to install (many are peel-and-stick), and energy-efficient.

When choosing LED lighting, pay attention to the Color Temperature, measured in Kelvins (K). For a kitchen, you generally want something in the 3000K to 4000K range. This gives a clean, neutral light that renders colors accurately without feeling cold and sterile like an office building. For an extra touch of class, add low-wattage puck lights or LED strips inside any glass-front cabinets to softly illuminate the contents. It adds a beautiful, ambient glow in the evening.
Your beautiful, functional, well-lit kitchen is almost complete. Now you just have to keep it that way.
Phase 5: Long-Term Care & Value Preservation
You’ve put in the work. You’ve invested the time and money. Now, you need to protect that investment. A few simple habits will keep your cabinets looking brand new for years.
19. Maintain Your New Look: Everyday Cleaning and Protection for Longevity
The number one enemy of a cabinet finish is prolonged exposure to moisture and grease. Get in the habit of wiping up spills immediately. Use a soft, damp microfiber cloth for daily cleaning—no harsh, abrasive sponges or aggressive cleaners like bleach or ammonia. They will dull and degrade the finish over time. For tougher grease, use a drop of mild dish soap in warm water.

I always tell my clients to think of their cabinet finish like the paint on their car. You wouldn’t scrub your car with a scouring pad, would you? The same principle applies here. Treat it gently. A little proactive care goes a long way in preventing the kind of accumulated grime and damage that forces another full makeover down the line. It’s the simple, boring discipline that preserves the beauty you worked so hard to create.
But no matter how careful you are, life happens.
20. Quick Fixes: Repairing Scratches and Dings for Sustained Beauty
Eventually, a pot will slip, or a belt buckle will scrape against a cabinet, and you’ll get a small nick or scratch. Don’t ignore it. That little break in the finish is a weak spot where moisture and grime can get underneath and cause the damage to spread. The key is to address it immediately while it’s still a tiny, easy fix.

Assemble a small “Cabinet First-Aid Kit.” Get a set of furniture repair markers or wax filler sticks that match your paint or stain color. For a tiny scratch, you can often just color it in with the marker. For a deeper ding, press the wax stick in to fill the hole, scrape it flush with a credit card, and buff it with a soft cloth. Having these tools on hand means you can fix a blemish in 30 seconds, keeping your cabinets looking pristine and preventing a small problem from becoming a big one.
The Final Frame
Your kitchen cabinets are the architectural backbone of the most-used room in your home. They set the tone for everything. As you’ve seen, you don’t need a six-figure budget and a wrecking ball to achieve a transformation that is both visually stunning and incredibly functional. The power is in the process—in the strategic planning, the fanatical preparation, and the thoughtful execution of the details.
Treat this guide as your professional shot list. Pick the ideas that fit your space, your budget, and your skill level. Whether you tackle a single upgrade like new hardware or commit to a full prep-and-paint job, you’re investing in the heart of your home. The pride you’ll feel when you stand back and look at your “after” shot—knowing you did it the right way—is a return on investment you can’t put a price on. Now go make it happen.