Homeowners often fixate on a single number: square footage. The real estate market reinforces the stubborn belief that comfort is strictly mathematical, leading many to assume that a small bedroom inevitably implies a cramped existence. This “Square Footage Myth” suggests that without physical expansion, you are destined to feel boxed in.
However, discerning homeowners seeking elegant small bedrooms ideas know that space is a sensory experience, not just a measurement on a blueprint. A room usually feels restricted due to visual weight and blocked sightlines, not merely a lack of floor area. The concept of “visual flow” dictates that uninterrupted lines and vertical volume trick the brain into perceiving expansiveness. A compact room designed with a single visual axis often feels more breathable and inviting than a larger, poorly planned suite.
This guide utilizes professional design strategies to manipulate spatial perception. We explore how selecting “leggy” furniture exposes floor space to create essential visual “air gaps” and how the “3D Rule” of concealed storage eliminates the clutter that fragments a room. By mastering light, monochromatic palettes, and prioritizing verticality, you can debunk the myth and transform a tiny footprint into a sophisticated sanctuary.
Phase 1: Visual Architecture (Manipulating Optics)
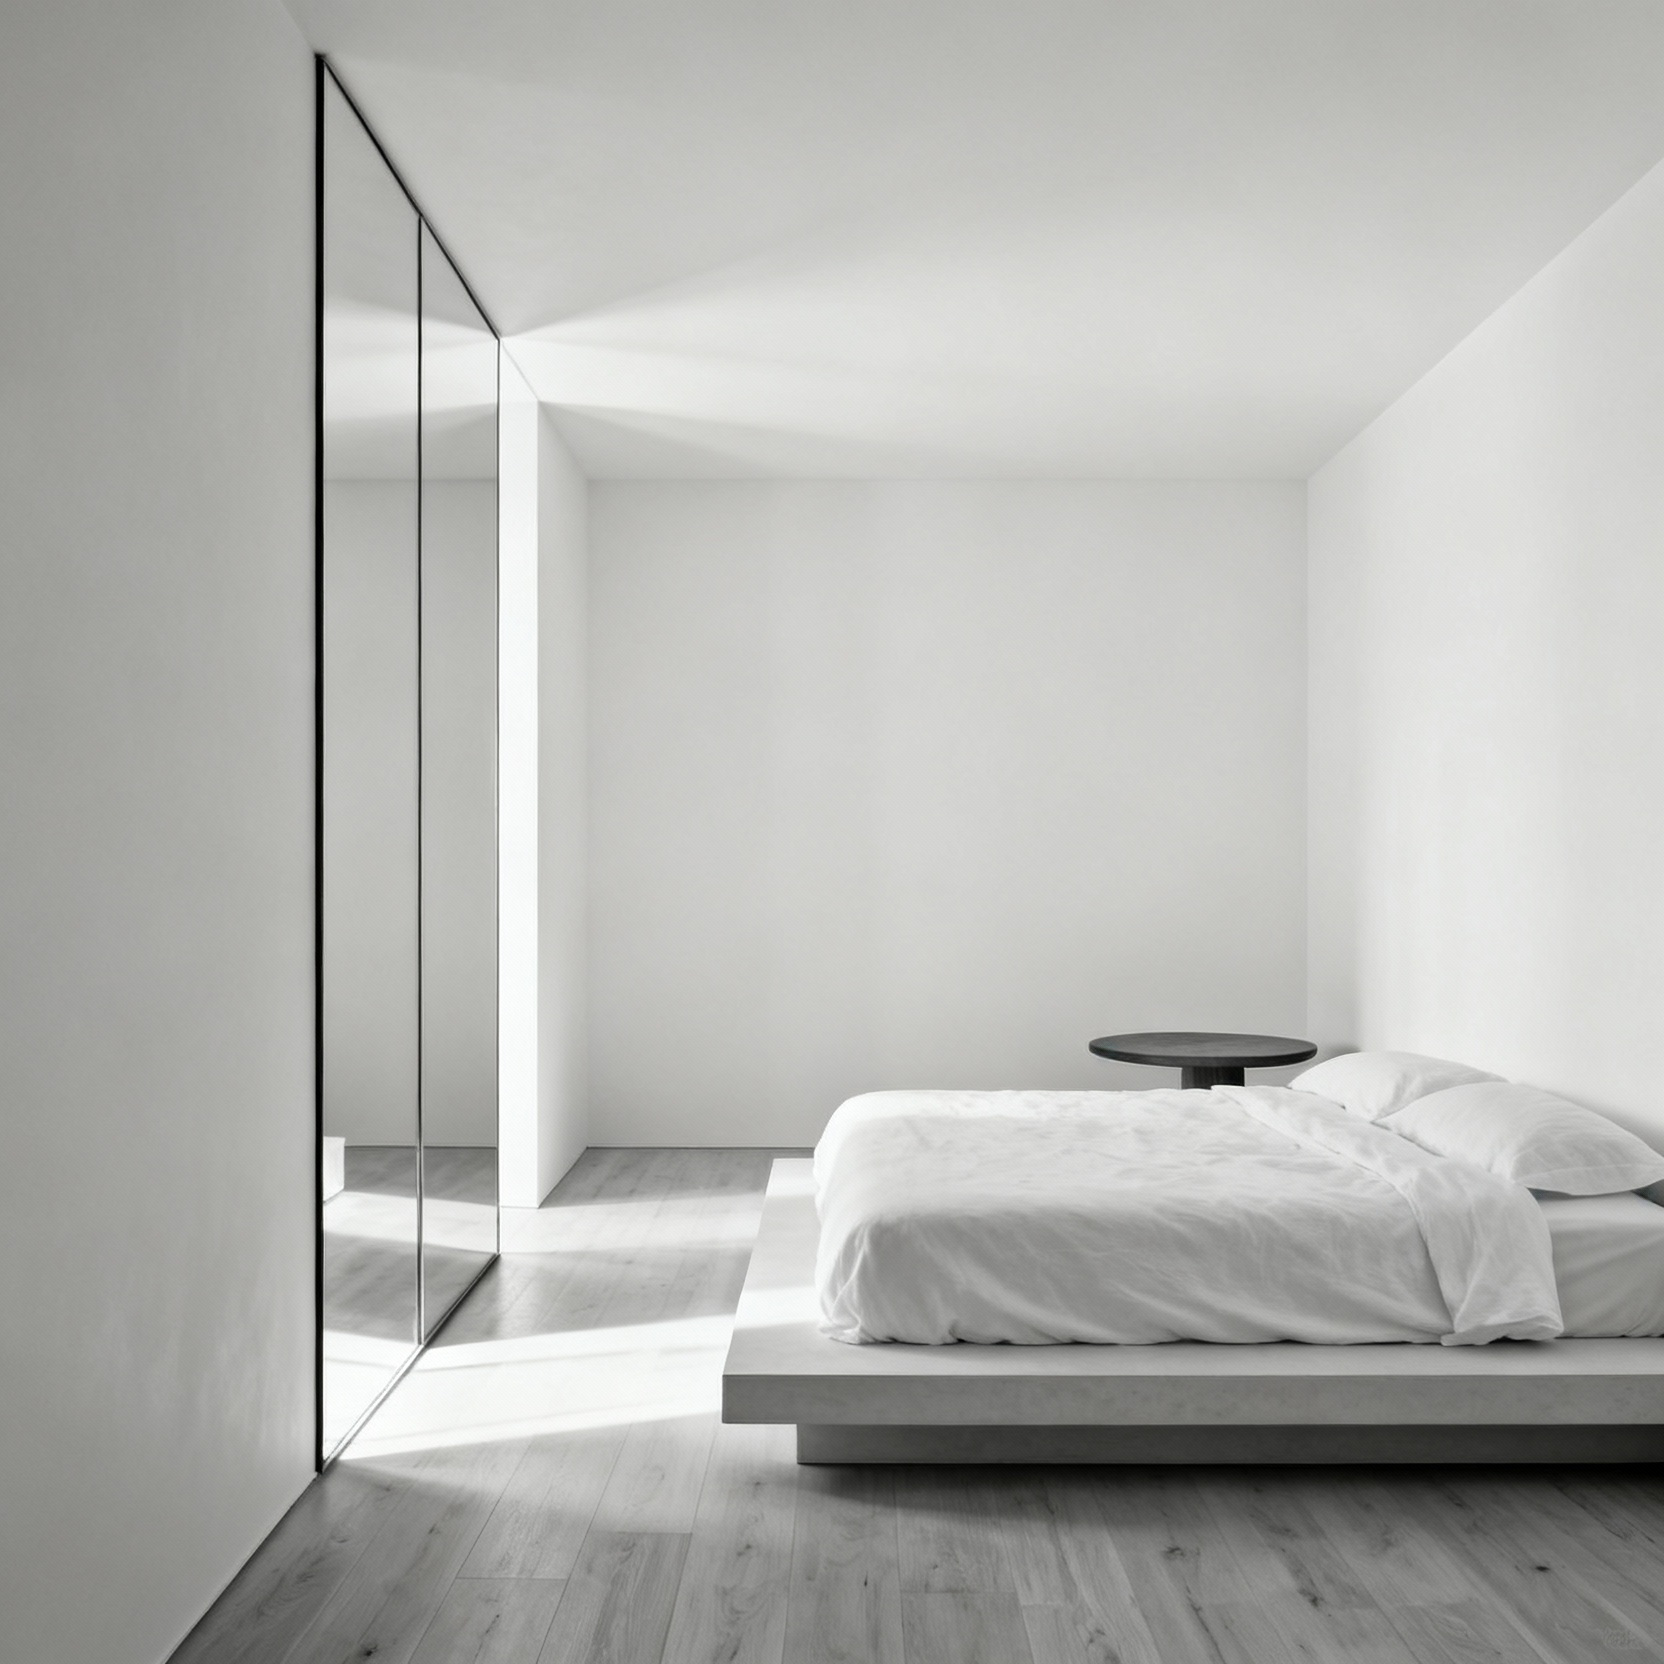
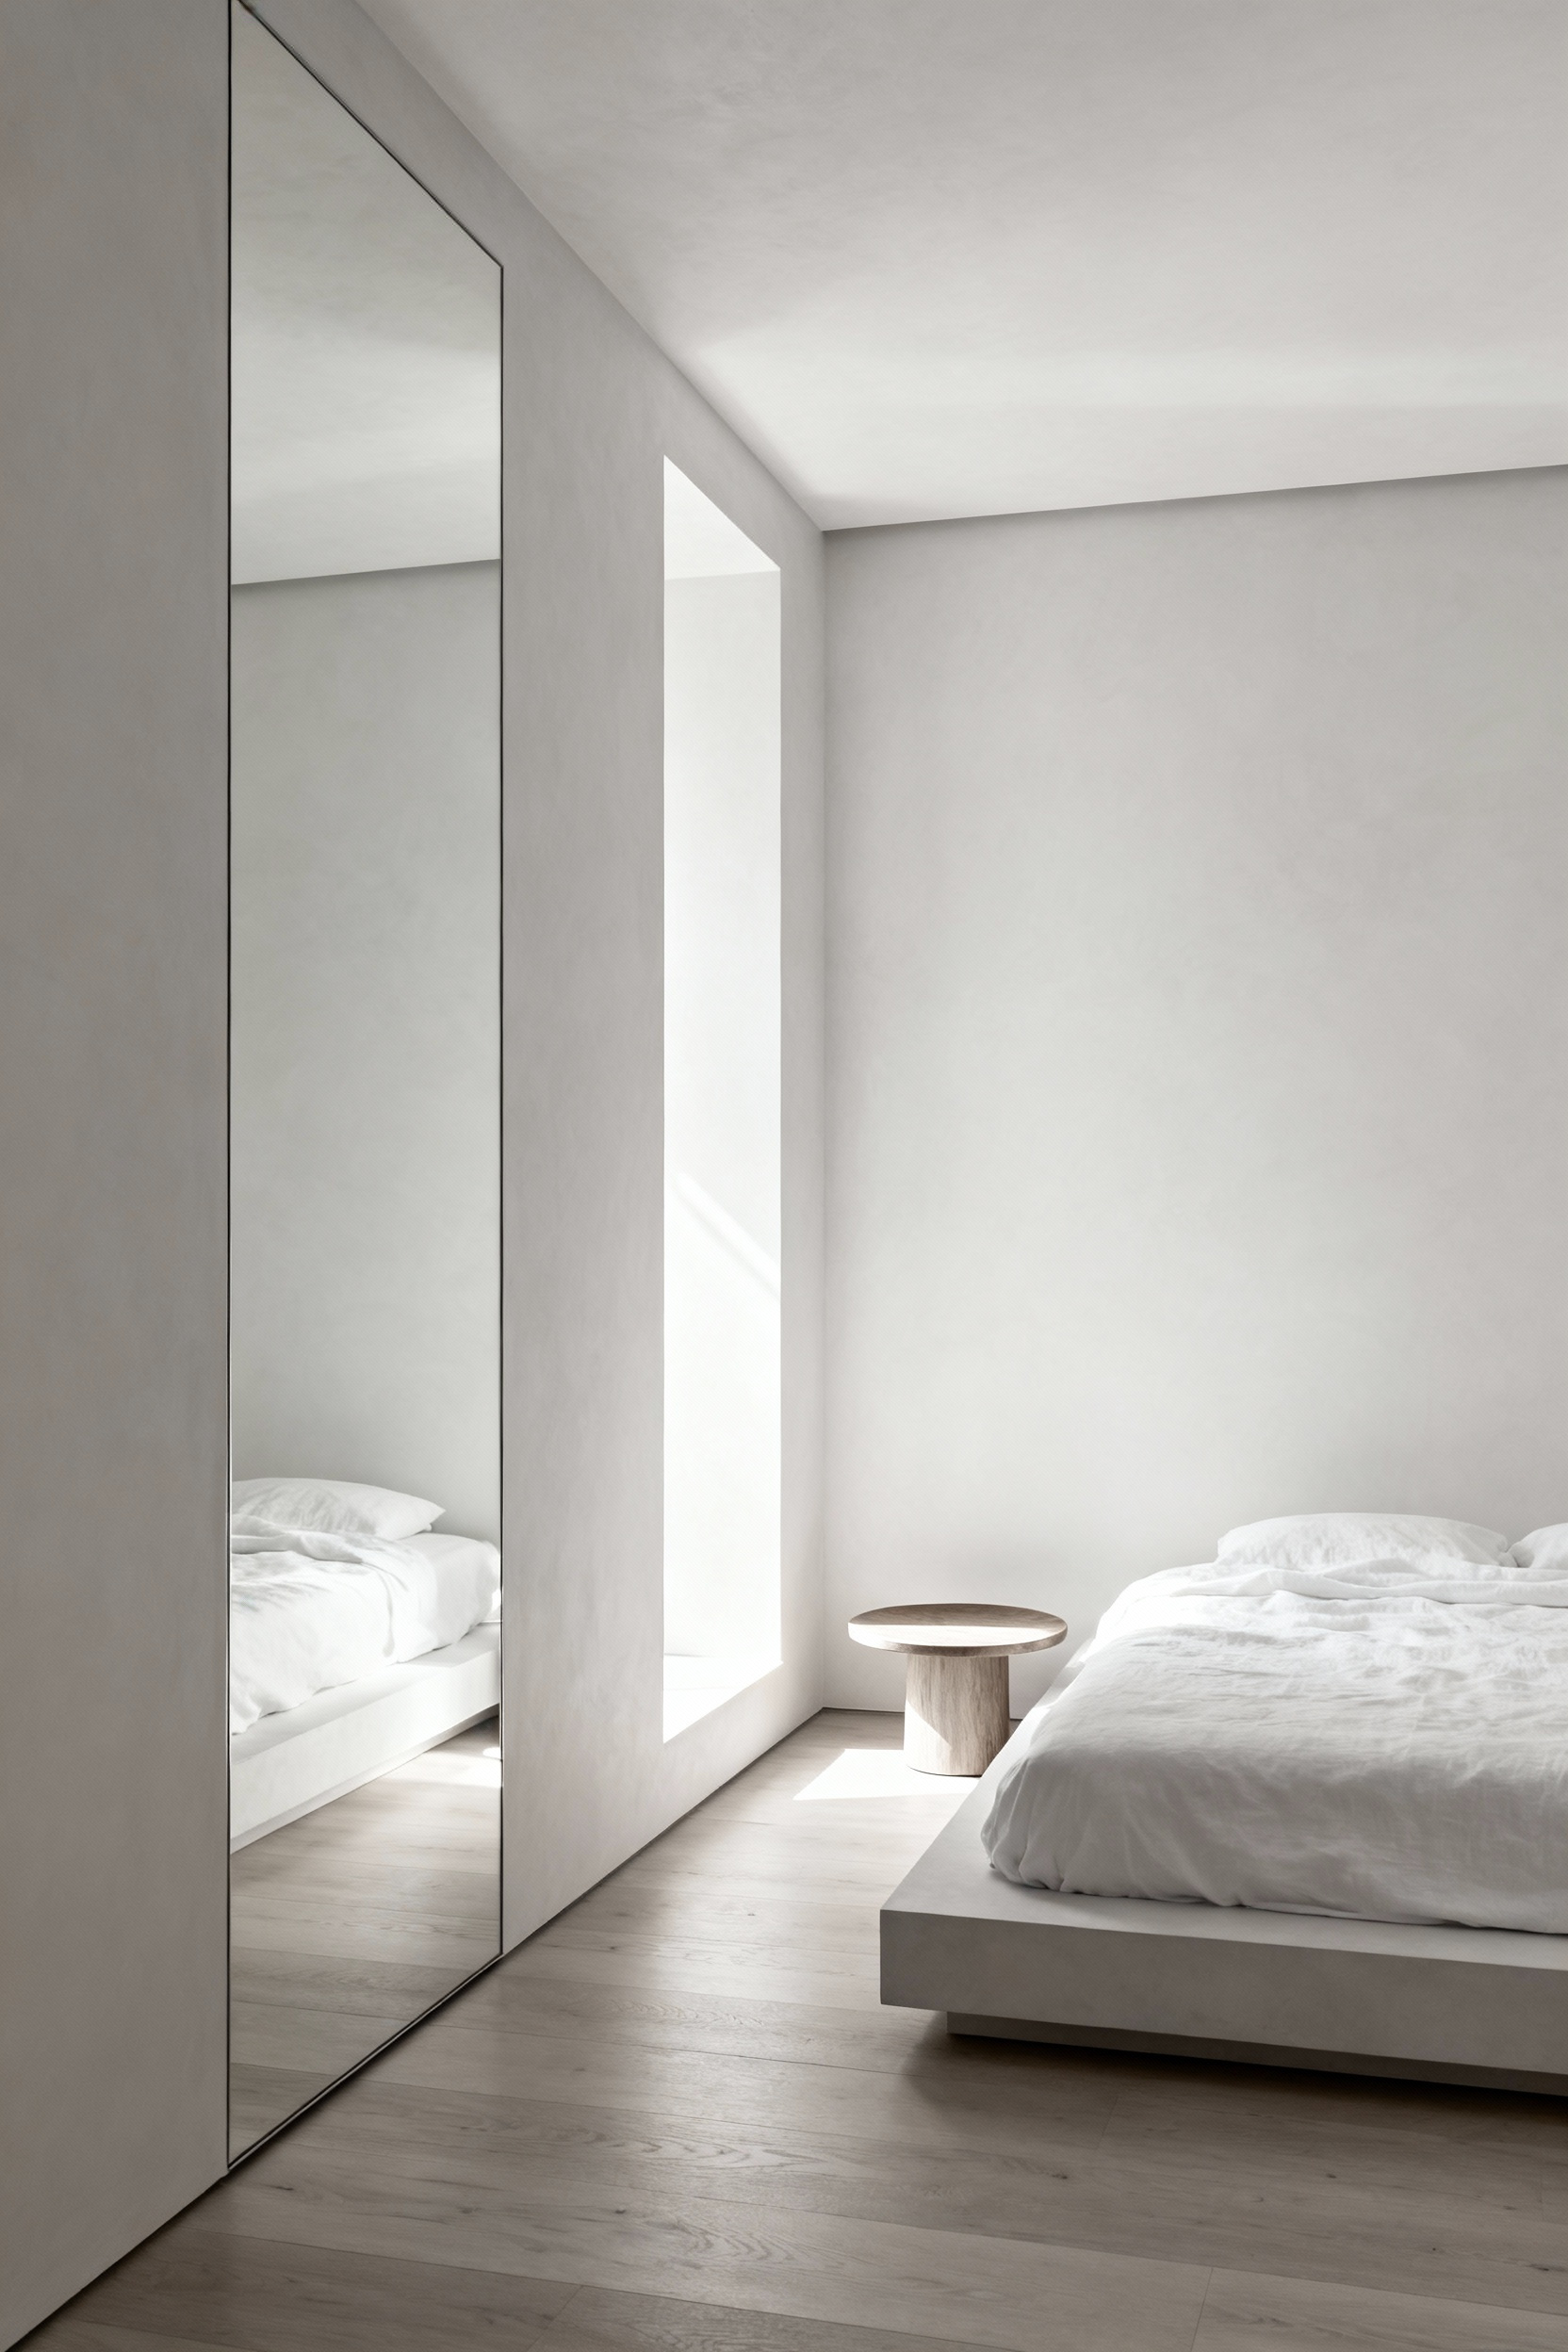
In a small bedroom, the primary goal is to trick the eye into perceiving boundaries where none exist. To achieve this, start by erasing the hard lines that define the room’s limits. Paint your walls and ceiling in the same light, monochromatic hue, such as soft white or pale gray. This technique dissolves the visual border where the wall meets the ceiling, making the room appear significantly taller.
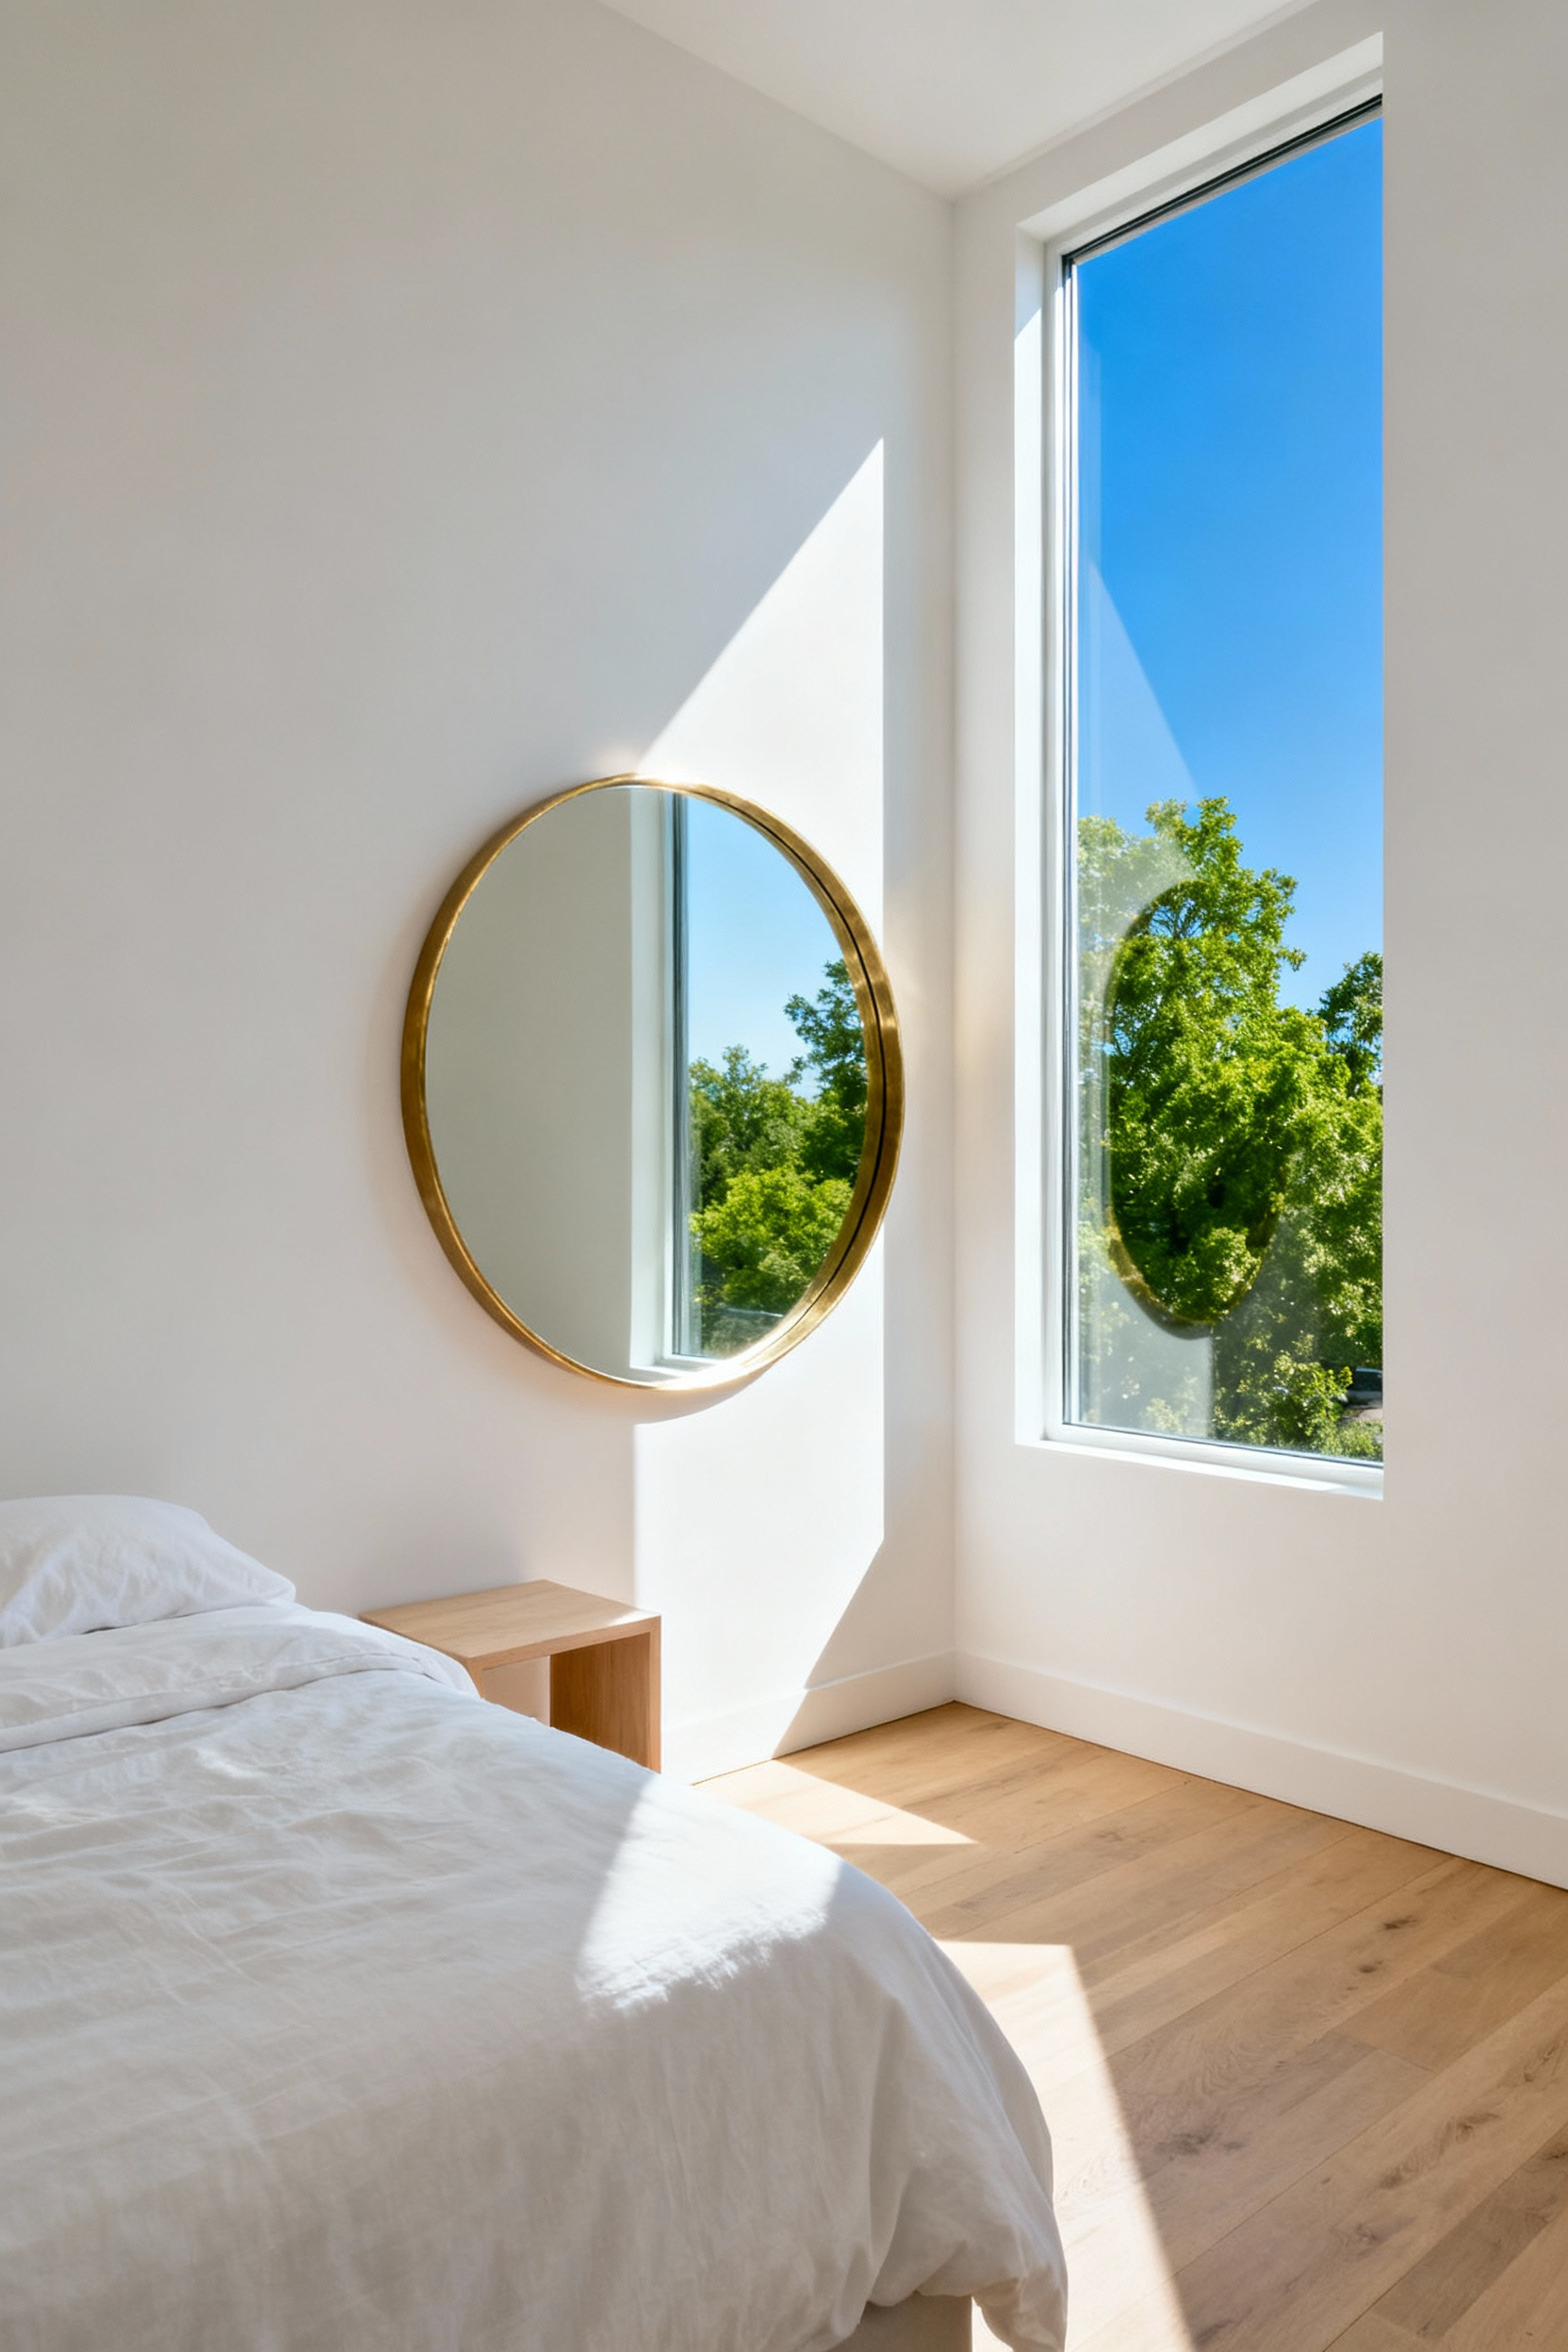
You can amplify this expansion by installing oversized or floor-to-ceiling mirrors, ideally on a wall opposite a window. This strategic placement bounces natural light deeper into the space and effectively doubles the visual square footage.
Once you have expanded the perceived width, focus on manipulating verticality and floor space. Draw the eye upward by mounting curtains high and wide, placing the rod near the ceiling rather than directly above the window frame. This lengthens the look of the walls.
Simultaneously, select furniture with slender, visible legs instead of solid, boxy bases. By revealing more of the floor underneath the bed or nightstand, you create an uninterrupted visual path. This simple adjustment prevents the room from feeling heavy and reinforces a sense of “airiness” throughout the layout.
Finally, refine your lighting scheme to eliminate physical clutter and enhance depth. Relying on a single overhead fixture tends to shrink a room, so layer your lighting with ambient, task, and accent sources to draw the eye to different corners. Prioritize wall-mounted sconces or pendant lights over bulky table lamps. This approach clears precious surface area on your bedside tables and keeps the focus on the architecture of the room rather than the density of its contents.
1. The ‘Infinity Curve’ Effect: Painting Trim and Ceilings to Blur Boundaries
The “Infinity Curve” effect, often referred to as color drenching, fundamentally changes how the eye perceives spatial boundaries in a tight room. Traditional contrasting trim acts as a visual frame, highlighting the room’s limited dimensions and stopping the eye at every corner.
By painting every surface—walls, baseboards, window casings, and doors—the exact same shade, you eliminate these hard stops. This technique allows the gaze to sweep continuously across the room, creating an optical illusion of seamless, expansive space.
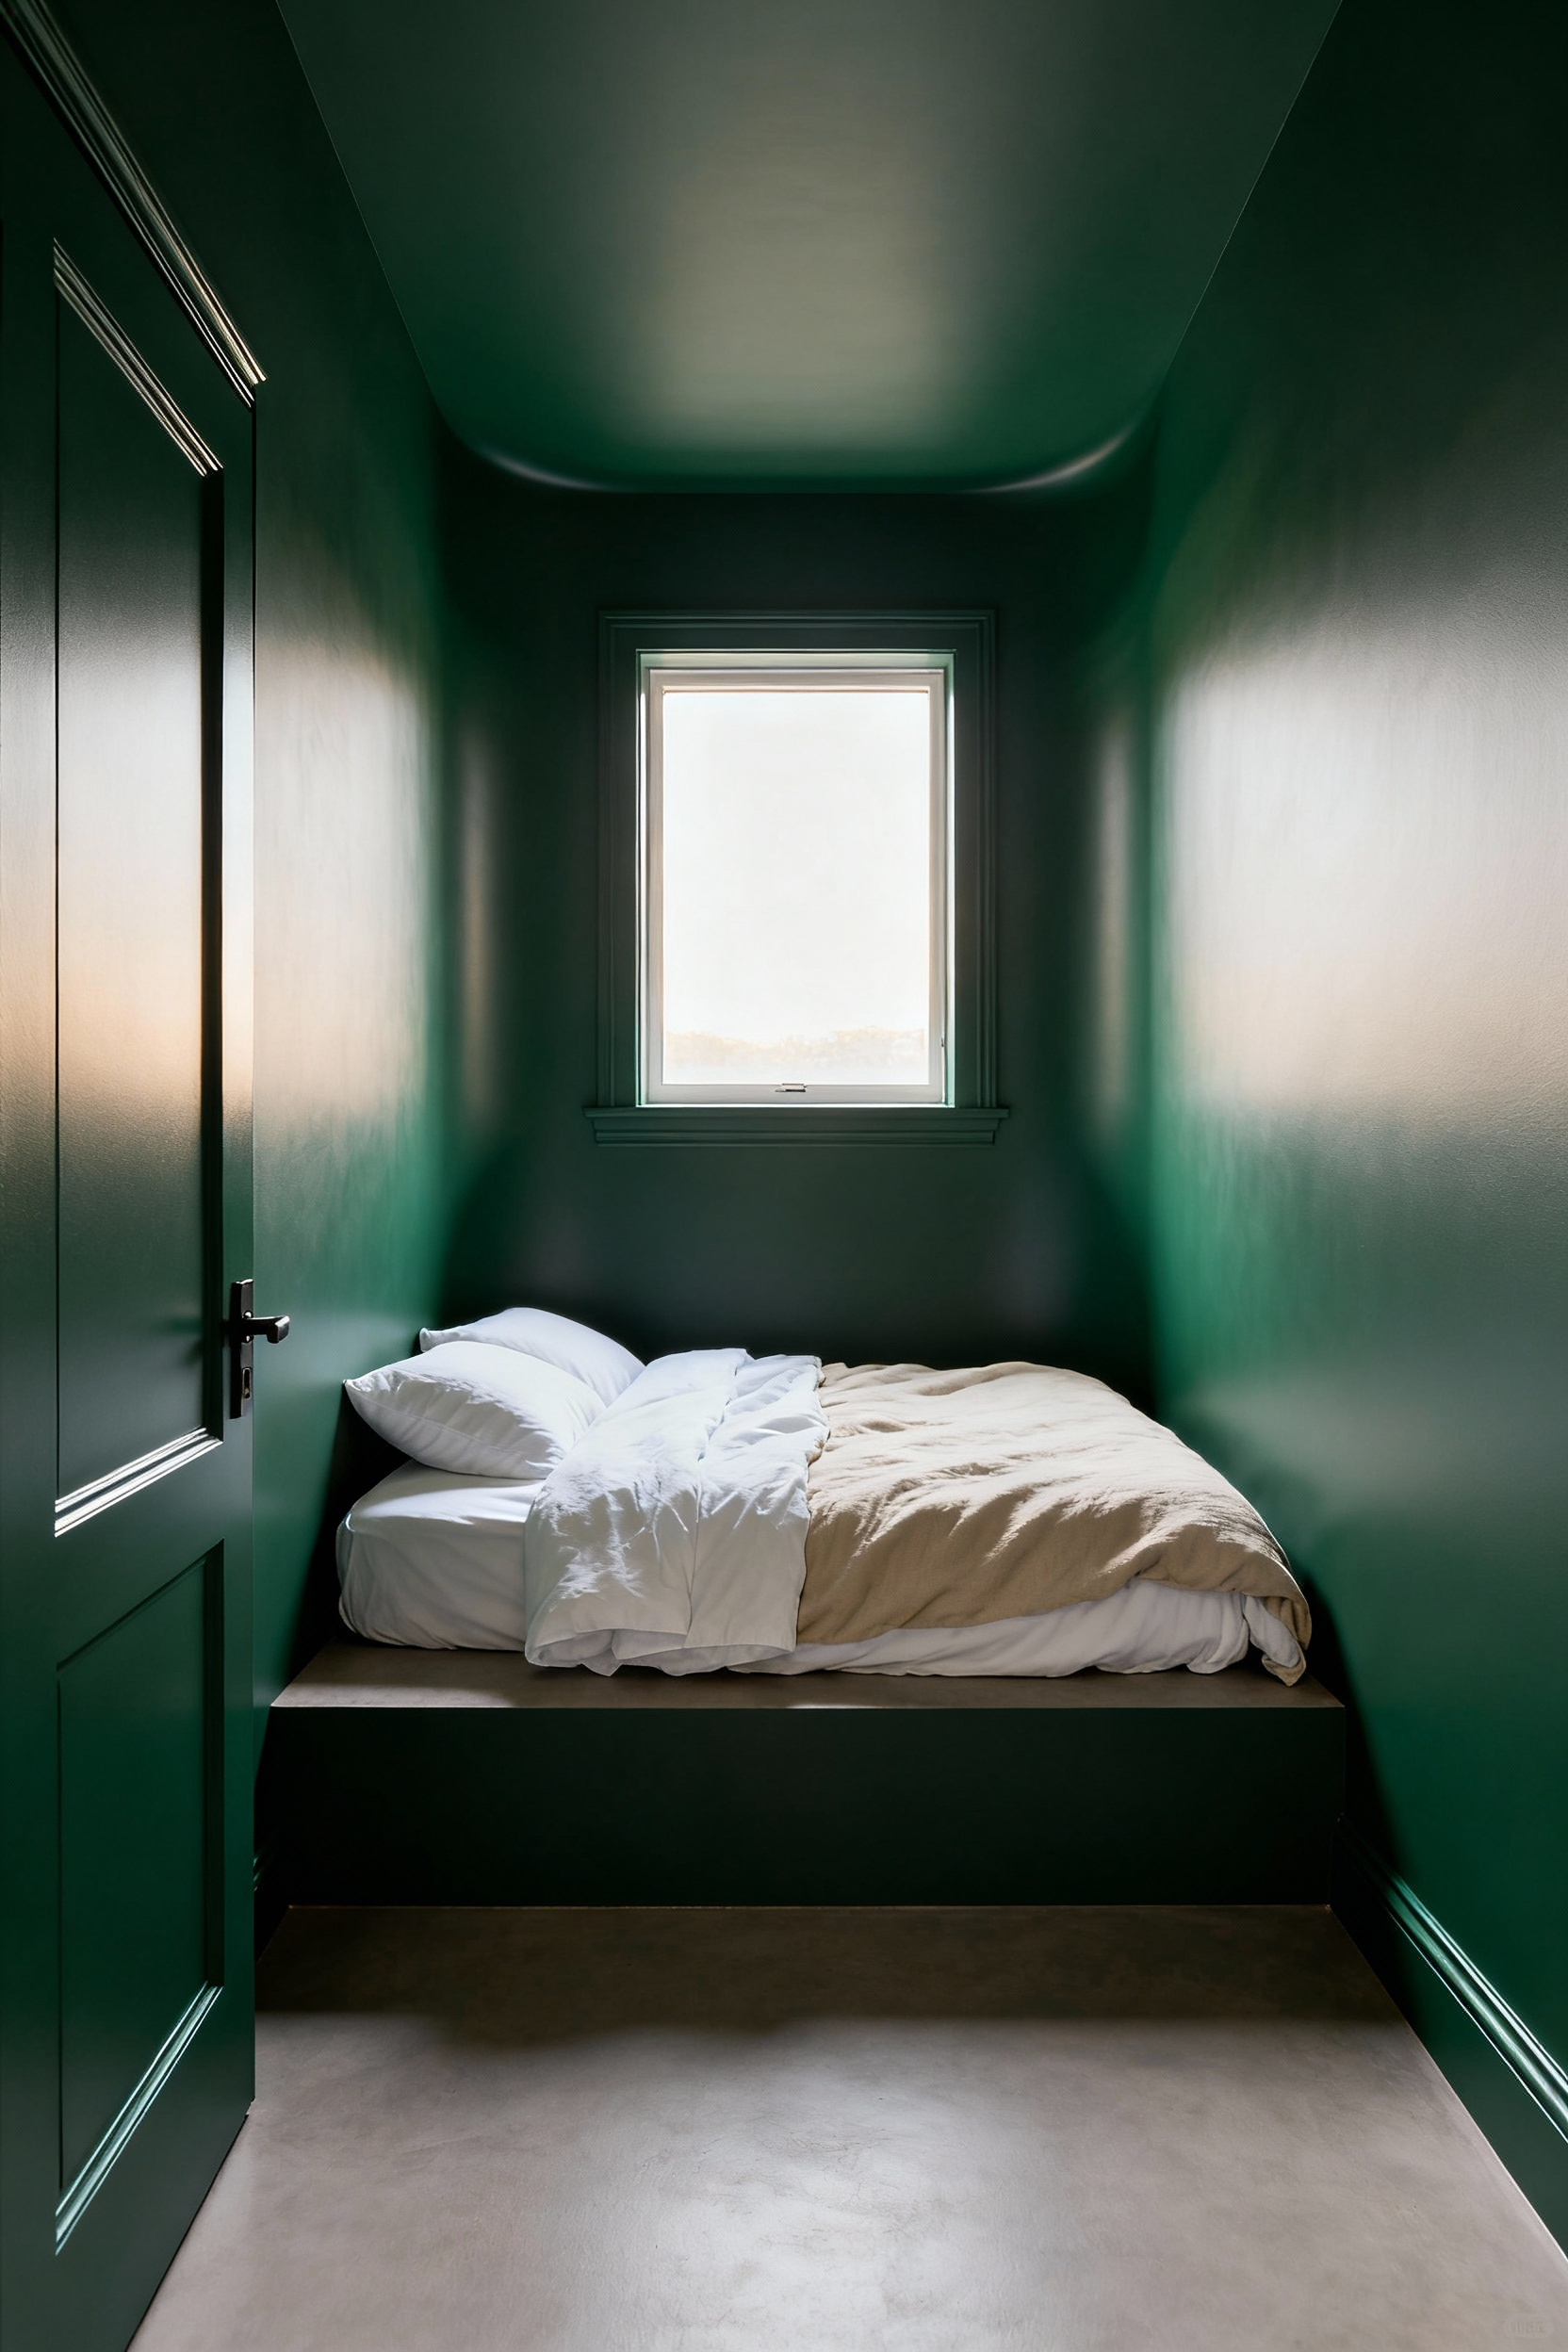
To execute this properly, you must extend the color to the ceiling. Leaving a ceiling white creates a harsh horizontal line that acts as a “lid,” making the room feel boxed in and the ceiling lower. However, a monochrome palette requires texture to avoid looking flat. Use the same color but alter the finish to create subtle architectural definition:
- Walls and Ceiling: Apply a matte or eggshell finish to absorb light and soften the surface.
- Trim and Doors: Use a semi-gloss or satin finish to reflect light and highlight architectural details.
The final atmosphere depends entirely on your color choice. Light neutrals, such as pale taupe or soft white, reflect light to make the room feel genuinely airier and physically larger. Conversely, saturated dark colors like navy or deep green embrace the small footprint. These tones create a sophisticated “cocoon” effect, turning a cramped bedroom into an intimate, dramatically comforting sanctuary. For more ideas on achieving optical expansion through color, review our guide on 10 Color Schemes to Make Your Small Bedroom Feel Huge.
2. Strategic Scale: Why Oversized Art Expands Perceived Depth Better than Gallery Walls
Gallery walls often introduce unnecessary visual noise into compact spaces. The grid of multiple frames and mats fragments the wall, creating a busy atmosphere that makes a small bedroom feel compressed.
Conversely, a single oversized piece creates an uninterrupted visual field. This approach eliminates clutter and establishes a powerful anchor. By fixing the gaze on one singular focal point, you stop the eye from bouncing disjointedly around the room, which instantly makes the space feel more expansive and intentional.
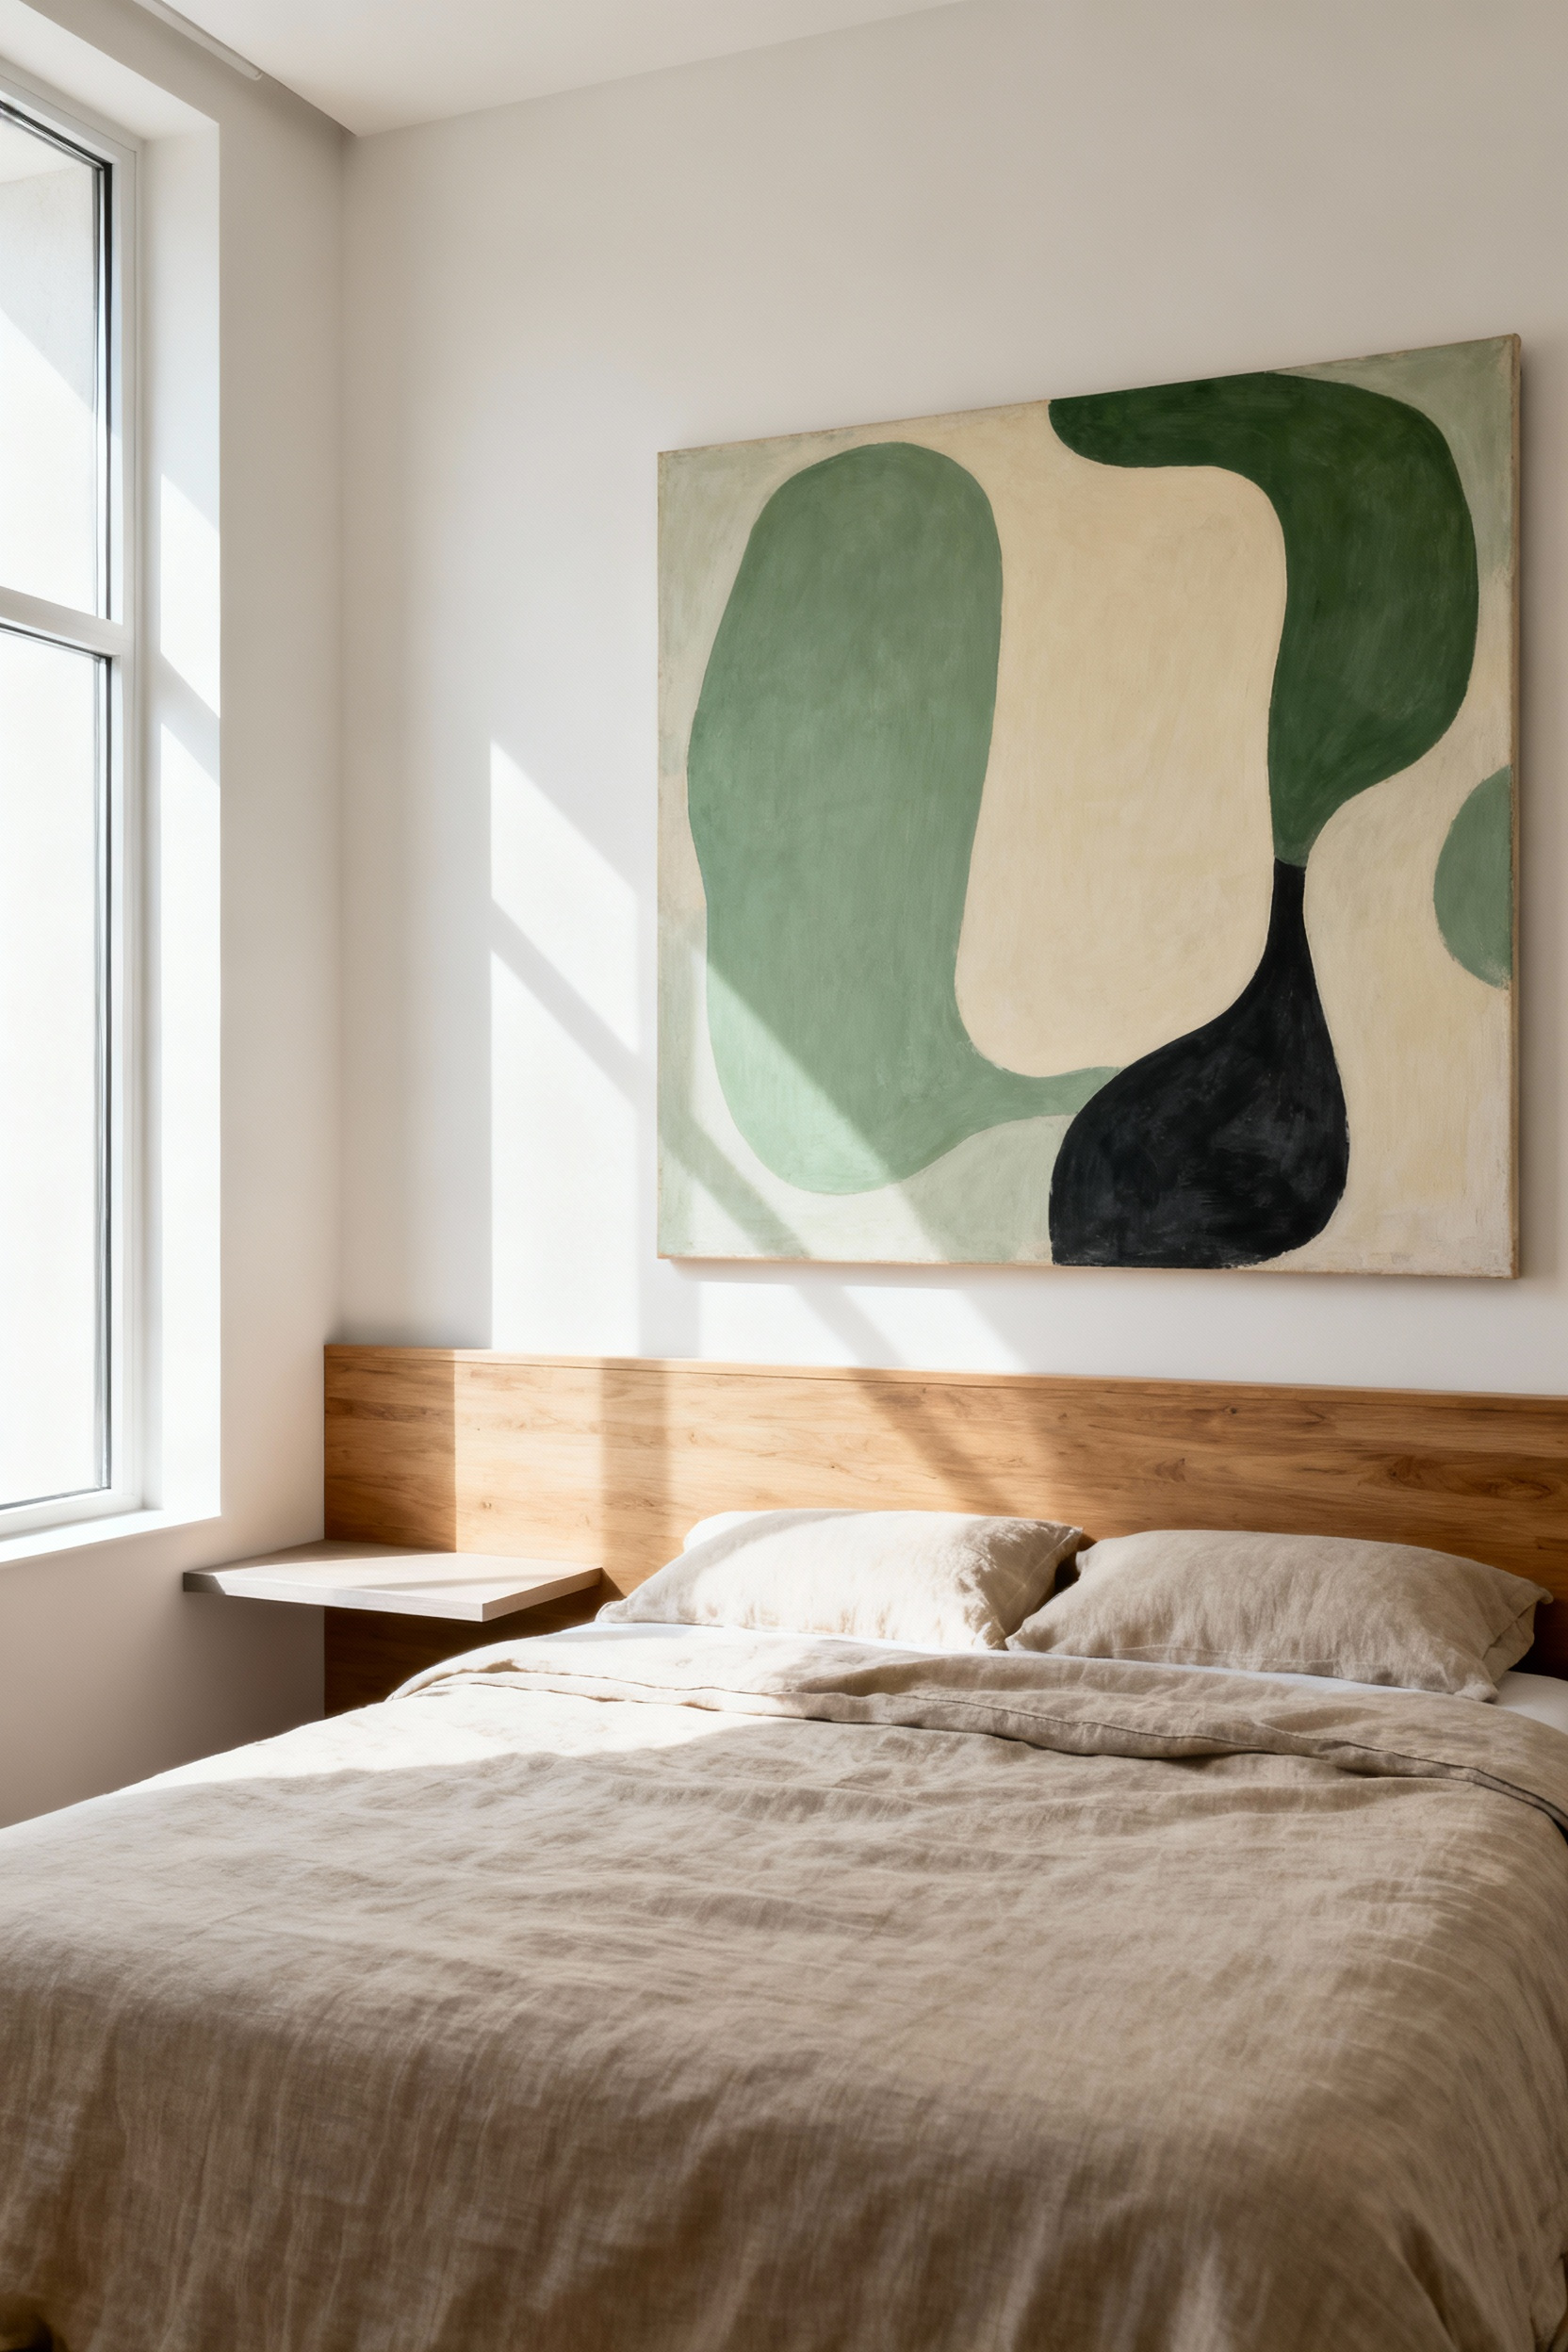
To maximize this illusion, treat the content of the art as a visual portal. Select imagery with expansive subject matter, such as deep landscapes or abstracts with strong perspective lines, to trick the mind into perceiving a view beyond the wall’s physical boundary. Additionally, prioritizing verticality creates architectural lift. A tall, portrait-oriented piece draws the eye upward, enhancing perceived ceiling height and adding vertical depth to a room with a limited footprint.
Achieving the right balance requires adherence to specific proportions. “Strategic Scale” is not about filling every inch of space but about balancing mass against the furniture below it. Follow these guidelines for the best result:
- Adhere to the 2/3rds Rule: Ensure the art spans 50% to 75% of the width of the furniture beneath it, such as the headboard or dresser.
- Maintain Balance: This specific width anchors the piece to the furniture, preventing it from looking like it is floating while ensuring it does not overwhelm the surrounding negative space.
3. Light Layering: Replacing Center Pendants with Architectural Perimeter Lighting
In small bedrooms, a central pendant often dominates the vertical space, effectively lowering the perceived ceiling height. Removing this bulky fixture in favor of architectural perimeter lighting immediately declutters the aesthetic and expands the room visually.
Techniques like cove lighting—where LED strips sit within ceiling recesses or molding—cast a soft, upward glow that washes the ceiling with light. This approach blurs the sharp boundaries between the walls and the ceiling, creating an illusion of greater height and depth that a standard fixture simply cannot achieve.

This method establishes a sophisticated ambient base. Unlike the harsh, direct glare of a single overhead bulb, perimeter lighting provides uniform, indirect illumination that suits a restful environment. To maximize this effect, prioritize the technical specifications of your LEDs:
- Select the right temperature: Choose a warm color temperature between 2700K and 3000K to maintain a cozy, inviting atmosphere.
- Install dimmers: Always integrate a dimmer switch. This gives you granular control to transition from bright general illumination to a low, moody glow for winding down.
While perimeter lighting solves the ambient equation, it functions best when layered with specific task fixtures. Once you establish that soft overhead glow, incorporate wall-mounted sconces or slim bedside lamps for focused brightness. This strategy separates general lighting from functional reading light, ensuring you have the right illumination exactly where you need it without reintroducing visual clutter to the center of the room.
4. The Photographer’s Mirror Trick: Doubling Light Sources, Not Just Reflections
Treat mirrors as active lighting equipment rather than passive decor. In photography, we use reflectors to bounce light into dark shadows; a well-placed mirror serves the exact same function in a small bedroom. By positioning a large mirror directly opposite or adjacent to your window, you capture incoming natural light and project it deeper into the room. This technique effectively doubles your illumination source and reflects the outdoor view, tricking the eye into perceiving greater depth and a significantly airier environment.
You can achieve similar results with artificial lighting to reduce the need for extra fixtures. Place a mirror—whether wall-mounted or a standing design—directly behind a bedside lamp or sconce. This amplifies the bulb’s glow and disperses soft light throughout the space, eliminating the need for cluttering floor lamps. To maximize this effect, consider these specific placements:
- Establish Symmetry: Install matching mirrors on both sides of the bed or a dresser. This creates visual balance and reflects light evenly across the room, adding structure and calm to a compact layout.
- Create a Virtual Window: Hang a frameless or window-pane style mirror in a dark, windowless corner. It captures light from distant sources to simulate an architectural opening, instantly relieving the cramped feeling of solid walls.
5. High-Gloss Finishes: Using Lacquer to Bounce Light and Create Dimension
High-gloss finishes function like architectural mirrors. They do not simply cover a surface; they activate it. By applying a lacquer or high-gloss paint to a single focal wall, such as the space behind a headboard or opposite a window, you create an illusion of exceptional depth. This mirror-like quality visually pushes the room’s boundaries outward and dramatically amplifies natural light. The result is a space that feels expansive rather than enclosed.
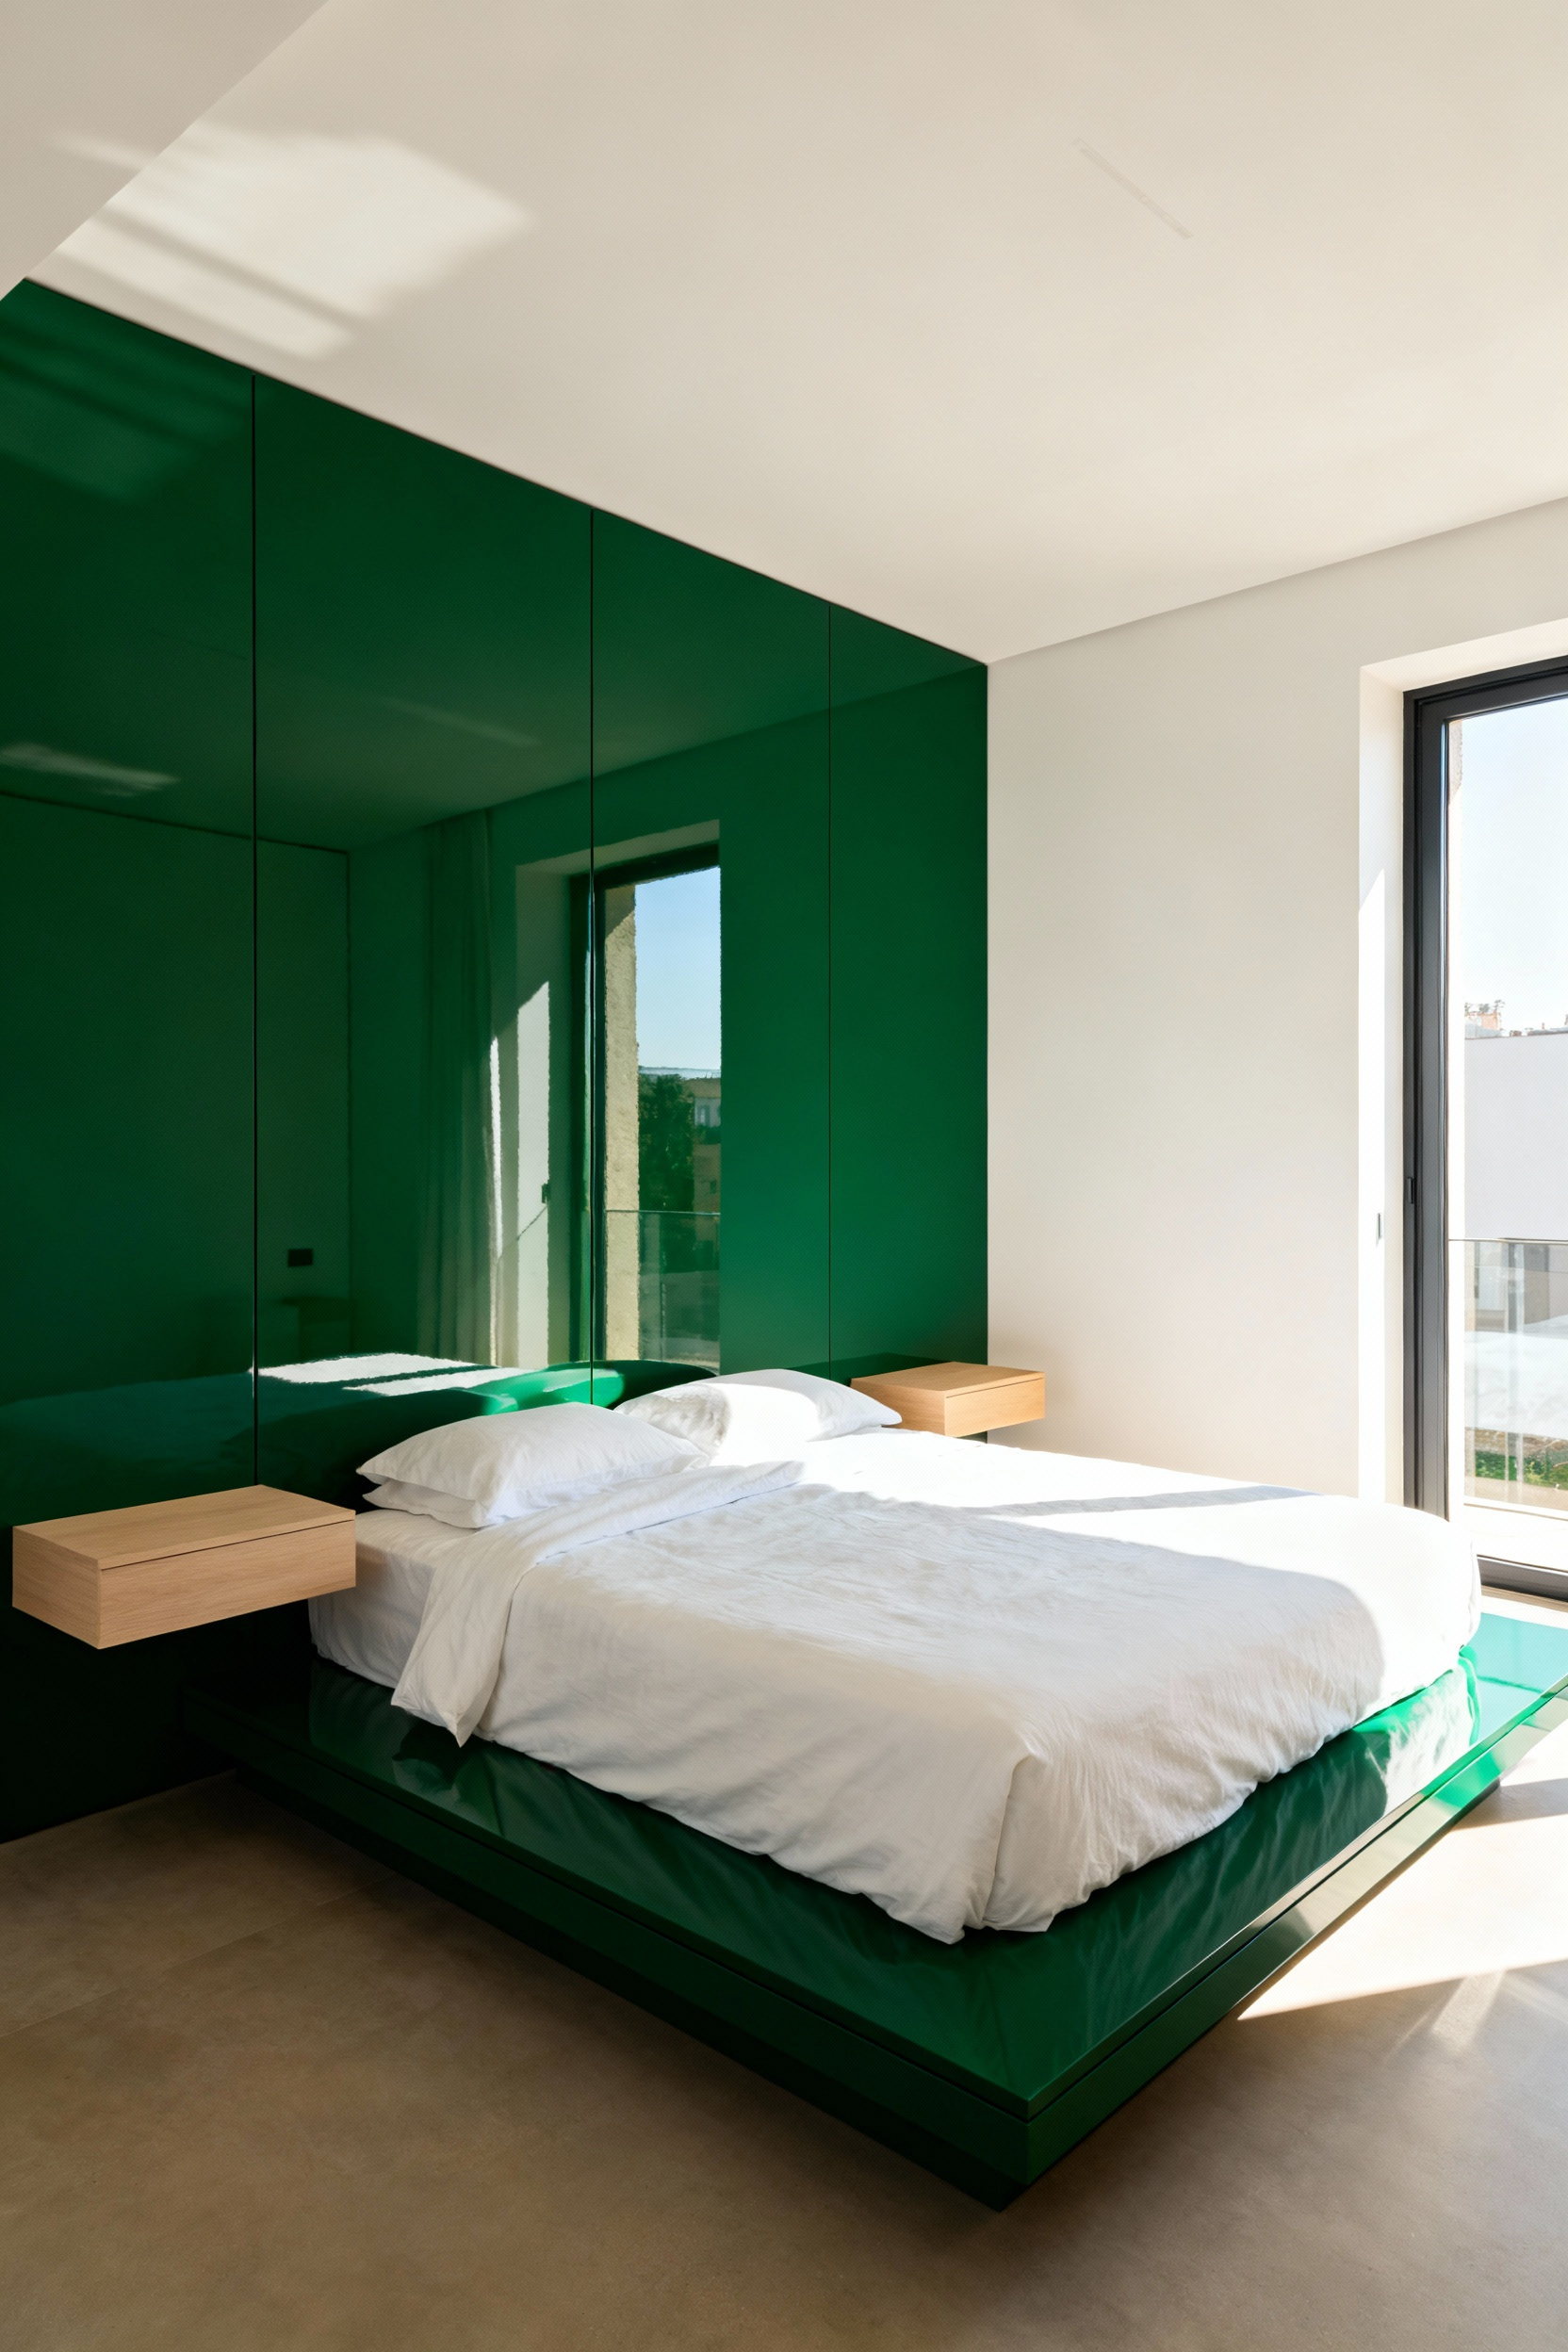
For a less labor-intensive approach, consider introducing high-gloss furniture rather than painting the architecture. Select a single piece, such as a dresser or nightstand, to serve as a modern, luxurious focal point. These compact, reflective surfaces catch light and bounce it across the room, making the area feel larger without the intensity of a fully lacquered environment. This allows you to control the reflection and maintain a balanced aesthetic.
However, the success of this look relies entirely on the condition of the underlying surface. High-gloss and lacquer finishes magnify every imperfection, highlighting bumps and uneven textures that matte paint would hide. To achieve a true glass-like effect, meticulous preparation is non-negotiable:
- Smooth the Foundation: Thorough sanding is required to level the surface completely.
- Prime Correctly: Use a high-quality primer designed for glossy topcoats to ensure adhesion and smoothness.
- Layer Thinly: Apply multiple thin coats rather than one thick coat to avoid drips and brush marks.
If you cannot commit to this level of preparation, hiring a professional ensures the finish creates the intended dimension rather than highlighting flaws.
Phase 2: Functional Calibration (Furniture & Layout)
Calibration begins with the room’s largest piece: the bed. Determine this placement first, typically against the longest wall or tucked into a corner, to establish a clear traffic flow. You must maintain at least two to three feet of clearance for movement and door access.
To prevent the space from feeling heavy, select furniture with slim profiles and exposed legs. Seeing the flooring beneath a dresser or bed extends sightlines, which tricks the eye into perceiving a larger, airier footprint.

Once the anchor is set, maximize utility by prioritizing multi-functional pieces and vertical storage. In a small bedroom, floor space is premium real estate; avoid bulky items that serve a single purpose. Instead, calibrate your layout using these space-saving strategies:
- Go vertical: Install floor-to-ceiling built-ins or floating shelves to remove visual clutter from the floor while drawing the eye upward.
- Demand double duty: Select bed frames with integrated drawers, storage ottomans for seating, or a small desk that functions as a nightstand.
- Embrace asymmetry: Abandon rigid symmetry. Replace one nightstand with a tall, narrow chest to increase storage capacity without expanding the furniture’s footprint.
6. Floating Fundamentals: Wall-Mounted Nightstands to Maximize Visible Floor Plane
In architectural design, the “visible floor plane” defines how large a room feels to the human eye. By eliminating traditional furniture legs, a floating nightstand exposes the flooring underneath, instantly reducing visual weight.
This continuous sweep of the floor creates an illusion of expanded square footage, transforming a cramped sleeping quarter into an airy, minimalist space. The result is a cleaner composition that feels less cluttered and significantly more open.

To achieve the best balance of form and function, installation height is critical. Mount the nightstand so the surface aligns perfectly with the top of your mattress or sits just one to two inches higher. This specific placement ensures your essentials remain within a natural, ergonomic reach while you are lying down.
When selecting your unit, prioritize models with concealed storage, such as hidden drawers or lift-top compartments. Tucking away cords, remotes, and reading glasses is the only way to maintain the streamlined aesthetic that makes the floating look effective.
Finally, you must optimize the limited surface area these units provide. Avoid crowding the nightstand with a traditional table lamp, which defeats the purpose of a minimalist setup. Instead, pair the floating shelf with a sleek wall-mounted sconce or a ceiling pendant. This lighting strategy keeps the surface completely free for functional items, such as a current book or a glass of water, ensuring the design remains as practical as it is visually striking.
7. The Asymmetry Advantage: Breaking Traditional Layout Rules for Better Flow
Rigid symmetry often strangles the functionality of a small bedroom. While a centered bed flanked by matching nightstands creates a pleasing photo, it frequently creates narrow, unusable pathways on either side.
To maximize floor space, push the bed directly into a corner or against a non-traditional wall, such as in front of a window. This layout creates a cozy, defined sleeping zone and consolidates the remaining open space into a single, usable area. By abandoning the centered anchor, you free up solid walls for substantial storage units like wardrobes and ensure unobstructed flow to closet doors and room entrances.

Once you shift the layout, rethink your supporting furniture to prioritize traffic flow. Embrace asymmetrical bedside storage to keep pathways clear. Use a slim console, a small desk, or even a floating shelf on the tighter side of the bed, reserving larger tables for the side with more clearance. In particularly tight quarters, forgo a bulky physical headboard entirely to save valuable inches of depth. You can still establish a strong focal point by applying an accent wall treatment, such as wallpaper or board-and-batten, directly behind the mattress.
Finally, achieve a sense of harmony through visual balance rather than identical repetition. Asymmetry requires counterbalancing visual weight to prevent the room from feeling lopsided. If you place a heavy, solid dresser on one side of the room, balance it on the opposing side with a tall floor lamp, a stack of artwork, or a full-length mirror. This approach allows for a dynamic, breathable layout that serves the homeowner’s daily needs rather than adhering to an outdated design rulebook.
8. Bed Elevation: Utilizing Under-Bed Cubic Footage Without Visual Clutter
In a small bedroom, the bed dominates the floor plan, making the volume beneath it the largest untapped resource for storage. Ignoring this space wastes valuable cubic footage, yet simply sliding items underneath creates visual noise that makes the room feel chaotic and smaller.
The most architectural solution is to invest in a built-in storage bed frame. Platform beds with integrated drawers or hydraulic ottoman lifts offer deep, fully concealed storage. These designs maintain the clean lines of the furniture while utilizing every inch of space, keeping the room visually uniform. For additional techniques, review our guide on 9 Brilliant Hacks to Maximize Storage in Your Tiny Bedroom.
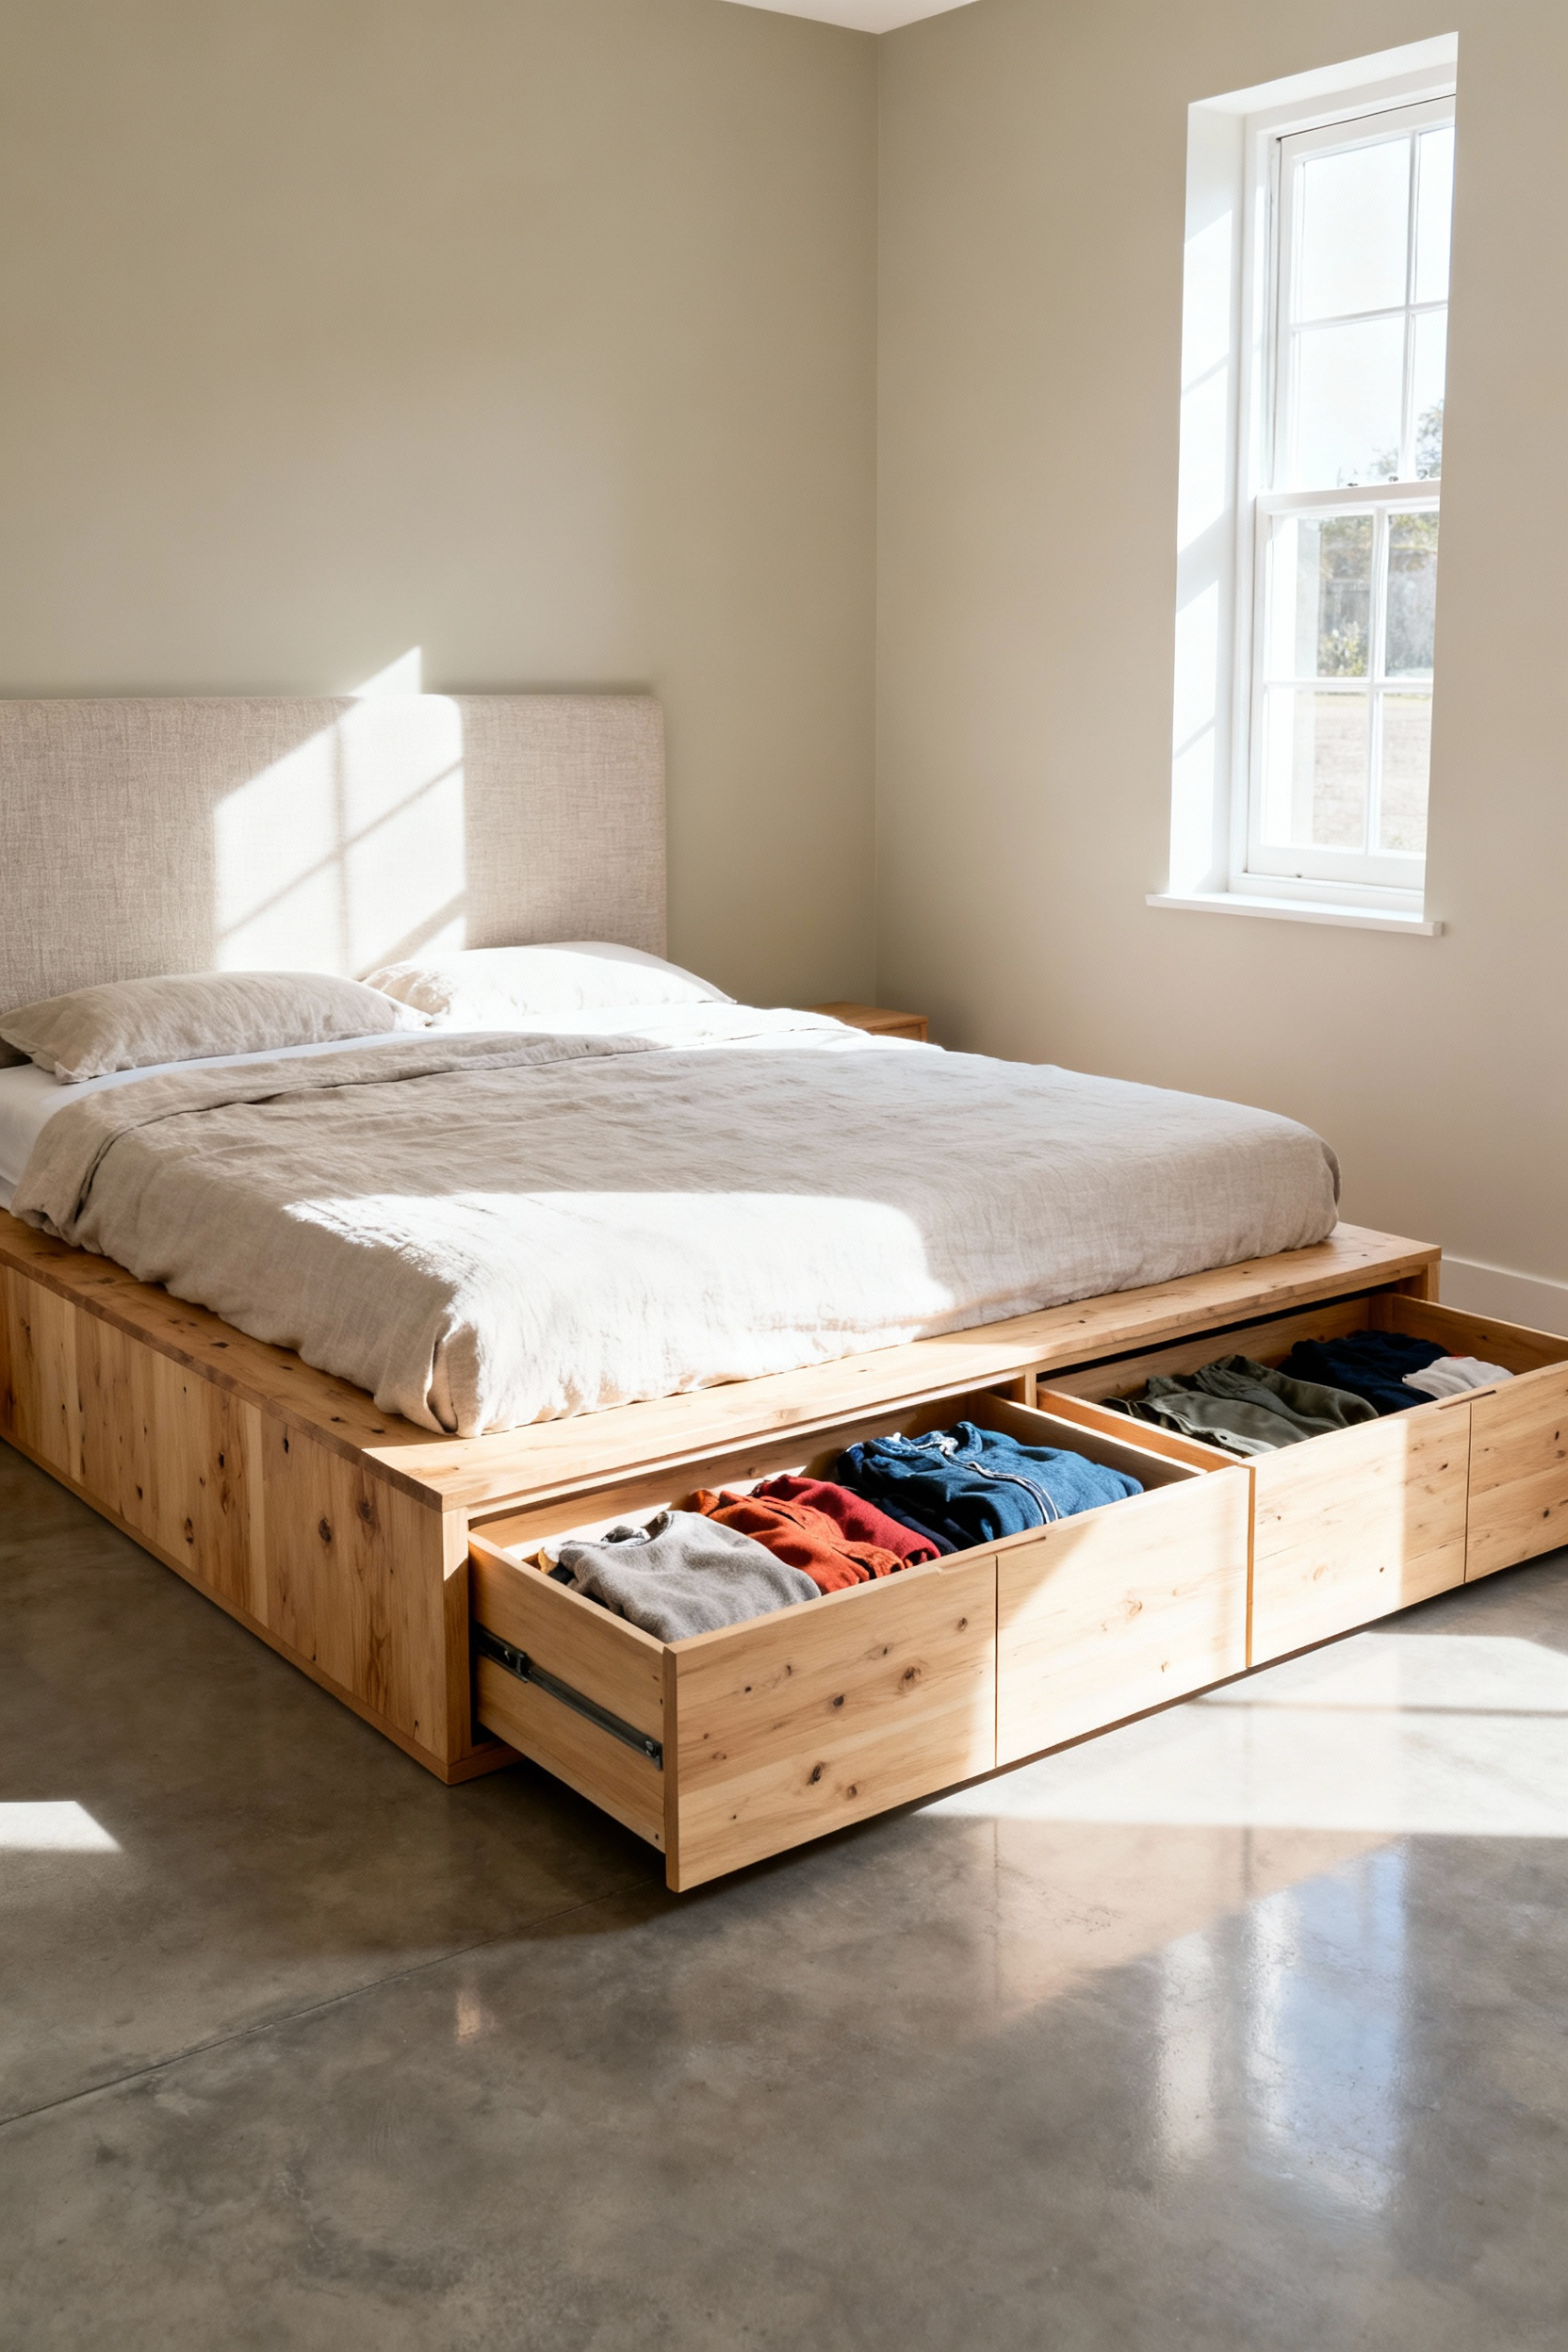
If purchasing a new frame isn’t feasible, you can maximize a standard frame by increasing its vertical capacity. Use sturdy bed risers to elevate the frame, instantly expanding the available storage height. To maintain efficiency, opt for flat, lidded containers on wheels that protect items from dust and allow for easy retrieval.
However, to prevent this utilitarian setup from clashing with your design, employ a floor-length bed skirt. A crisp, tailored dust ruffle completely hides inexpensive bins and risers, effectively erasing the visual clutter while retaining full access to your belongings.
For bedrooms where the under-bed area remains visible, you must treat storage containers as decor rather than simple receptacles. Swap mismatched plastic tubs for cohesive, aesthetically pleasing options that align with the room’s palette. Woven baskets, chic rolling drawers, or uniform lidded canvas bins create a sense of rhythm and order. By selecting containers that complement your existing textures and colors, you transform necessary storage into an intentional design feature.
9. The Murphy Bed Evolution: Modern Integrated Systems for Dual-Purpose Rooms
The Murphy bed has graduated from a simple fold-out mattress to a sophisticated architectural solution. Modern systems prioritize dual functionality, serving a permanent purpose even when the bed is stored.
Look for designs with integrated sofas to instantly convert a sleeping quarter into a living space. For home offices, select systems with pivot desks that remain level as the bed descends. This engineering allows you to leave monitors and paperwork undisturbed, seamlessly transitioning the room from workspace to bedroom without clearing your surface.
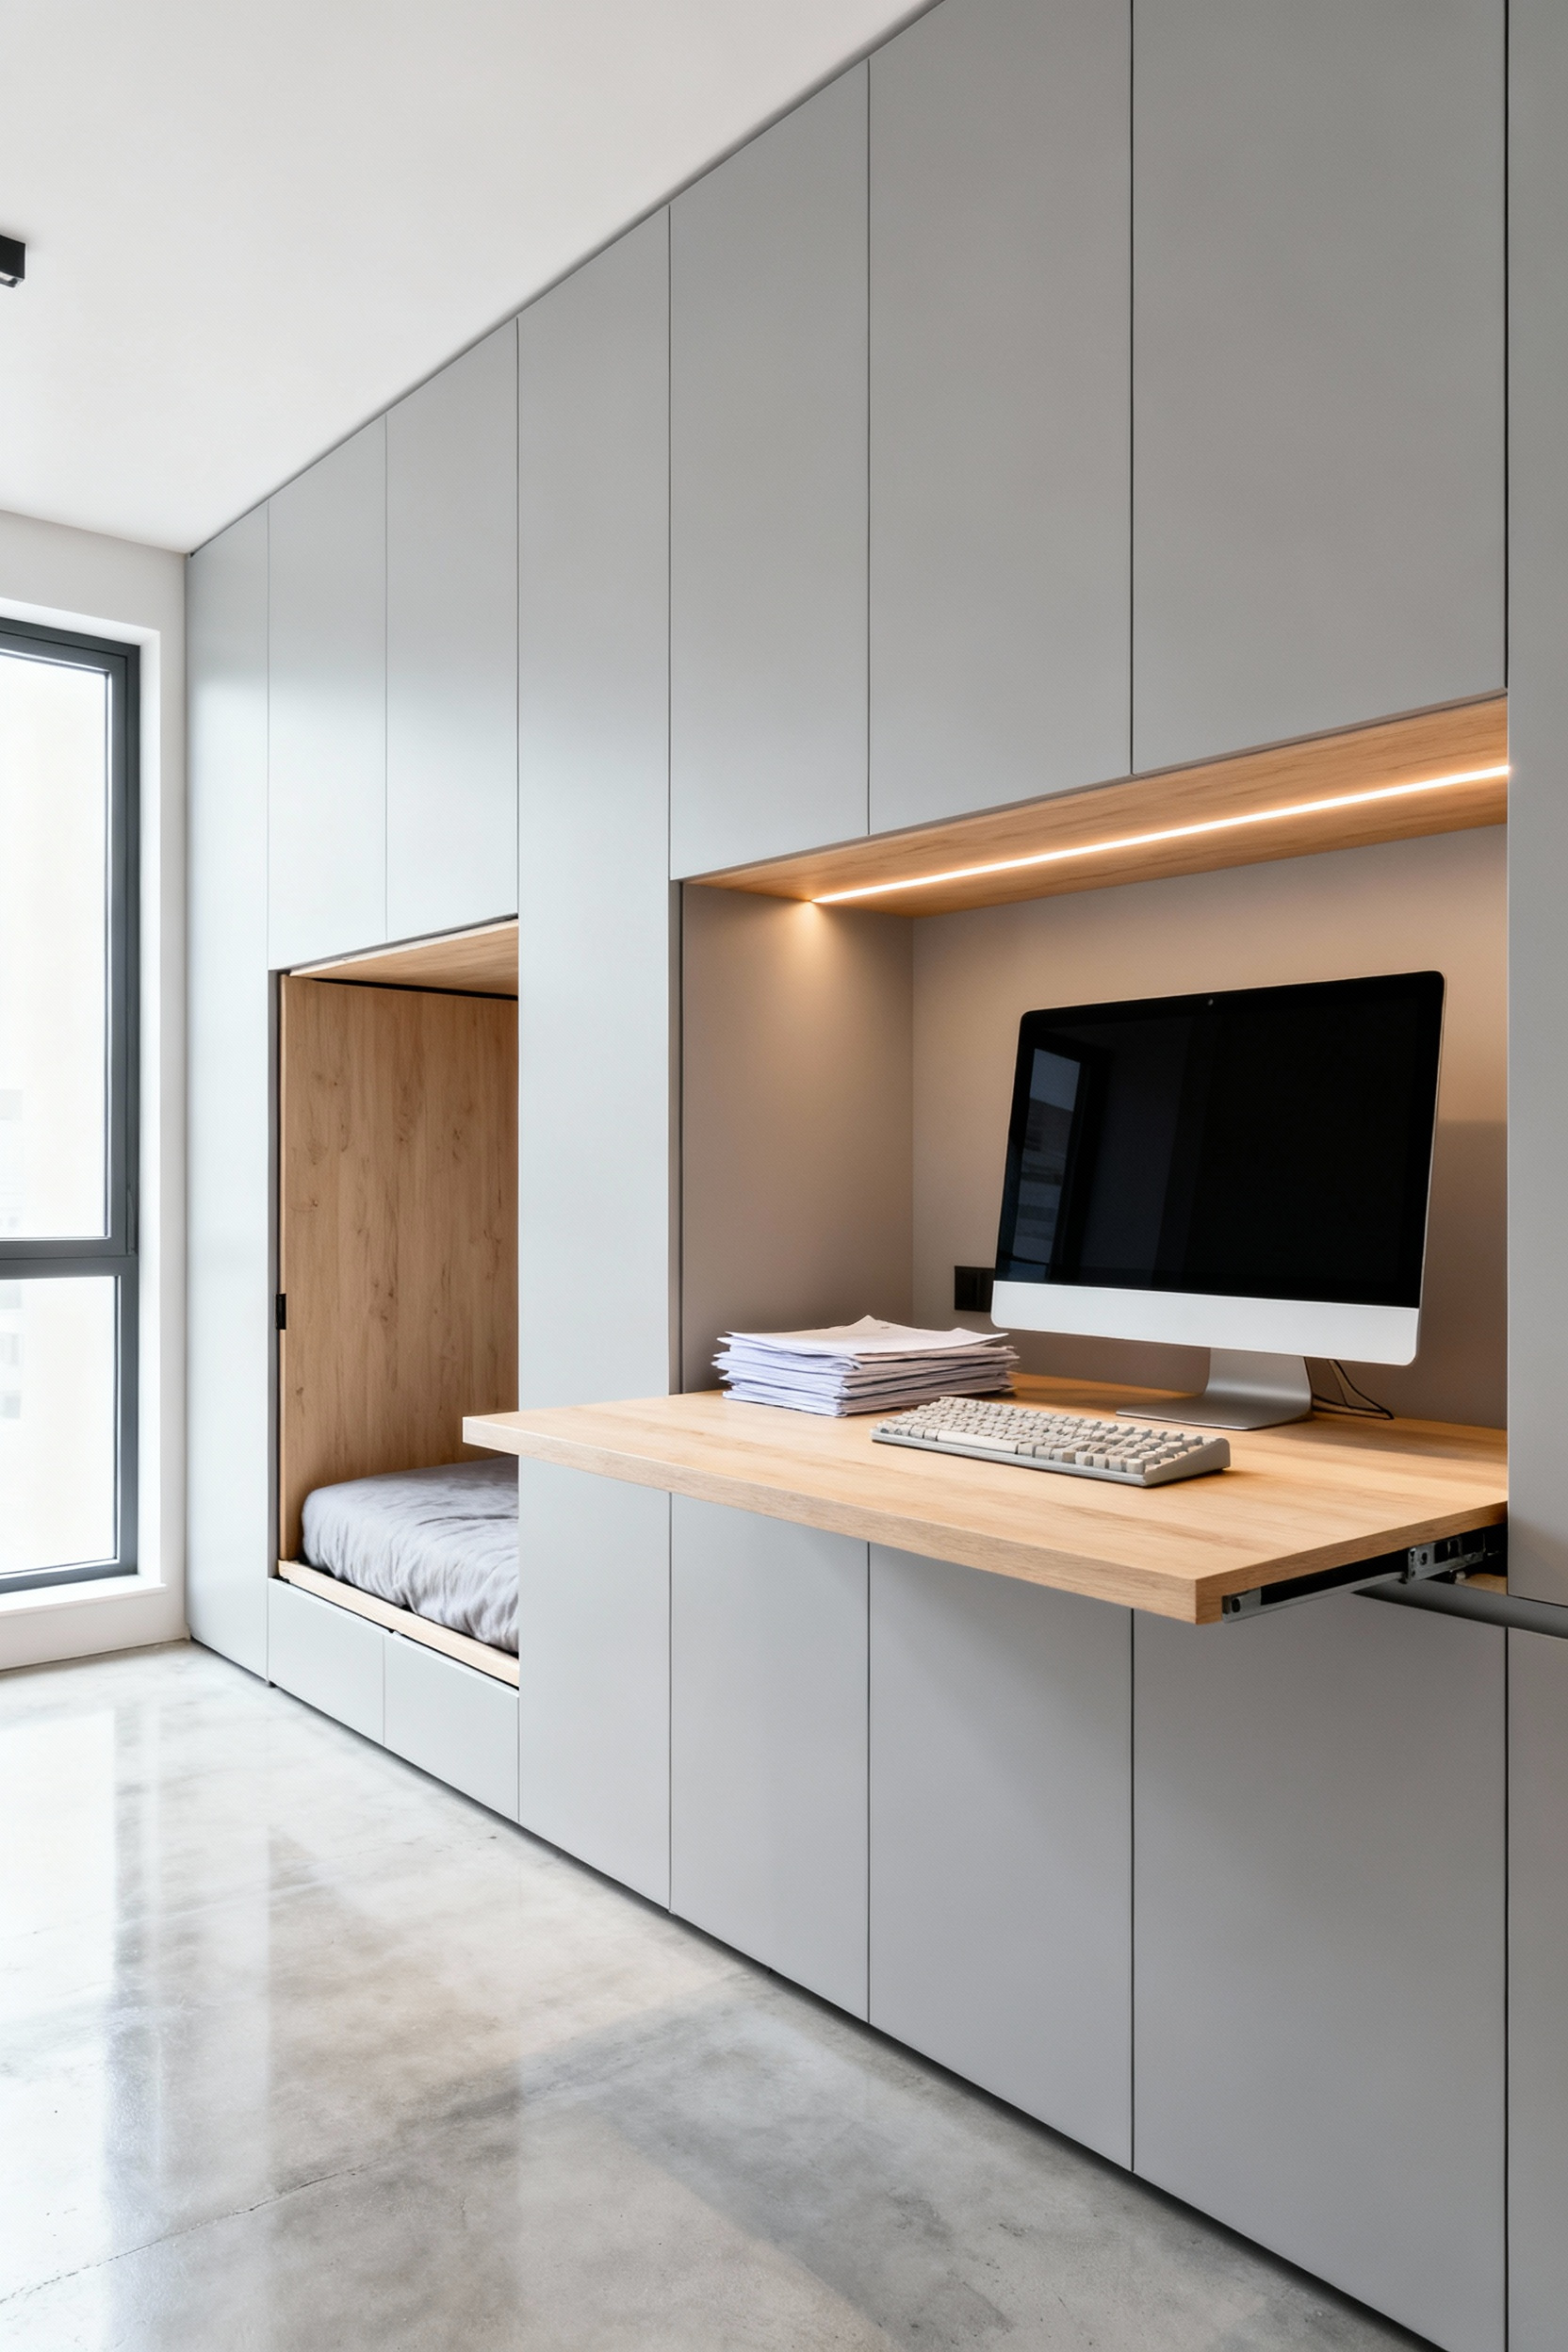
To truly maximize square footage, treat the bed as the anchor of a complete floor-to-ceiling storage hub. Flank the central unit with custom-fit cabinetry, wardrobes, or shelving to utilize the full vertical height of the room. Specify custom finishes and hardware that match your existing décor so the closed unit resembles high-end millwork rather than a concealed mattress. Prioritize safety and ease of use by choosing hydraulic or piston mechanisms. These modern systems offer smooth, one-handed operation and secure locking features, a significant upgrade from the cumbersome spring-loaded models of the past.
Modern integrated systems also eliminate the need for peripheral furniture like bulky nightstands through smart design. Select units equipped with built-in technology to streamline the user experience. Features such as integrated USB charging ports, electrical outlets, and motion-sensor LED strip lighting provide essential utility without cable clutter. By consolidating sleeping, working, storage, and lighting into one cohesive structure, you create a dual-purpose room that feels intentional rather than temporary.
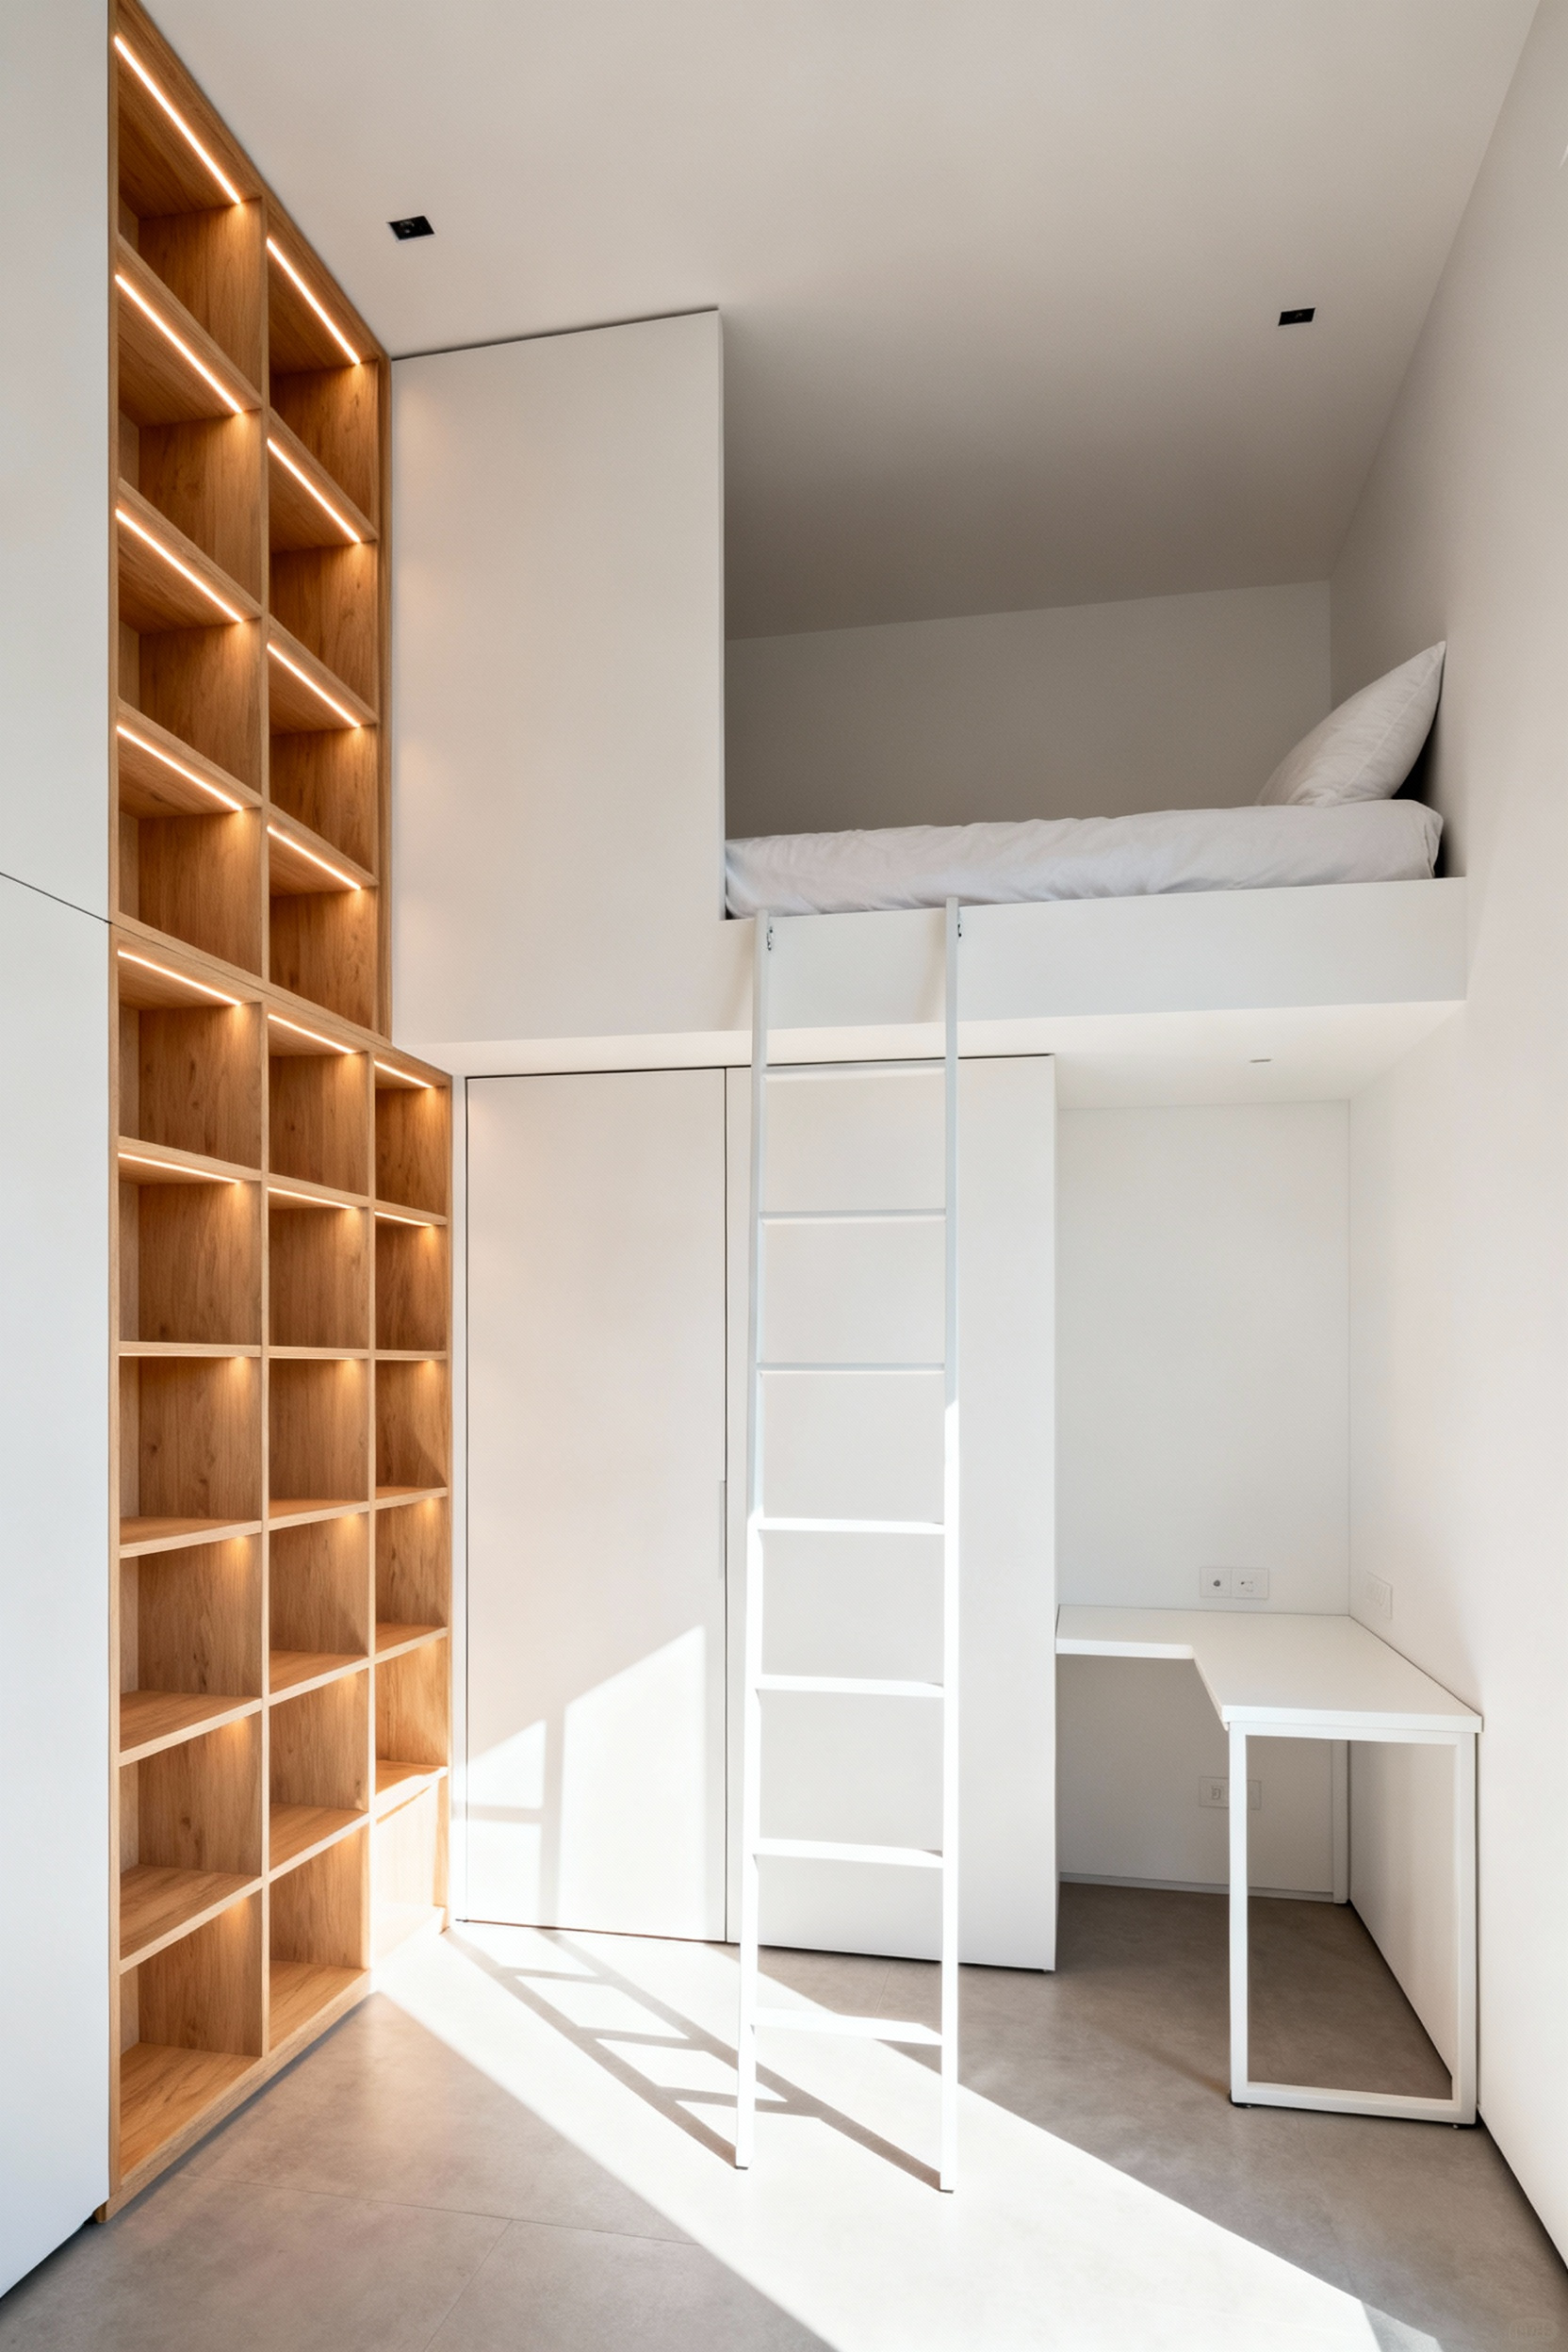
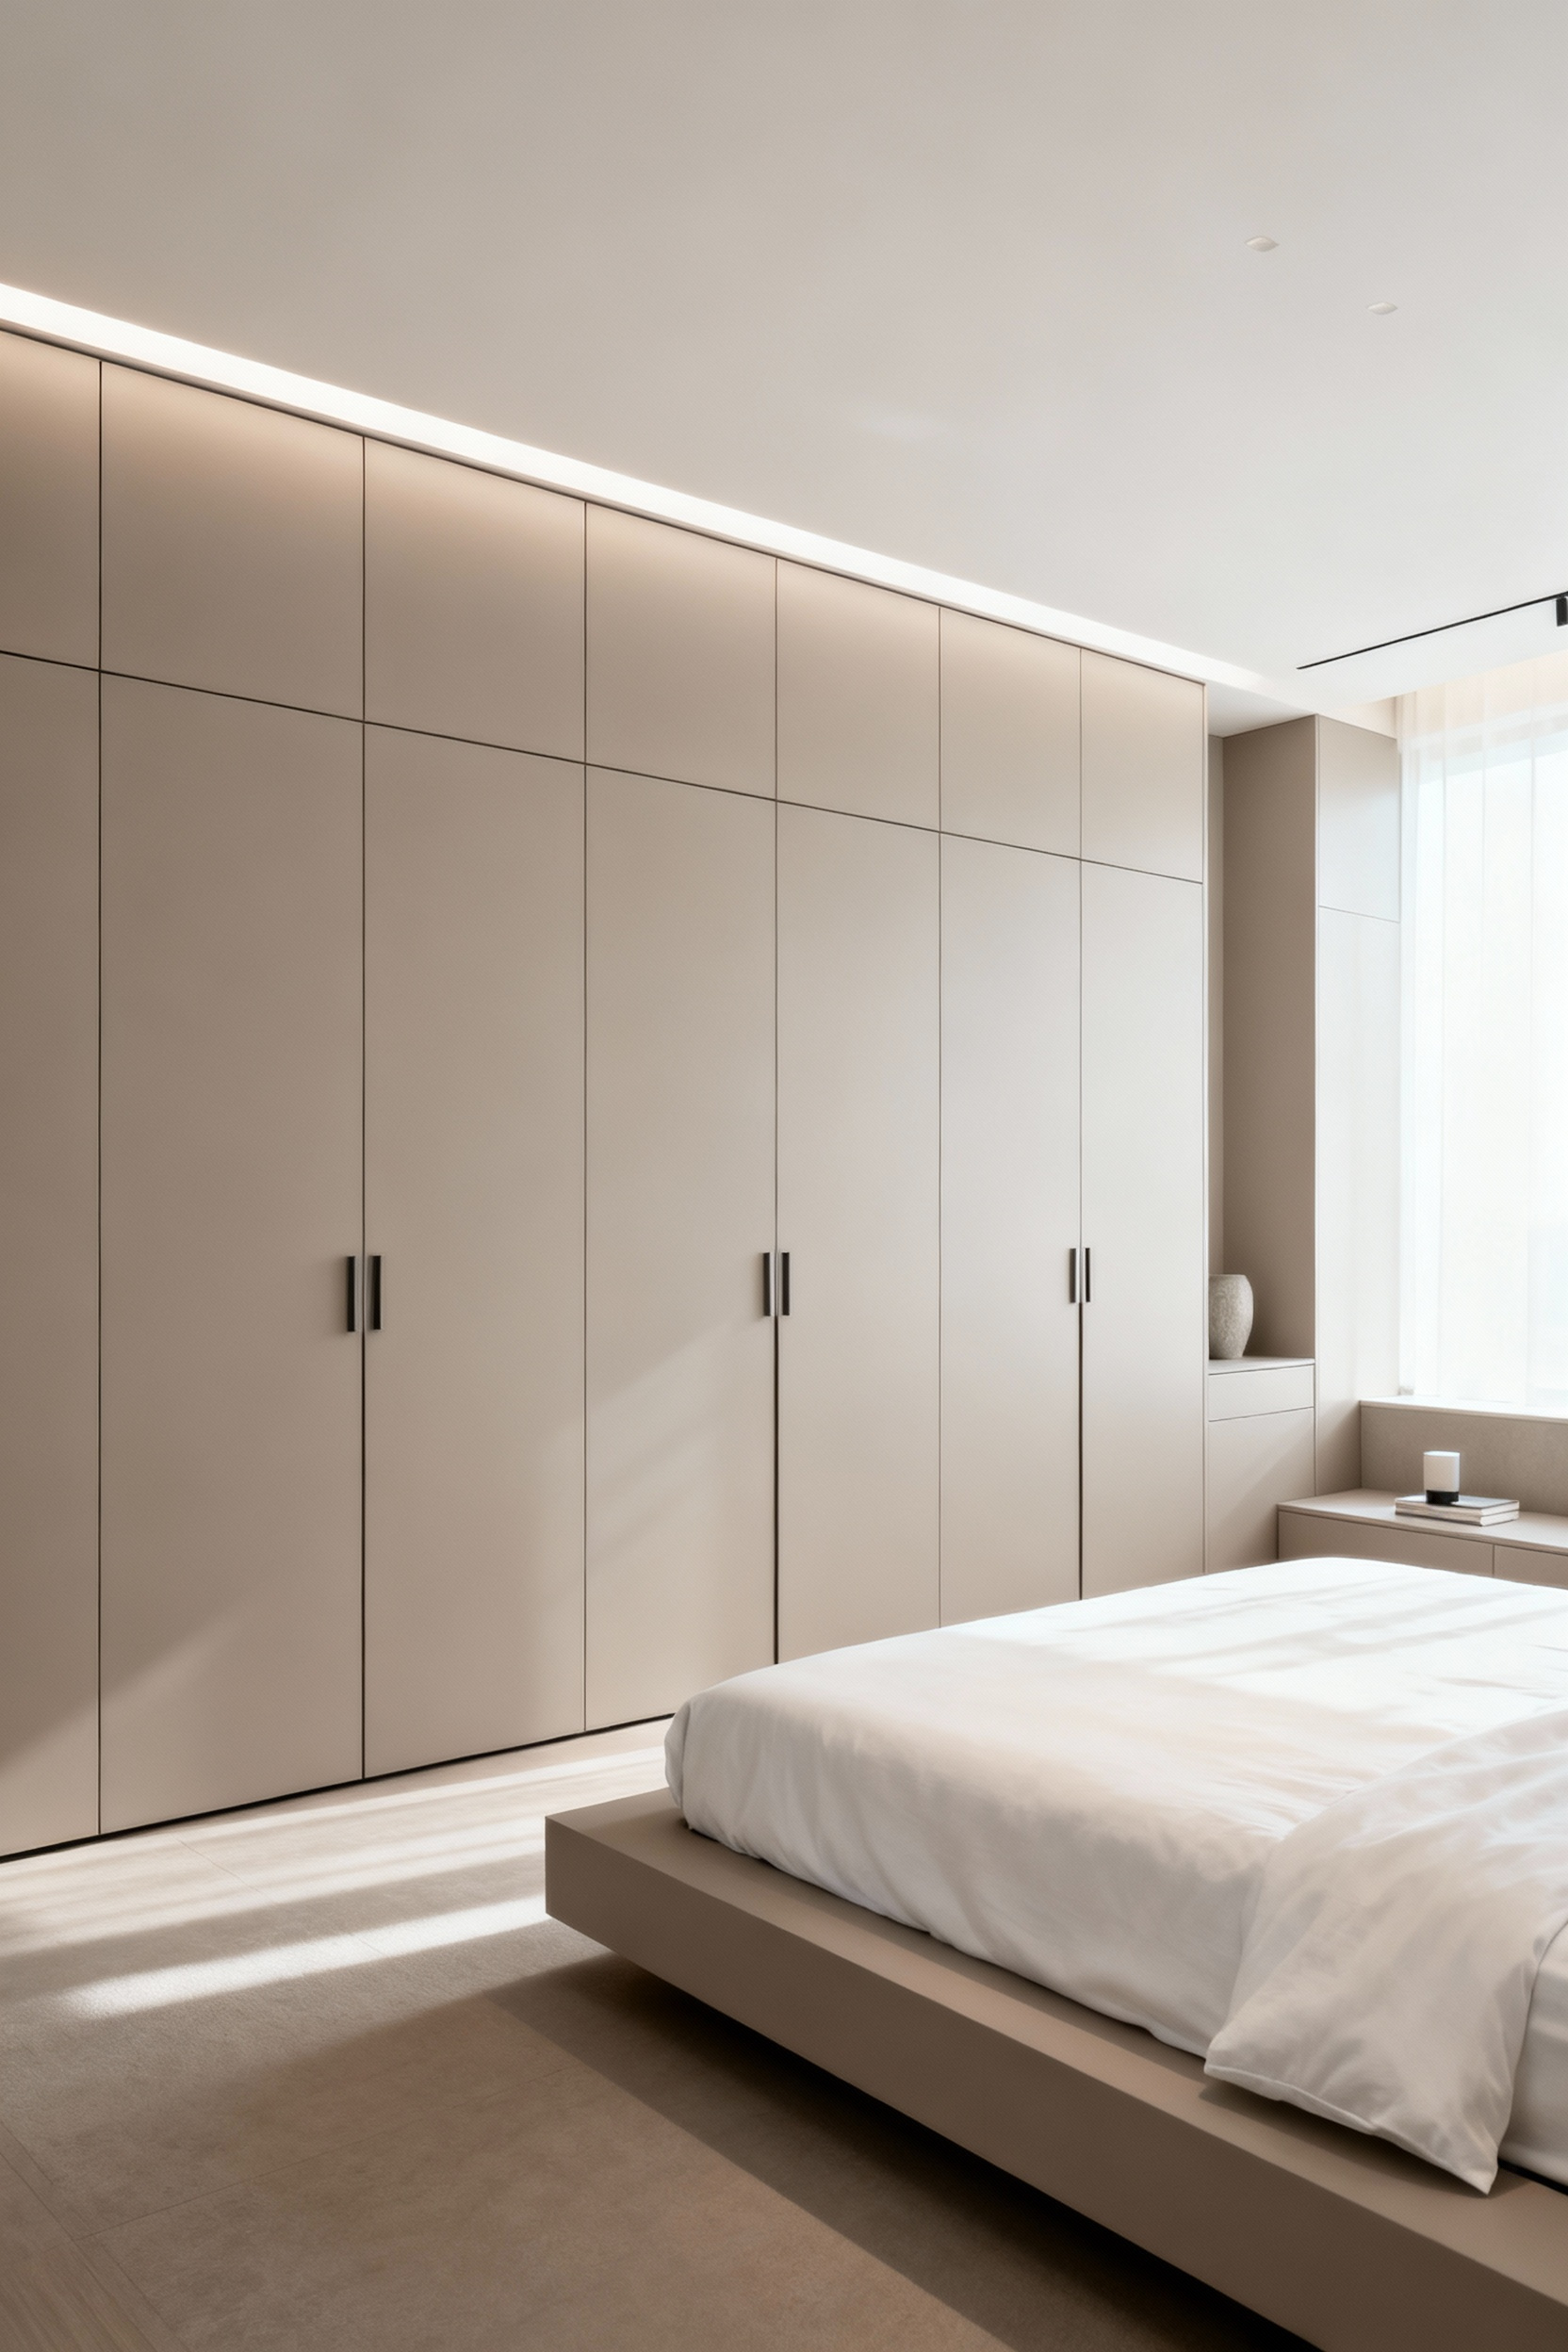
10. Vertical Zoning: Installing Floor-to-Ceiling Cabinetry to Draw the Eye Upward
Vertical lines are powerful tools used to guide the viewer’s eye. You can apply this same logic to a small bedroom by installing floor-to-ceiling cabinetry. Extending storage the full height of the wall creates a continuous vertical line that instantly emphasizes the room’s height rather than its limited square footage.
This “fitted” approach also eliminates the awkward, shadow-filled gap found above standard wardrobes. By closing this space, you remove visual clutter and create a streamlined, built-in aesthetic that feels intentional and high-end.

Beyond the visual benefits, this strategy dramatically increases utility without encroaching on the floor plan. You can designate the hard-to-reach upper shelves for seasonal bedding, luggage, or bulky winter coats, freeing up lower sections for daily use. Because this consolidates storage into one vertical zone, you eliminate the need for scattered dressers or chests, keeping the floor clear. To prevent these large structures from feeling imposing, stick to these design principles:
- Match the Architecture: Choose light, monochromatic colors that blend with your walls to maintain an unbroken visual flow.
- Reflect Light: Incorporate mirrored or high-gloss finishes to bounce natural light around the room and visually dissolve the cabinet’s weight.
- Prioritize Flush Hardware: Select discreet handles or push-to-open mechanisms to maintain a clean, wall-like appearance.
Phase 3: Advanced Infrastructure (Structural & Tech)
Maximize usable square footage by shifting your focus from freestanding furniture to permanent structural solutions. Build recessed nooks or floor-to-ceiling custom shelving that utilize wall cavities to keep the floor plan clear. This approach eliminates the visual weight of heavy dressers and wardrobes.
For immediate spatial gain, replace traditional hinged doors with pocket doors to reclaim the swing radius, or construct an elevated loft to physically separate the sleeping zone from the active floor area below. These architectural alterations prioritize clear sightlines and open circulation paths.
Future-proof the room by adopting transformable or robotic furniture systems. Modern mechanized units can deploy a bed or desk from the wall or ceiling at the touch of a button, allowing a single footprint to function effectively as a bedroom, living room, and office. Unlike static furniture, these systems adapt to your immediate needs, ensuring the room remains open and breathable when specific functions are not in use.
Finally, manage the room’s atmosphere through a clutter-free smart ecosystem. Visual noise creates mental clutter, so the goal is to integrate technology that works invisibly.
- Smart Lighting: Use smart bulbs or LED strips to control ambiance and shift the room’s mood without relying on bulky floor lamps.
- Concealed Hardware: Opt for hidden wall-mounted screens and small, voice-activated assistants to reduce visible wiring.
- Automated Control: Centralize controls to maintain a clean aesthetic that highlights the room’s architectural lines rather than its gadgets.
11. Hardwired Integration: Eliminating Cord Visual Noise with Sconces and Smart Switches
Visual noise creates subconscious stress in compact spaces, and exposed electrical cords are often the primary culprit. By choosing hardwired sconces over plug-in models, you completely eliminate hanging wires and the need for bulky table lamps.
This approach creates a “visually quiet” aesthetic that makes a small bedroom feel spacious and intentional. Mounting fixtures directly to the wall also reclaims valuable real estate on your nightstand. Without a lamp base consuming space, you gain immediate surface area for essentials like books or a phone, streamlining the room’s overall composition.

Proper installation height is critical for marrying form with function. Select swing-arm or adjustable fixtures and mount them roughly 5 to 10 inches above your shoulder height when sitting in bed. This positioning provides directed task lighting for reading while keeping the wall uncluttered. Unlike fixed overhead lighting, adjustable sconces allow you to manipulate the beam, ensuring light falls on your book rather than the entire room.
To maximize the utility of this setup, pair your hardwired sconces with an in-wall smart dimmer switch. This integration offers two distinct advantages:
- Convenient Control: You can manage power and brightness via voice commands or a smartphone app, eliminating the need to reach for a physical switch once you are tucked in.
- Mood Layering: A smart dimmer allows you to transition seamlessly from bright task lighting to a soft, warm ambient glow, adding a layer of sophistication and coziness to the space.
12. Recessed Niche Engineering: Stealing Storage Space Between the Studs
Look past the surface of your drywall to find the hidden volume in your bedroom. In standard timber framing, a valuable 3.5 to 4-inch void exists between the studs. You can harvest this space to create recessed storage that sits flush with the wall. This engineering technique effectively adds square footage by eliminating the need for bulky furniture that encroaches on your walking path.

One practical application is the creation of a horizontal bedside niche. By framing out a shelf within the wall cavity, you create a floating nightstand that holds essentials like a phone or book without touching the floor. For a stealthier approach, install a hinged mirrored door over the opening. This disguise provides a functional mirror for the room while concealing jewelry, accessories, or a small safe behind the glass.
Execution requires caution and an eye for detail. Before you cut into the drywall, use a stud finder with an electrical sensor or a small inspection hole to ensure the cavity is free of wiring, plumbing, or ductwork. Once installed, maximize visual flow by painting the niche interior the same color as the surrounding wall and matching the trim to existing woodwork. This ensures the storage reads as a deliberate architectural feature rather than a cluttered afterthought.
13. The Sliding Plane: Reclaiming Swing Radius with Pocket Doors or Barn Hardware
Traditional hinged doors demand a surprising amount of floor space—typically 7 to 10 square feet—just to accommodate their swing radius. This “dead zone” restricts furniture layout and often makes compact bedrooms or adjoining bathrooms feel cramped.
By adopting the concept of the sliding plane, you eliminate this arc entirely. This strategic shift allows you to place essential furniture, such as a dresser or bedside table, on the walls immediately adjacent to the doorway, maximizing every inch of the usable floor plan.

Your hardware choice determines both the function and the visual impact of the door. For the cleanest look, choose a pocket door. These slide completely into a wall cavity, leaving the surface area on both sides clear for artwork or shelving while providing better sound insulation. If opening the wall is structurally difficult or costly, opt for barn hardware. This system slides along an exterior track, offering a simpler installation process while acting as a dramatic rustic or modern focal point.
You can further manipulate the perception of space by carefully selecting the door’s material. Consider mirrored panels for closet applications to reflect light and create the illusion of a much larger room. Alternatively, frosted or partial-glass doors maintain necessary privacy while allowing natural light to filter through, ensuring the room feels bright and airy even when the door is closed.
14. Handleless Joinery: Push-to-Open Hardware for Seamless Architectural Lines
In a small bedroom, visual clutter reduces the perceived size of the space just as much as physical clutter. Integrating push-to-open mechanisms into your built-in joinery eliminates the need for protruding handles, creating an ultra-sleek and minimalist aesthetic.
When applied to wardrobes and drawers, this hardware allows the cabinetry to form a flat, uninterrupted facade. This seamless visual flow helps large furniture pieces blend into the walls, effectively expanding the architectural lines of the room.
Beyond the visual benefits, handleless designs offer critical functional advantages in tight quarters. Protruding knobs and pulls often become catch points for clothing or hips, especially in narrow walkways or near the foot of the bed. By removing this hardware, you eliminate obstructions in high-traffic zones. This ensures that floor-to-ceiling storage maximizes utility without encroaching on the limited physical space required for comfortable movement.
For the best user experience, invest in dual-function hardware systems. Advanced options, such as Blum’s TIP-ON BLUMOTION, combine mechanical opening support with a silent, soft-close action. This technology allows you to access heavy drawers with a gentle touch while ensuring they close smoothly and quietly. Prioritizing high-quality mechanisms maintains the serene atmosphere of the bedroom and prevents the jarring noise often associated with standard spring-loaded latches.
15. Custom Window Seats: Integrating Radiator Covers and Storage into One Form
Radiators in older homes often dominate valuable wall space, creating visual clutter and limiting furniture placement. By enclosing the heating unit within a custom window seat, you transform a mechanical necessity into a cohesive architectural feature.
For the best visual balance in a small bedroom, extend the structure wall-to-wall. This creates a unified focal point and enables the integration of narrow floor-to-ceiling shelves on either side. Aim for a finished height of roughly 18 inches, including the cushion, and a depth of 16 to 20 inches. This scale provides comfort without encroaching too heavily on the room’s floor plan.
Proper airflow is the critical engineering challenge in this design. You must facilitate convection to prevent a drop in room temperature. Construct the front panel with slats, lattice, or decorative mesh to allow cool air to enter at floor level. Equally important is a dedicated air register or outlet strip installed along the top surface, directly above the radiator. This configuration creates a natural chimney effect, forcing warm air to rise and circulate into the room rather than becoming trapped inside the joinery.
Once the heating mechanics are addressed, focus on reclaiming lost square footage through smart storage integration in the spaces flanking the radiator. Select a storage mechanism based on how frequently you need to access the contents:
- Deep Drawers: These offer excellent organization for smaller items and allow access without removing the seat cushion.
- Hinged Lift-Tops: These utilize the full depth of the box, making them ideal for stowing bulky items like winter duvets or off-season clothing.
- Flanking Cabinets: Integrating vertical storage on either side of the seat frames the window and reduces the need for standalone dressers.
Phase 4: The Minimalist Edit (Final Polish)
Soften the hard edges of the room with deliberate texture. Install linen or light-colored curtains to diffuse natural light, instantly making the space feel more refined and expansive. Since the bed acts as the primary focal point, elevate it with quality bedding and a single textured throw to add depth without visual weight.
To maintain this airy atmosphere, eliminate bulky table lamps that crowd your limited surface area. Instead, mount wall sconces or position a slender floor lamp to provide ambient lighting. This structural shift clears your nightstand for essentials and keeps the visual lines clean.

Adopt a strict editorial eye for your surfaces. Limit décor to two or three items per nightstand or dresser to prevent the visual noise that makes small bedrooms feel claustrophobic. Curate a vignette with a specific purpose, such as a stack of favorite books or a sculptural vase. Introduce life into the composition with a single piece of maintenance-free greenery, like a tall faux olive tree or a hardy snake plant. This adds vertical interest and natural texture without demanding valuable floor space or complex care.
Finally, exercise restraint with color to preserve the minimalist aesthetic. While a neutral palette expands a small room visually, a calculated splash of accent color provides necessary depth. Introduce this tone sparingly through a throw pillow, a solitary piece of art, or a candle holder. This approach ensures a cohesive, polished look where every object serves a distinct visual or functional role.
16. Monochromatic Textures: Creating Interest Without Color Chaos
When working with a monochromatic palette in a small bedroom, texture replaces color as the primary tool for distinguishing space and form. Without distinct hues to separate elements, a room can easily feel flat or one-dimensional.
To combat this, maximize textile contrast on the bed, which serves as the room’s largest visual anchor. Layer materials within the same color family to create immediate depth. For instance, combine crisp linen sheets with plush velvet throw pillows and a chunky knit blanket. This mix of smooth, soft, and rough surfaces creates a rich focal point that holds attention without creating visual chaos.

You can also introduce contrast through the architectural “bones” of the room by manipulating how surfaces reflect light. Varying your paint sheens adds definition to the space without breaking the color scheme. Use a flat or matte finish on the walls to absorb light, then apply a semi-gloss or satin finish to the trim and baseboards. This subtle shift highlights the room’s contours. For even more architectural interest, treat the headboard wall with textured grasscloth wallpaper or wood paneling painted to match the walls. These tone-on-tone applications generate shadow play, giving the walls a sense of movement and complexity.
Finally, ground the design with natural and organic materials to prevent the space from feeling sterile. A single-color room, especially in light neutrals, risks looking clinical if everything is sleek and manufactured. Incorporate elements like raw or weathered wood nightstands, rattan mirror frames, or a woven sisal rug. These organic textures add necessary warmth and grain. They break up the uniformity of the color block, ensuring the environment feels curated and inviting rather than empty.
17. Negative Space as a Design Element: The Discipline of Empty Surfaces
What you leave out of a room is often as critical as what you include. This concept translates directly to small bedroom design, where negative space acts as the room’s visual oxygen. It is not merely empty space; it is a strategic element that allows the eye to rest and reduces the sensation of chaos.
Start by maximizing the visibility of your floor. Select furniture that elevates mass off the ground, such as bed frames with exposed legs or wall-mounted floating nightstands. This creates an unbroken line of sight across the floorboards, tricking the eye into perceiving a larger, airier footprint. To further minimize visual weight, consider incorporating transparent materials like glass or acrylic for small tables, allowing the room’s backdrop to remain visible. For a deep dive into achieving this clean aesthetic, see our guide on 12 Easy Minimalist Bedroom Ideas for Small Spaces.
True discipline, however, must be applied to your flat surfaces and walls. Adhere to the “Discipline of Empty Surfaces” by strictly limiting items on dressers and nightstands to functional necessities, such as a lamp and a single book. The goal is to leave the majority of the surface clear to prevent the visual clutter that shrinks a space.
Apply this same restraint to your walls. While a single large-scale art piece can serve as a strong focal point, resist the urge to cover every vertical inch with shelving or gallery walls. Leaving substantial portions of the wall intentionally bare creates essential breathing room, making the entire bedroom feel significantly more expansive and composed.
Conclusion: From Constraints to Curation (Moving from renovation to lifestyle implementation)
Viewing a small bedroom through the lens of constraints limits its potential. Instead, treat your square footage as a curated exhibit of your daily life. By prioritizing multifunctional furniture and maximizing vertical planes, you stop fighting the room’s size and start leveraging its intimacy. Strategic lighting and light-reflecting textures do more than decorate; they transform a cramped box into a serene retreat. This shift from mere renovation to intentional curation turns physical limitations into opportunities for sophisticated, streamlined living.
True luxury in a compact space stems from the daily discipline of maintaining visual flow. Your design choices now set the stage for a calmer, more efficient future routine. As you settle into this new layout, remember that while the architecture supports the lifestyle, your habits sustain it. Whether you are looking for simple paint hacks or full architectural solutions, implementing these small bedrooms ideas ensures your sanctuary remains defined by what you love, not just what fits.
To maintain this balance, begin by strictly auditing your current possessions before moving them back in. Only reintroduce items that serve a distinct function or spark genuine joy, ensuring your sanctuary remains defined by what you love, not just what fits.
Frequently Asked Questions (FAQ)
How do I make a small bedroom look bigger using only paint and color?
The most effective optical illusion is the ‘Infinity Curve’ technique. Paint the walls, trim, and ceiling the exact same light, monochromatic color (like soft white or pale gray). This eliminates the visual lines that define the room’s boundary, blurring where the wall ends and the ceiling begins, making the room feel significantly taller and more expansive.
What is the best type of bed frame for maximizing space in a tiny room?
The ideal frame is a platform bed with integrated, concealed storage drawers or a hydraulic lift mechanism. This utilizes the largest area of untapped space (the cubic footage beneath the mattress) without creating visual clutter. Alternatively, if your room serves dual purposes (e.g., office/guest room), a modern, integrated Murphy bed system with a pivot desk is an excellent architectural solution.
How can I maximize storage in a small bedroom without introducing visual clutter?
Maximize vertical storage using floor-to-ceiling built-in cabinetry and look for opportunities to steal space within the walls, such as creating recessed niches between the studs. Avoid standalone dressers where possible, and ensure any storage is handleless (using push-to-open hardware) so that it blends seamlessly into the walls, maintaining clean architectural lines and visual flow.